Akai MPK Mini Play
$76.99
The Akai MPK Mini Play midi keyboard is a compact and portable music production tool that lets you create music on-the-go!
Compare
Description
Akai Professional has been manufacturing MIDI controllers for the past few decades, and the MPK Mini Play is their latest addition to the family of controllers. This device is a MIDI keyboard that comes with a small but powerful synth engine, which allows you to create music without needing a computer or any external software.
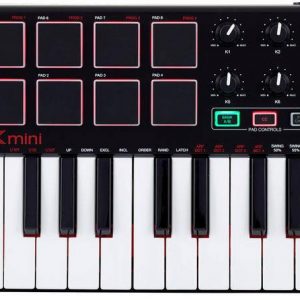
The Akai MPK Mini Play boasts 25 velocity-sensitive keys and is equipped with eight RGB-backlit drum pads that can be used to trigger samples or drum loops. The keys are compact, making it a portable choice for musicians on the go. It also features a built-in speaker, which can be useful during live performances, or when you’re just trying to play around with a simple idea.
One of the most notable features of the MPK Mini Play is that it comes with over 128 sounds and 10 preloaded drum kits, which provide a variety of options to work with. These sounds cover a range of genres including hip-hop, EDM, and rock. In addition, the device also includes a mini-USB port, which allows you to connect it to your computer to access a wider range of sounds and presets.
The MPK Mini Play is easy to use, and it comes with a simple and straightforward interface that allows you to quickly switch between sounds and modes. You can also use the device as a standalone keyboard, without having to connect it to a computer or any external audio equipment. Moreover, it has a built-in arpeggiator, which can help you create complex and interesting melodic patterns.
Another useful feature is the on-board controls, which allow you to adjust the volume, octave, pitch bend, and modulation using the knobs and buttons available on the device. This makes it easy to get creative with your sounds and to come up with new ideas.
Overall, the Akai MPK Mini Play is a great option for musicians looking for a compact and portable MIDI controller that can be used anytime, anywhere. The built-in sounds and presets make it easy to get started, and the option to connect to your computer provides even more flexibility and options. Whether you’re a beginner or a seasoned musician, the MPK Mini Play can help you create music whenever inspiration strikes.
Akai MPK Mini Play properties
| Product name |
MPK Mini Play |
| Brand |
Akai |
| Type |
Keyboard Instruments |
| Keyboard Instrument |
MIDI Keyboard |
| Keys |
Yes |
| Number of Keys |
25 pcs |
| Key Functions |
Touch Sensitive |
| Pads |
Yes |
| Rotary Controls |
Yes |
| Connections |
6.3mm (1/4″RTS) In, Headphone |
| Colour |
Red |
| Power Supply |
USB |
Frequently Asked Questions:
What is the difference between the MIDI output of a keyboard and the audio input of the AKAI MPK Mini Play?
The MIDI (Musical Instrument Digital Interface) output of a keyboard is a digital protocol that sends information about the notes, velocity, and other control data to other devices like synthesizers or software. It does not produce any audio signal. On the other hand, the audio input of the AKAI MPK Mini Play is for capturing external sounds (like vocals or instruments) and converting them into digital audio signals that can be processed within the device or a connected computer. This allows you to play these recordings alongside your MIDI sequences, create loops, or use the samples as part of your music production.
What is the optimal MIDI connection setup for an Akai MPK Mini Play when using it as a controller for digital audio workstations?
To optimize your MIDI connection setup for an Akai MPK Mini Play when using it as a controller for digital audio workstations (DAWs), follow these steps:
1. Connect the Akai MPK Mini Play to your computer using the included USB cable. This will allow you to transmit and receive MIDI data between the device and your DAW software. Launch your chosen digital audio workstation software, such as Ableton Live, Logic Pro X, or Pro Tools. Open the MIDI settings in your DAW by navigating to the appropriate menu. In Ableton Live, for example, this can be found under Preferences > MIDI/Sync. Assign the MPK Mini Play as a MIDI input and output device. This will allow it to communicate with your DAW software and any other MIDI-enabled instruments or hardware that you may have connected. Set up the MIDI mapping for the MPK Mini Play within your DAW software by assigning specific notes, controllers, or expressions to each of its knobs, pads, and buttons. This will allow you to control various parameters in your DAW and external hardware seamlessly. Save your MIDI mapping settings as a preset for quick recall whenever you use the MPK Mini Play with your chosen DAW software. To connect additional devices or instruments via MIDI, you can use a MIDI interface that supports multiple inputs and outputs. This will allow you to expand your setup and control more elements within your music production environment. Once everything is properly configured, test your setup by playing notes on the MPK Mini Play and observing the corresponding responses in your DAW software or external hardware devices. Make any necessary adjustments until you achieve optimal performance.
How do I properly configure the Akai MPK Mini Play's MIDI controller settings for use with my digital audio workstation software?
Firstly, make sure your DAW software is installed and launched on your computer. Connect the Akai MPK Mini Play to your computer using the USB cable provided in the package. Open your DAW software and navigate to its preferences or settings menu. In most cases, this will be accessed from within the program's main menu, which can typically be found at the top-left corner of the screen. Look for an option labeled "MIDI" or "MIDI Setup", then select it. Here is where you will configure your DAW to recognize and respond to MIDI input from your MPK Mini Play. Once in the MIDI settings menu, you should be able to find an area labeled as "MIDI Ports" or "Virtual MIDI Ports". This is where you can assign the specific USB port that your MPK Mini Play is connected to. Locate the virtual MIDI ports listed in your DAW software, then click and drag your Akai MPK Mini Play's MIDI Out port onto the appropriate slot for your DAW's input port. This will ensure that your controller transmits data directly into your DAW without any delays or conflicts with other MIDI devices. After successfully mapping your MPK Mini Play to your DAW's virtual MIDI ports, you can then begin using the controller in your preferred DAW software. For more specific details on configuring your DAW for use with your MPK Mini Play, we recommend checking the manufacturer's documentation or online support resources. Remember that each DAW software may have slight variations in how it handles MIDI input and configuration, so it's essential to consult the specific instructions provided by your software's developer or support team.
How does the Akai MPK Mini Play's integration with Apple's GarageBand and other Core MIDI-compatible software differ from traditional MIDI controllers?
The Akai MPK Mini Play stands out from traditional MIDI controllers due to its seamless integration with Apple's GarageBand and other Core MIDI-compatible software. Unlike traditional MIDI controllers that require a separate interface or driver to communicate with your computer, the MPK Mini Play can directly connect via USB, making it a plug-and-play solution. This eliminates the need for any additional hardware or software and simplifies setup, allowing you to focus on creating music instead of troubleshooting technical issues. Additionally, the MPK Mini Play features a built-in sound library with over 100 instrument sounds, which can be accessed directly within GarageBand, making it an ideal choice for beginners and professionals alike.
How do you program a custom bank of 16 sounds on the Akai MPK Mini Play using its built-in MPC-style sample playback functionality?
1. First, make sure your MPK Mini Play is turned off. Next, locate the "Load" button and press it while holding down the "Shift" key. This will enter the "Edit" mode. Once in Edit mode, you need to navigate to the "Sample Mode" menu by pressing the "Bank" and "Browse" buttons simultaneously. Now, navigate through the "Sample Mode" menu using the "Browse" button until you reach the "Play Sample" option. To enter the sample playback setup screen, press the "Play Sample" option while holding down the "Shift" key. This will bring up a new menu with options for setting up your custom sounds. In this new menu, navigate to the "Wave" section and select an empty slot (indicated by a question mark or blank space). Now you can load a sample from your computer using the USB connection on the Akai MPK Mini Play. To do this, plug in your MPK Mini Play and use the MPC software to transfer your samples to the device. Once your samples are loaded onto the MPK Mini Play, you can customize them by adjusting parameters such as pitch, filter cutoff, and volume using the on-device controls or via the MPC software. To save your custom sound, press the "Save" button while holding down the "Shift" key. This will bring up a new menu where you can name and store your custom sample. Repeat this process for each of the remaining 15 slots in your custom bank of sounds.
Before you buy Akai MPK Mini Play


Reviews
There are no reviews yet.