Exporting the final mixdown in Cubase 12, or any digital audio workstation (DAW) for that matter, is a critical step in the music production process. It marks the culmination of countless hours of creative effort, recording, arranging, and mixing, resulting in a polished and ready-to-share audio masterpiece. The importance of exporting the final mixdown in Cubase 12 lies in several key aspects:
- Preservation of Creativity: Exporting the final mixdown allows you to capture the current state of your project, preserving all the creative decisions and hard work you put into it. As you continue to work on new projects or revisit older ones, having a well-documented final mixdown ensures you can always return to your original vision.
- Compatibility and Portability: When you export the final mixdown, you’re creating a standard audio file format (e.g., WAV, MP3) that can be played on any device or media player. This compatibility ensures your music can be shared easily with others, submitted to streaming platforms, or used for various purposes like licensing, without worrying about DAW-specific settings or plugins.
- Quality Control: Exporting the final mixdown allows you to carefully scrutinize the mix one last time before sharing it with the world. You can listen to it on different speakers, headphones, and devices to ensure it translates well across various playback systems and environments. This process helps catch any last-minute issues that may have been overlooked during the mixing process.
- Mastering Process: The final mixdown serves as the starting point for the mastering engineer, should you decide to have your music professionally mastered. The engineer can work with the exported audio file to enhance its overall quality, loudness, and coherence, making the music sound even more professional and competitive in the market.
- Backup and Archiving: Exporting the final mixdown acts as a backup of your entire project. While you might have saved the session files and project settings, having an export of the final mix ensures you have a consolidated version that can be easily retrieved even if the original project files become corrupted or lost.
- Version Control: Exporting the final mixdown is particularly useful when collaborating with other musicians, producers, or clients. It allows you to provide them with a version of the song that is not editable, ensuring that everyone is on the same page and working with the same finalized version.
- Performance Considerations: The final mixdown is usually a stereo audio file, which requires significantly less processing power than a fully loaded project in a DAW. If you intend to perform the music live, using the mixdown instead of running the entire project can reduce the risk of technical issues during the performance.
In conclusion, exporting the final mixdown in Cubase 12 is a crucial step in the music production workflow. It ensures the preservation, compatibility, and quality of your music, making it ready for distribution, mastering, and other post-production processes. Additionally, it acts as a valuable backup and version control tool, giving you peace of mind knowing that your creative efforts are securely captured in a professional and shareable audio format.
How to Export Final Mixdown?
Exporting the final mixdown in Cubase 12 is a straightforward process that allows you to render your completed music project into a high-quality audio file suitable for distribution, sharing, and further processing. Follow these steps to export the final mixdown in Cubase 12:
- Finish the Mixing Process: Before exporting, make sure you are satisfied with the mix. Adjust the levels, apply effects, and fine-tune the automation to achieve the desired sound.
- Prepare the Project: Check for any potential issues like clipping or unwanted artifacts. Bounce or freeze MIDI tracks to audio if your project has many virtual instruments to reduce CPU load during the export process.
- Set the Export Range: Decide whether you want to export the entire project or only a specific range (e.g., from bar 1 to bar 128). You can set the range by locating the left and right locators in the Project window.
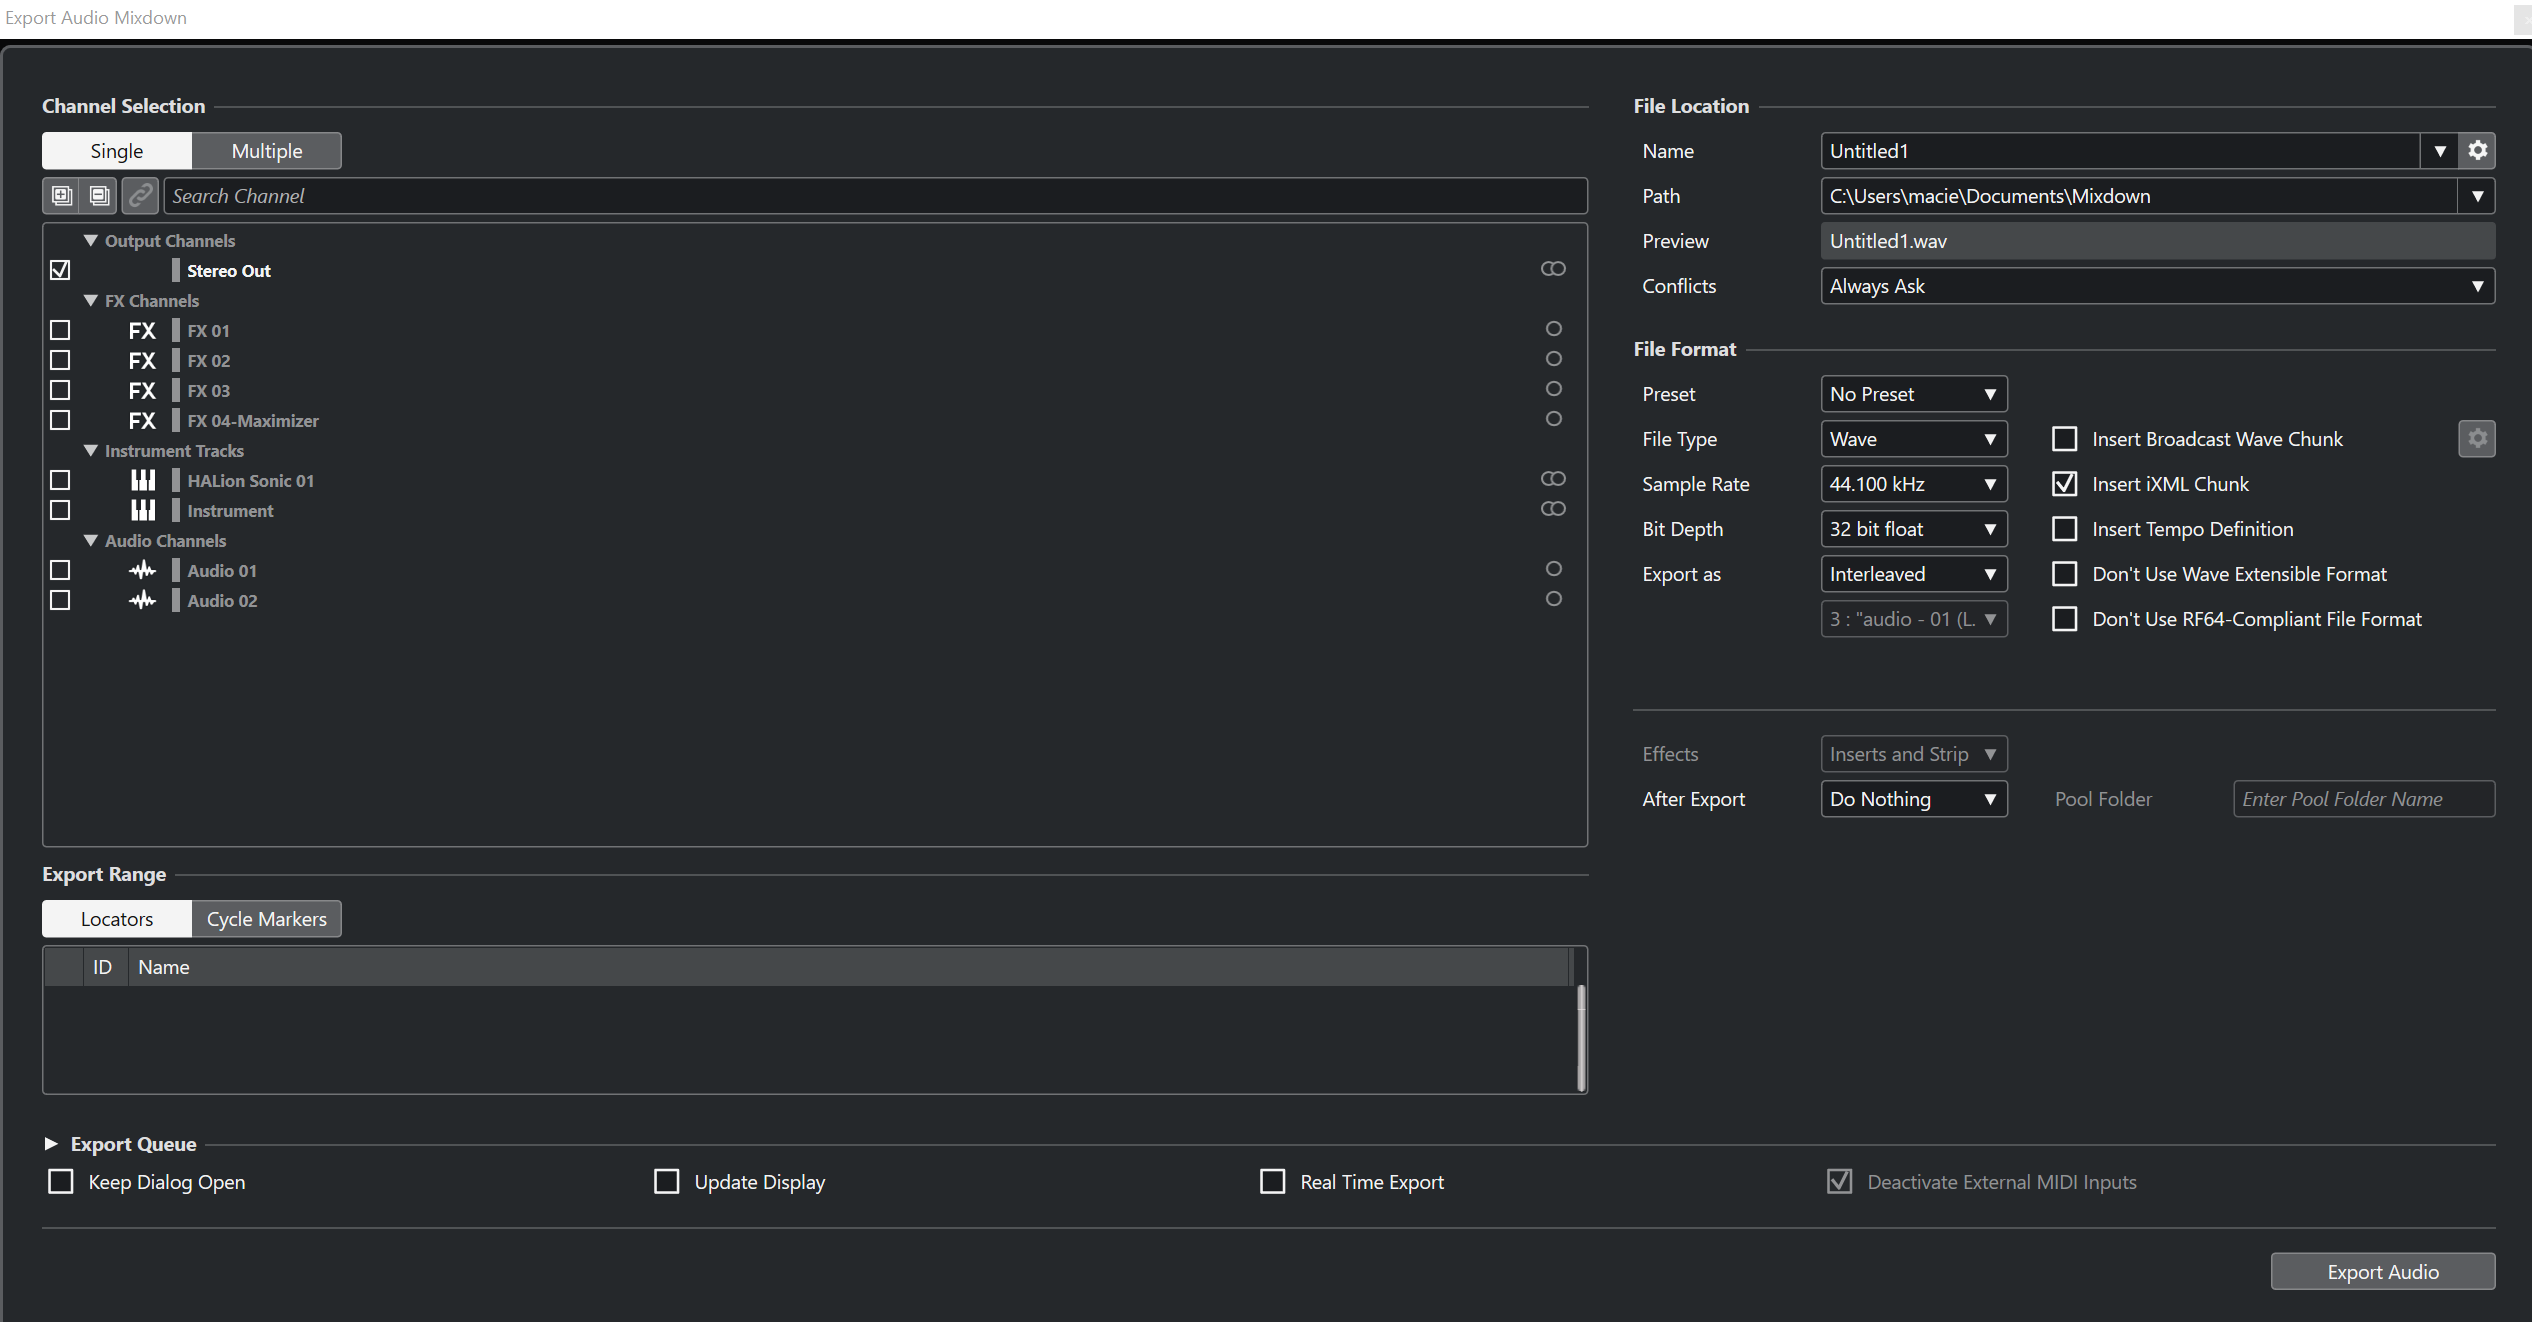
- Select the File Format: Go to the File menu, then choose Export > Audio Mixdown. In the Audio Mixdown dialog box, you’ll see various export options. First, select the desired file format, such as WAV, AIFF, MP3, or others, depending on your needs.
- Configure Audio Settings: Next, you’ll need to set the audio format options. Click on the “Audio Engine” dropdown menu to choose the sample rate and bit depth. For most cases, a sample rate of 44.1kHz and a bit depth of 16-bit or 24-bit are suitable.
- Naming and Location: In the Audio Mixdown dialog box, you can name the exported file and specify the destination folder where you want to save it. Choose a descriptive filename that reflects the project and version.
- Real-time or Offline Export: Cubase 12 allows you to export the mixdown in real-time or offline mode. Real-time export plays the project from start to finish while recording the audio output, similar to how it would sound during playback. Offline export processes the mixdown without real-time playback, rendering it faster. Choose the one that suits your preference and computer resources.
- Check Export Settings: Double-check all the export settings before proceeding. Ensure that any effects or processing on the master bus are as intended.
- Exporting the Mixdown: Click on the “Start” or “Export” button to begin the mixdown process. A progress bar will show the export status, and depending on the length and complexity of your project, it may take a few moments or longer to complete.
- Verify the Exported File: After the export is finished, locate the saved mixdown file in the specified destination folder. Play it back in Cubase 12 to ensure that it matches your intended mix. Perform A/B comparisons with the in-session mix to catch any discrepancies.
- Backup and Archiving: It’s essential to back up both the exported mixdown file and the original Cubase project files to preserve your work and facilitate future revisions or mastering processes.
By following these steps, you can successfully export the final mixdown in Cubase 12 and share your music with the world in a professional and high-quality audio format.
Troubleshooting and Common Issues
Exporting the mix in Cubase 12 is generally a smooth process, but like any software, it can sometimes encounter issues. Troubleshooting these problems is essential to ensure you get the high-quality mixdown you desire. Here are some common issues you might encounter during mix export in Cubase 12 and their possible solutions:
- Audio Artifacts or Distortion: Issue: After exporting, you notice unwanted clicks, pops, or distortion in the mixdown file. Solution:
- Check for any clipping on individual tracks or the master bus. Lower the levels if necessary.
- Ensure that no effects or plugins are causing issues during export. Bypass or remove any problematic plugins.
- Silent or Muted Mixdown: Issue: The exported mixdown file plays silently or contains no audio. Solution:
- Check the export range to ensure it includes the desired audio. Adjust the left and right locators if needed.
- Verify that all tracks are properly routed to the main output bus and are not muted or disabled.
- Incomplete Mixdown: Issue: The exported mixdown is cut off or shorter than expected. Solution:
- Verify the export range and ensure it covers the entire project if needed.
- Check if any track or event extends beyond the export range, as this could truncate the mixdown.
- Wrong File Format or Settings: Issue: The exported mixdown is in the wrong file format or has incorrect audio settings. Solution:
- Double-check the export settings before starting the mixdown process, including file format, sample rate, and bit depth.
- Make sure you are exporting the mixdown to the intended destination folder.
- Real-time Export Glitches: Issue: Real-time export encounters dropouts or audio glitches during the process. Solution:
- Close any other resource-intensive applications running in the background to free up system resources.
- Increase the buffer size in the audio settings to reduce the strain on your computer’s CPU.
- Offline Export Errors: Issue: The offline export process encounters errors or stops unexpectedly. Solution:
- Ensure that your Cubase 12 software is up to date with the latest patches and updates.
- Try exporting the mixdown in real-time mode instead if offline export continues to encounter issues.
- Exported Mix Sounds Different: Issue: The exported mixdown sounds different from what you hear during playback in Cubase 12. Solution:
- Check for any activated “Control Room” features in Cubase that might affect the monitoring during export.
- Disable any external effects processors or plugins that may not be present during the export process.
- No Sound in Exported Mix: Issue: The exported mixdown has no audio when played in external media players. Solution:
- Ensure that the audio output device settings in Cubase 12 match the desired playback device.
- Verify that the export format is supported by the media player being used.
If you encounter any of these issues while exporting the mix in Cubase 12, troubleshooting and resolving them promptly will help you achieve the desired results and deliver a polished and professional final mixdown. Regularly saving your project and creating backups before export attempts can also prevent data loss in case of unexpected issues.