Setting up project preferences in Cubase 12 is an essential step in optimizing your workflow and achieving the best possible results in your music production endeavors. As one of the most popular digital audio workstations (DAWs) in the industry, Cubase 12 offers a wide range of customizable options and settings that allow you to tailor your projects to your specific needs. Here are some reasons why setting up project preferences in Cubase 12 is important:
- Workflow Efficiency: By configuring your project preferences according to your preferred workflow, you can save valuable time and streamline your creative process. Cubase 12 provides numerous customization options, such as keyboard shortcuts, project templates, and default settings for tracks and channels. By setting these preferences according to your specific requirements, you can work more efficiently and focus on the creative aspects of your music production.
- Audio and MIDI Settings: Cubase 12 allows you to define audio and MIDI settings within your project preferences. This includes selecting the audio interface, sample rate, and bit depth for recording and playback, as well as configuring MIDI input and output devices. Properly setting up these preferences ensures that you have the correct hardware and software settings for capturing and reproducing audio and MIDI accurately, minimizing potential issues such as latency, synchronization problems, or incorrect signal routing.
- Audio and MIDI File Formats: Another important aspect of project preferences in Cubase 12 is the ability to choose the default audio and MIDI file formats for recording and exporting. This allows you to select the file formats that are compatible with your specific needs, ensuring seamless integration with other software or platforms. For example, if you frequently collaborate with musicians or producers who use different DAWs, you can set the file formats accordingly to ensure smooth file exchange and compatibility.
- Display and Visualization: Cubase 12 offers various display and visualization options that can greatly enhance your workflow and creative experience. From waveform colors and track layouts to grid settings and marker visibility, customizing these preferences according to your visual preferences can make it easier to navigate and work within your projects. Additionally, adjusting settings for waveform zoom levels, ruler options, and track heights can provide a more comfortable and personalized working environment.
- Preferences Presets: Cubase 12 allows you to save and recall project preferences presets, enabling you to switch between different setups effortlessly. This is particularly useful when working on different types of projects or collaborating with multiple artists. You can create and save presets for specific genres, recording scenarios, or personal preferences, ensuring consistent and efficient setups across various projects.
In conclusion, setting up project preferences in Cubase 12 is crucial for optimizing your workflow, achieving better productivity, and tailoring the software to your specific requirements. By customizing preferences related to workflow, audio and MIDI settings, file formats, display and visualization, and utilizing preferences presets, you can enhance your creative experience and produce high-quality music more effectively with Cubase 12.
Project Setup
Setting up a project in Cubase 12 is an important initial step in your music production journey. Proper project setup ensures that you have the right settings, tracks, and configurations to work efficiently and effectively. Here’s a guide on how to set up a project in Cubase 12:
- Project Template Selection: When starting a new project in Cubase 12, you have the option to choose from various project templates. These templates provide pre-configured settings and track layouts tailored to different music genres or production scenarios. Selecting an appropriate template can save you time by providing a starting point with the necessary tracks, effects, and settings already in place. Alternatively, you can start with an empty project if you prefer to build everything from scratch.
- Project Settings: Once you’ve chosen a template or created an empty project, it’s essential to configure the project settings to match your specific requirements. To access project settings in Cubase 12, go to the “Project” menu and select “Project Setup.” Here, you can adjust parameters such as sample rate, bit depth, time format, and synchronization settings. Make sure to set these parameters according to your desired audio quality and compatibility with external hardware or software.
- Audio and MIDI Device Setup: Configuring your audio and MIDI devices correctly is crucial for seamless integration with Cubase 12. In the “Devices” menu, select “Device Setup” to access the settings. Under the “VST Audio System” tab, choose your audio interface and set the buffer size according to your preference (lower buffer sizes reduce latency but require more processing power). In the “MIDI” tab, ensure that your MIDI input and output devices are properly configured and recognized by Cubase 12.
- Track Configuration: Cubase 12 offers various track types to accommodate different audio and MIDI sources. To add tracks to your project, click on the “Add Track” button or use the shortcut (Shift+T). You can choose from audio, instrument, MIDI, group, or FX tracks, depending on your specific needs. Set the appropriate number of tracks, names, and routing configurations to accommodate your recording, virtual instrument, or MIDI data requirements.
- Routing and Bussing: Configuring audio routing and bussing allows you to manage signal flow within your project efficiently. In Cubase 12, you can use the MixConsole or the Track Inspector to route audio or send tracks to various destinations, such as groups, effects, or external hardware. By setting up routing and bussing early in the project, you can ensure that your audio signals are organized, processed, and mixed effectively.
- Project Organization: As your project grows, keeping it organized becomes essential. Cubase 12 provides tools to help you manage your tracks, events, and markers effectively. Use folder tracks to group related tracks together, color-code tracks for visual distinction, and use markers to navigate your project easily. You can also create track versions or use track archives to save alternative arrangements or settings for later reference.
- Saving and Backing Up: Regularly saving your project and creating backups are crucial steps to prevent data loss and protect your work. Cubase 12 allows you to save projects in its proprietary .cpr format, which includes all project settings, audio, and MIDI data. Additionally, you can create backup files or use Cubase’s auto-save feature to ensure you have multiple versions of your project in case of accidents or computer failures.
By following these steps and customizing your project settings, tracks, routing, and organization, you can set up your project effectively in Cubase 12. Remember that every project may have unique requirements, so adapting these steps to your specific needs will contribute to a smooth and productive music production experience.
Template selection
Template selection in Cubase 12 is a valuable feature that helps streamline your music production process by providing pre-configured settings, tracks, and effects tailored to specific genres or production scenarios. Templates serve as starting points for your projects, allowing you to focus on creativity rather than spending time on initial setup. Here’s a guide on how to select and utilize templates in Cubase 12:
- Accessing Templates: When creating a new project in Cubase 12, you’ll be presented with the option to select a template. To access the template selection window, click on “File” and choose “New Project.” You can then choose to start with an empty project or select from a variety of predefined templates.
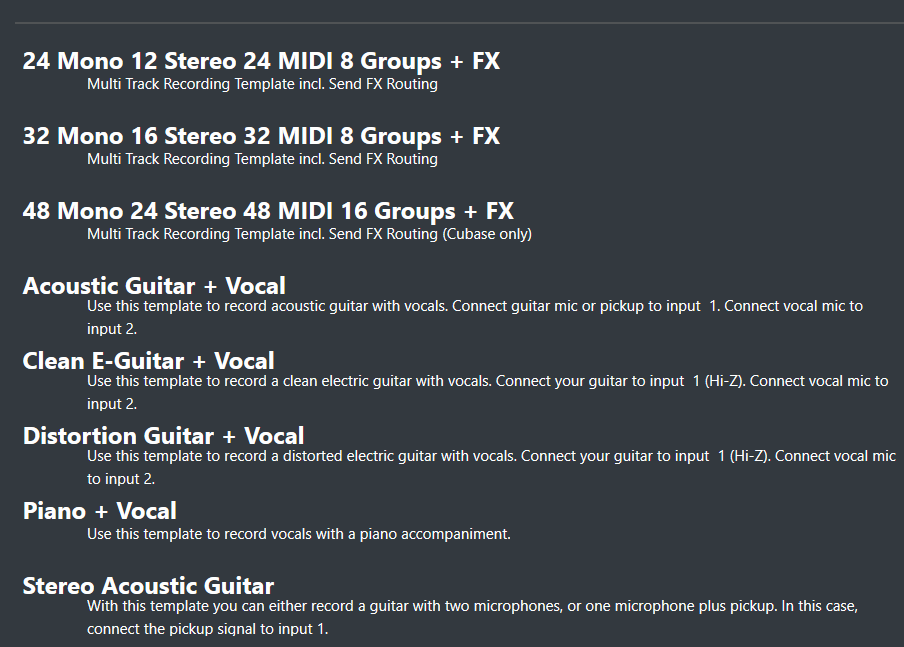
- Template Categories: Cubase 12 offers a range of template categories to cater to different musical styles and production needs. Common categories include Pop, Rock, EDM, Hip Hop, Classical, Film Scoring, and more. Additionally, Cubase 12 provides templates specifically designed for recording live bands, mixing and mastering, podcasting, and other specialized scenarios. Browse through the available categories to find a template that best matches the genre or production style you’re working on.
- Template Selection: Once you’ve chosen a category, Cubase 12 will display a list of available templates within that category. Each template has a name and a brief description, giving you an idea of its intended use and the settings it includes. Take the time to review the available templates and choose the one that closely aligns with your project requirements. If you’re unsure, you can experiment with different templates to see which one suits your needs best.
- Customizing Templates: After selecting a template, Cubase 12 will create a new project with the predefined settings, tracks, and effects provided by the template. However, it’s important to note that templates are not set in stone and can be customized according to your preferences. You can add or remove tracks, modify effects, adjust routing, and make any necessary changes to suit your specific project requirements. Templates serve as a starting point, but you have the flexibility to tailor them to your liking.
- Saving Custom Templates: In addition to the predefined templates provided by Cubase 12, you can also create and save your own custom templates. Once you’ve made the desired modifications to a project based on a template, go to the “File” menu and select “Save as Template.” Give your custom template a name, specify the category if desired, and save it. This allows you to create templates that reflect your preferred setup, including track configurations, effects, routing, and more, saving you time when starting future projects.
- Template Management: Cubase 12 provides tools for managing your templates. In the template selection window, you can access the “Manage Templates” button, which opens the Template Manager. Here, you can organize your templates into folders, rename them, delete unwanted templates, and import/export templates for use on other systems or sharing with collaborators. Proper template management helps keep your template library organized and easily accessible.
By utilizing the template selection feature in Cubase 12, you can jump-start your projects with pre-configured settings, tracks, and effects that align with your desired genre or production scenario. Whether you choose from the provided templates or create your own custom templates, this feature enhances your workflow, saves time on initial setup, and allows you to focus on the creative aspects of your music production in Cubase 12.
Project settings
Project settings in Cubase 12 play a crucial role in tailoring your music production environment to meet your specific requirements. These settings encompass various aspects such as audio quality, time format, synchronization, and project management. Understanding and configuring project settings properly in Cubase 12 can greatly enhance your workflow and ensure optimal results. Here’s a breakdown of the key project settings in Cubase 12:
- Sample Rate and Bit Depth: The sample rate and bit depth settings determine the audio quality and resolution of your project. In Cubase 12, you can specify the sample rate (e.g., 44.1 kHz, 48 kHz, 96 kHz) and bit depth (e.g., 16-bit, 24-bit) under the “Project Setup” menu. Higher sample rates and bit depths can provide better audio fidelity, but they also require more processing power and storage space. Select the appropriate sample rate and bit depth based on your project’s needs and the capabilities of your audio interface and system.
- Time Format and Display: Cubase 12 allows you to customize the time format and display settings to suit your preference and workflow. You can choose between musical time (bars and beats) or linear time (hours, minutes, seconds, and milliseconds) as the primary time format. Additionally, you can configure the display to show timecode, frames, or samples. Select the time format that aligns with your musical background and working style.
- Synchronization and Clock Source: Synchronization settings are crucial when working with external devices or collaborating with other musicians or studios. Cubase 12 provides various synchronization options, including internal sync, external sync via MIDI Timecode (MTC), and synchronization to external audio clocks. You can set the clock source, define the sync mode, and adjust the frame rate to ensure precise synchronization between Cubase and external devices or software.
- Project Length and Length Snap: Cubase 12 allows you to specify the project length in bars and beats or in minutes and seconds. This setting helps define the overall duration of your project. Additionally, you can enable the length snap feature, which allows you to snap events, MIDI notes, or automation points to the project length grid, making it easier to align elements and maintain consistent timing.
- Auto-Save and Backup: Cubase 12 provides options for auto-saving your projects at regular intervals to prevent data loss in case of crashes or power outages. You can configure the auto-save interval and specify the number of backup files to retain. Enabling this feature ensures that you have multiple versions of your project available in case of unexpected incidents.
- Project Folder and File Management: Cubase 12 allows you to define the project folder and specify the location where project files, audio files, and other associated data are stored. You can choose to keep all files within the project folder or specify custom locations. Proper project folder and file management contribute to easy project organization, file sharing, and backup procedures.
- MIDI and Audio Pre-Record Length: The pre-record length settings in Cubase 12 determine the duration of audio and MIDI material recorded before the actual record start position. This feature is useful to capture musical ideas that occur slightly before pressing the record button. You can adjust the pre-record length to ensure you don’t miss any important moments during recording sessions.
Configuring these project settings in Cubase 12 is crucial for achieving optimal audio quality, synchronization, and project management. By customizing these settings according to your specific needs, you can create a personalized and efficient music production environment that maximizes your creativity and productivity.
General preferences
General preferences in Cubase 12 allow you to customize the behavior and appearance of the software according to your personal preferences and workflow. These preferences cover a wide range of settings that can enhance your productivity, streamline your workflow, and make your music production experience more efficient. Here are some key areas of general preferences in Cubase 12:
- Editing and Display Preferences: Cubase 12 provides numerous editing and display preferences that allow you to tailor the software to your specific needs. You can customize settings related to waveform display, grid and snap options, event handling, editing tools behavior, and more. Adjusting these preferences helps you work more comfortably and efficiently, allowing you to focus on the creative aspects of your music production.
- Key Commands and Macros: Key commands are keyboard shortcuts that enable you to perform various functions in Cubase 12 quickly. In the general preferences, you can customize key commands and even create your own key command sets. This allows you to optimize your workflow by assigning frequently used functions to keys that are convenient for you. Additionally, Cubase 12 allows you to create macros, which are sequences of commands that can be executed with a single key command, further enhancing your efficiency.
- MediaBay Preferences: MediaBay is a powerful media management tool in Cubase 12 that allows you to organize, search, and access your audio and MIDI files quickly. In the general preferences, you can customize MediaBay settings such as search paths, file type associations, and metadata display options. Configuring these preferences ensures that MediaBay functions according to your file organization structure and helps you locate and manage your assets efficiently.
- VST Plug-in Management: Cubase 12 offers extensive support for VST plug-ins, allowing you to expand your sonic possibilities. In the general preferences, you can manage VST plug-ins by specifying the folders where your plug-ins are located. Cubase 12 scans these folders and makes the plug-ins available for use within the software. By configuring these preferences, you can keep your plug-ins organized and easily accessible, enhancing your creative workflow.
- Audio and MIDI Device Preferences: Configuring audio and MIDI devices properly is crucial for seamless integration with Cubase 12. In the general preferences, you can customize settings related to audio and MIDI devices, such as selecting the audio interface, adjusting buffer sizes, setting up control surfaces, and more. Proper configuration of these preferences ensures accurate audio reproduction, low latency, and smooth communication with MIDI devices.
- Appearance and Layout: Cubase 12 allows you to customize the appearance and layout of the software to suit your visual preferences. In the general preferences, you can adjust settings related to window colors, track colors, grid lines, font sizes, and other visual elements. These preferences enable you to create a personalized working environment that is visually appealing and comfortable for long hours of music production.
- File and Backup Preferences: Cubase 12 provides options to customize file-related preferences, such as specifying default file types for saving projects, setting up automatic backup intervals, and managing project versions. Configuring these preferences ensures that your projects are saved and backed up according to your desired settings, minimizing the risk of data loss and providing peace of mind.
By customizing general preferences in Cubase 12, you can create a tailored music production environment that aligns with your preferences and enhances your workflow. These preferences allow you to optimize the software’s behavior, appearance, and functionality, ultimately improving your productivity and creativity.
Audio preferences
Audio preferences in Cubase 12 provide you with control over various audio-related settings, allowing you to optimize your audio workflow and achieve the best possible sound quality. These preferences cover aspects such as audio interfaces, sample rate, buffer size, driver settings, and more. Here’s a breakdown of the key audio preferences in Cubase 12:
- Audio Interface Settings: Cubase 12 offers extensive support for a wide range of audio interfaces. In the audio preferences, you can select your audio interface and configure its specific settings. This includes selecting the input and output channels, adjusting the audio buffer size, setting the sample rate and bit depth, and configuring clock source and synchronization options. Properly configuring these settings ensures seamless integration with your audio interface and optimal audio performance.
- Buffer Size: The buffer size determines the amount of audio data processed at a time and affects the latency of your audio system. In the audio preferences, you can adjust the buffer size to find the balance between low latency and stable performance. Smaller buffer sizes reduce latency but may require more processing power from your computer. Larger buffer sizes provide more stable performance but increase the latency. Finding the optimal buffer size for your specific setup is crucial for a responsive and reliable audio experience.
- Sample Rate and Bit Depth: Cubase 12 allows you to specify the sample rate and bit depth for your projects. In the audio preferences, you can set the desired sample rate (e.g., 44.1 kHz, 48 kHz, 96 kHz) and bit depth (e.g., 16-bit, 24-bit). Choosing the appropriate sample rate and bit depth depends on your specific needs and the capabilities of your audio interface and recording equipment. Higher sample rates and bit depths can provide better audio fidelity but also require more processing power and storage space.
- Driver Settings: Cubase 12 supports various audio drivers, including ASIO, Core Audio, and Windows Audio. In the audio preferences, you can configure the driver settings for your specific audio interface and operating system. This includes adjusting the buffer size, latency, and other driver-specific options. Selecting the appropriate driver and configuring its settings correctly helps ensure reliable and efficient audio performance.
- Control Room Settings: The Control Room feature in Cubase 12 allows you to set up a separate monitoring environment for recording and mixing. In the audio preferences, you can configure the Control Room settings, such as speaker setups, headphone mixes, talkback functionality, and more. Customizing these settings allows you to create a monitoring setup that suits your specific needs, ensuring accurate monitoring and a comfortable recording and mixing experience.
- VST System Link: Cubase 12 offers VST System Link, which enables you to connect multiple computers running Cubase to create a distributed processing system. In the audio preferences, you can configure VST System Link settings, such as network synchronization, audio transmission, and device linking. This allows you to distribute the processing load across multiple computers, enhancing your system’s capabilities for demanding projects and resource-intensive tasks.
- Audio File Formats and Settings: Cubase 12 provides options to configure audio file formats and settings for recording and exporting. In the audio preferences, you can specify the default audio file format (e.g., WAV, AIFF, FLAC) and configure settings such as sample rate, bit depth, dithering, and file naming conventions. Customizing these preferences ensures that your recorded and exported audio files are in the desired format and quality, compatible with other software and platforms.
By customizing audio preferences in Cubase 12, you can optimize your audio workflow, achieve low-latency performance, and ensure the best possible sound quality. These preferences allow you to tailor Cubase 12 to your specific audio interface, recording setup, and sonic requirements, providing you with the tools to create professional-quality audio productions.
MIDI preferences
MIDI preferences in Cubase 12 offer a range of settings and customization options that allow you to optimize your MIDI workflow and take full advantage of the MIDI capabilities within the software. These preferences cover areas such as MIDI devices, input and output settings, MIDI recording, quantization, and more. Here’s a breakdown of the key MIDI preferences in Cubase 12:
- MIDI Device Setup: Cubase 12 provides extensive support for MIDI devices, including keyboards, controllers, drum pads, and more. In the MIDI preferences, you can configure the settings for your MIDI devices. This includes selecting the MIDI input and output devices, defining MIDI ports, assigning channels, and specifying clock synchronization settings. Properly configuring MIDI device settings ensures seamless integration with your hardware and accurate communication between Cubase and your MIDI devices.
- Input and Output Settings: In the MIDI preferences, you can customize the behavior and settings related to MIDI input and output. This includes options such as merging incoming MIDI data, filtering specific MIDI events, configuring MIDI thru behavior, and enabling or disabling MIDI transmission for specific tracks or devices. Customizing these settings allows you to control how MIDI data is sent and received within Cubase 12, ensuring efficient routing and communication.
- MIDI Recording Settings: Cubase 12 provides various MIDI recording settings that can be configured in the MIDI preferences. You can specify settings such as automatic quantization, MIDI chase behavior, note expression recording, and more. These settings help you define how MIDI data is recorded and captured within Cubase, allowing for precise and controlled MIDI performances.
- MIDI Editing Preferences: Cubase 12 offers comprehensive MIDI editing capabilities, and in the MIDI preferences, you can customize settings related to MIDI editing behavior. This includes settings for quantization, length adjustment, note expression editing, MIDI controller editing, and more. By configuring these preferences, you can tailor the MIDI editing environment to suit your specific requirements, enhancing your workflow and allowing for detailed MIDI manipulation.
- MIDI File Formats: In the MIDI preferences, you can specify the default MIDI file format for recording and exporting MIDI data. Cubase 12 supports various MIDI file formats, such as Standard MIDI File (SMF), MIDI clips, and MIDI loop formats. You can choose the format that best suits your needs, ensuring compatibility with other software or platforms when exchanging MIDI data.
- MIDI Input Transformer: Cubase 12 features the MIDI Input Transformer, which allows you to modify incoming MIDI data in real-time. In the MIDI preferences, you can access the MIDI Input Transformer settings to create custom MIDI filtering, transformation, or routing rules. This powerful feature enables you to manipulate MIDI data on-the-fly, opening up creative possibilities and providing flexibility in MIDI performance and control.
- MIDI File and Export Preferences: Cubase 12 provides options to configure MIDI file settings for exporting MIDI data. In the MIDI preferences, you can specify the default MIDI file format, resolution, and other export settings. Customizing these preferences ensures that your exported MIDI files are in the desired format and quality, ready for use in other software or for sharing with collaborators.
By customizing MIDI preferences in Cubase 12, you can optimize your MIDI workflow, enhance your MIDI recording and editing capabilities, and customize the behavior of MIDI devices within the software. These preferences allow you to tailor Cubase 12 to your specific MIDI setup, performance style, and production requirements, providing you with a powerful and flexible MIDI production environment.
Saving and Applying Preferences
Saving and applying preferences in Cubase 12 allows you to create custom configurations and easily switch between different settings or setups. This feature is particularly useful when working on multiple projects, collaborating with others, or adapting to specific production scenarios. Cubase 12 provides options to save and recall preferences, ensuring that you can quickly apply your preferred settings whenever needed. Here’s how you can save and apply preferences in Cubase 12:
- Saving Preferences:a. Customize Settings: Before saving preferences, customize the various settings in Cubase 12 according to your desired configuration. This includes preferences related to audio, MIDI, editing, display, plug-ins, key commands, and more. Adjust these settings to match your specific workflow and requirements.b. Access Preferences: To save preferences, go to the “File” menu in Cubase 12 and choose “Preferences.” Alternatively, you can use the keyboard shortcut (Ctrl+Comma on Windows or Command+Comma on Mac) to directly access the preferences window.c. Save Preferences Preset: In the preferences window, you’ll see different categories of settings on the left-hand side. Navigate through the categories and make sure all desired settings are adjusted according to your preference. Once you’ve customized the settings, click on the “Presets” button at the top of the preferences window and choose “Save as User Preset.” Give your preset a name and save it.d. Confirm and Exit Preferences: After saving the preferences preset, click “OK” to confirm the changes and close the preferences window. The preferences are now saved as a preset that can be applied later.
- Applying Preferences:a. Access Preferences: To apply saved preferences in Cubase 12, go to the “File” menu and choose “Preferences.” Alternatively, use the keyboard shortcut (Ctrl+Comma on Windows or Command+Comma on Mac) to open the preferences window.b. Load Preferences Preset: In the preferences window, navigate to the “Presets” button at the top and choose “Load User Preset.” A file dialog will open, allowing you to browse and select the saved preferences preset file. Once selected, click “Open” to load the preset.c. Confirm and Apply Preferences: After loading the preferences preset, you’ll see the settings reflected in the preferences window. Review the loaded preferences and ensure they match your desired configuration. Click “OK” to confirm the changes and apply the loaded preferences.d. Restart Cubase: In some cases, certain preferences may require a restart of Cubase for the changes to take effect. If prompted, close and restart Cubase to ensure that all loaded preferences are fully applied.
By saving and applying preferences in Cubase 12, you can easily switch between different settings or setups, allowing for efficient workflow customization. This feature enables you to quickly adapt to different projects, collaboration scenarios, or personal preferences, enhancing your productivity and providing a more personalized music production experience.
Loading preferences
Loading preferences in Cubase 12 allows you to apply a preconfigured set of settings to the software, making it easy to switch between different preferences configurations or restore previously saved settings. This feature is particularly useful when working on different projects, collaborating with others, or troubleshooting issues. Here’s how you can load preferences in Cubase 12:
- Accessing Preferences: To load preferences in Cubase 12, go to the “File” menu and choose “Preferences.” Alternatively, you can use the keyboard shortcut (Ctrl+Comma on Windows or Command+Comma on Mac) to open the preferences window.
- Loading Preferences Preset: In the preferences window, navigate to the “Presets” button at the top and choose “Load User Preset.” A file dialog will open, allowing you to browse and select the preferences preset file you want to load. The preferences presets typically have the file extension “.xml”. Once you’ve selected the desired preset, click “Open” to load it.
- Confirming and Applying Preferences: After loading the preferences preset, you’ll see the settings reflected in the preferences window. Review the loaded preferences to ensure they match the desired configuration. Make any additional adjustments if needed. Once you’re satisfied, click “OK” to confirm the changes and apply the loaded preferences.
- Restart Cubase (if necessary): In some cases, certain preferences may require a restart of Cubase for the changes to take effect. If prompted or if you notice that certain preferences are not fully applied, it is recommended to close and restart Cubase to ensure that all loaded preferences are properly activated.
Cubase 12 allows you to quickly apply preconfigured settings to the software, saving you time and effort in adjusting individual preferences manually. Whether you’re switching between different projects, restoring previous configurations, or troubleshooting issues, the ability to load preferences provides flexibility and convenience in customizing your Cubase 12 environment.
Conclusion
Setting up project preferences in Cubase 12 is a vital step in maximizing your productivity, optimizing your workflow, and achieving the best possible results in your music production endeavors. By customizing project preferences, you can tailor Cubase 12 to suit your specific needs and preferences, ensuring a personalized and efficient working environment.
Configuring preferences related to workflow, audio and MIDI settings, display and visualization, file formats, and presets allows you to streamline your creative process, save time on repetitive tasks, and maintain consistency across projects. Whether it’s setting up keyboard shortcuts, choosing the right audio interface and sample rate, or creating custom templates and presets, each preference can make a significant impact on your overall music production experience.
Setting up project preferences in Cubase 12 also enables you to adapt to different genres, recording scenarios, or collaboration requirements. The ability to save and recall preferences presets ensures that you can switch between different setups effortlessly and maintain consistency across various projects. This flexibility allows you to focus on the creative aspects of your music rather than getting bogged down by technical configurations.
Moreover, Cubase 12 provides a user-friendly interface that empowers you to dive deep into preferences and customize the software according to your needs. With options to adjust audio and MIDI device settings, manage VST plug-ins, fine-tune editing and display preferences, and define file and backup configurations, Cubase 12 offers comprehensive control over your music production environment.
In conclusion, setting up project preferences in Cubase 12 is essential for tailoring the software to your specific requirements, optimizing your workflow, and unleashing your creativity. By customizing preferences, you can create a personalized, efficient, and comfortable working environment that allows you to focus on producing high-quality music. Embracing the power of project preferences in Cubase 12 is a key step towards achieving your musical goals and enjoying a rewarding music production experience.