Setting up your audio device properly in FL Studio 21 is of utmost importance for a seamless and productive music production experience. FL Studio is a powerful digital audio workstation (DAW) that allows musicians, producers, and composers to create music using a wide range of virtual instruments, effects, and audio recording capabilities. To fully harness the potential of this software, it’s crucial to set up your audio device correctly. Here’s why it matters:
- Low Latency and Real-Time Performance: When you set up your audio device correctly, you reduce audio latency—the delay between when you trigger a sound and when you hear it. Low latency is crucial for real-time performance, as it enables you to play virtual instruments with minimal delay, making it feel more natural and responsive. It also ensures that audio effects and processing happen in real-time without noticeable delays.
- High-Quality Audio Output: Proper audio device setup ensures that your audio signals are delivered with the best possible quality. A well-configured audio device will provide accurate playback and recording, maintaining the integrity of your sound sources throughout the production process. This is essential for creating professional-grade music.
- Stable Performance and Reduced Glitches: Correctly setting up your audio device can significantly improve the overall stability of FL Studio. It helps prevent audio dropouts, glitches, and unexpected crashes during your production sessions. A stable system allows you to focus on your creativity without disruptions.
- Optimal Workflow: Efficient audio device configuration leads to an optimized workflow. When your audio device is correctly set up, you can easily switch between recording and playback modes, set up monitoring options, and manage inputs and outputs. This streamlined workflow enhances your productivity and allows you to work more effectively.
- Accurate Mixing and Mastering: A properly configured audio device ensures that you hear your mix accurately. This is crucial when making decisions about EQ, compression, and other effects during the mixing and mastering stages. If your audio device is set up incorrectly, your mix may sound different on other systems, leading to mix inconsistencies.
- Compatibility with External Hardware: Many producers use external audio interfaces, MIDI controllers, and other hardware in conjunction with FL Studio. Proper audio device setup ensures that these external devices integrate seamlessly with the software, enabling you to take advantage of their features and capabilities fully.
- Preventing Audio Clipping and Distortion: Correctly setting up your audio device can help you avoid audio clipping and distortion issues. Properly adjusting buffer sizes, sample rates, and other settings will prevent your audio from peaking and ensure smooth playback and recording.
Importance of setting up your audio device in FL Studio 21 cannot be overstated. It directly impacts the quality of your music production, your workflow efficiency, and your overall creative experience. Taking the time to configure your audio device properly will help you unlock the full potential of FL Studio and create music at its best.
Connecting Your Audio Device
Connecting your audio device to FL Studio 21 is a crucial step in setting up your digital audio workstation (DAW) for music production. Whether you are using an internal sound card, an external audio interface, or other audio devices, ensuring proper connectivity will enable you to record and play back audio with high quality and low latency. Here’s a step-by-step guide to help you connect your audio device to FL Studio 21:
- Install Drivers and Software:
- Before connecting your audio device, ensure you have installed the necessary drivers and software that came with it. These drivers facilitate communication between your device and the computer.
- Connect the Audio Device:
- If you’re using an internal sound card, it is likely already connected to your computer. External audio interfaces, on the other hand, require a physical connection. Use a USB or Firewire cable (depending on your interface) to connect it to an available USB or Firewire port on your computer.
- Power On the Audio Device:
- After connecting the audio device, power it on. Some interfaces may be bus-powered (powered through the USB connection), while others might require an external power source.
- Launch FL Studio 21:
- Open FL Studio 21 on your computer. Once the software is launched, click on “Options” in the top toolbar and select “Audio Settings.”
- Select the Audio Device:
- In the “Audio Settings” window, under the “Device” section, you’ll see a drop-down menu listing available audio devices. Choose your connected audio device from this list.
- Adjust Buffer Size and Sample Rate:
- The “Buffer Length” or “Buffer Size” determines the audio latency. A smaller buffer size reduces latency but may require more processing power. Experiment to find a balance that works for your system. The sample rate determines the audio quality, with higher rates providing better fidelity but higher processing demands.
- Configure Inputs and Outputs:
- In the “Audio Settings” window, you’ll find options to configure the inputs and outputs of your audio device. Set up the inputs you plan to use (e.g., microphones or instruments) and the outputs (e.g., studio monitors or headphones).
- Enable Input Monitoring (Optional):
- If you’re recording audio, you may want to enable input monitoring so that you can hear the input signal in real-time while recording. This helps with performances and pitch correction. You can typically find this option in your audio interface’s control panel or within FL Studio’s audio settings.
- Test the Audio Setup:
- After configuring your audio device settings, it’s essential to test them. Play a sound or a project to ensure you’re getting sound output from your selected audio device. Likewise, check your microphone or instrument to verify that you’re receiving input signal if you plan to record.
- Save the Audio Settings:
- Once you’ve verified that your audio device is working correctly, click “Accept” or “OK” to save the audio settings within FL Studio 21.
By following these steps, you’ll successfully connect your audio device to FL Studio 21, allowing you to make the most of the software’s powerful music production capabilities with high-quality audio recording and playback.
Configuring Audio Device Settings
Configuring audio device settings in FL Studio 21 is a vital step to ensure optimal performance and high-quality audio during your music production sessions. Proper configuration allows you to set up your input and output devices, adjust buffer settings, and fine-tune various audio parameters. Here’s a comprehensive guide to help you configure your audio device settings in FL Studio 21:
- Open FL Studio 21:
- Launch FL Studio 21 on your computer.
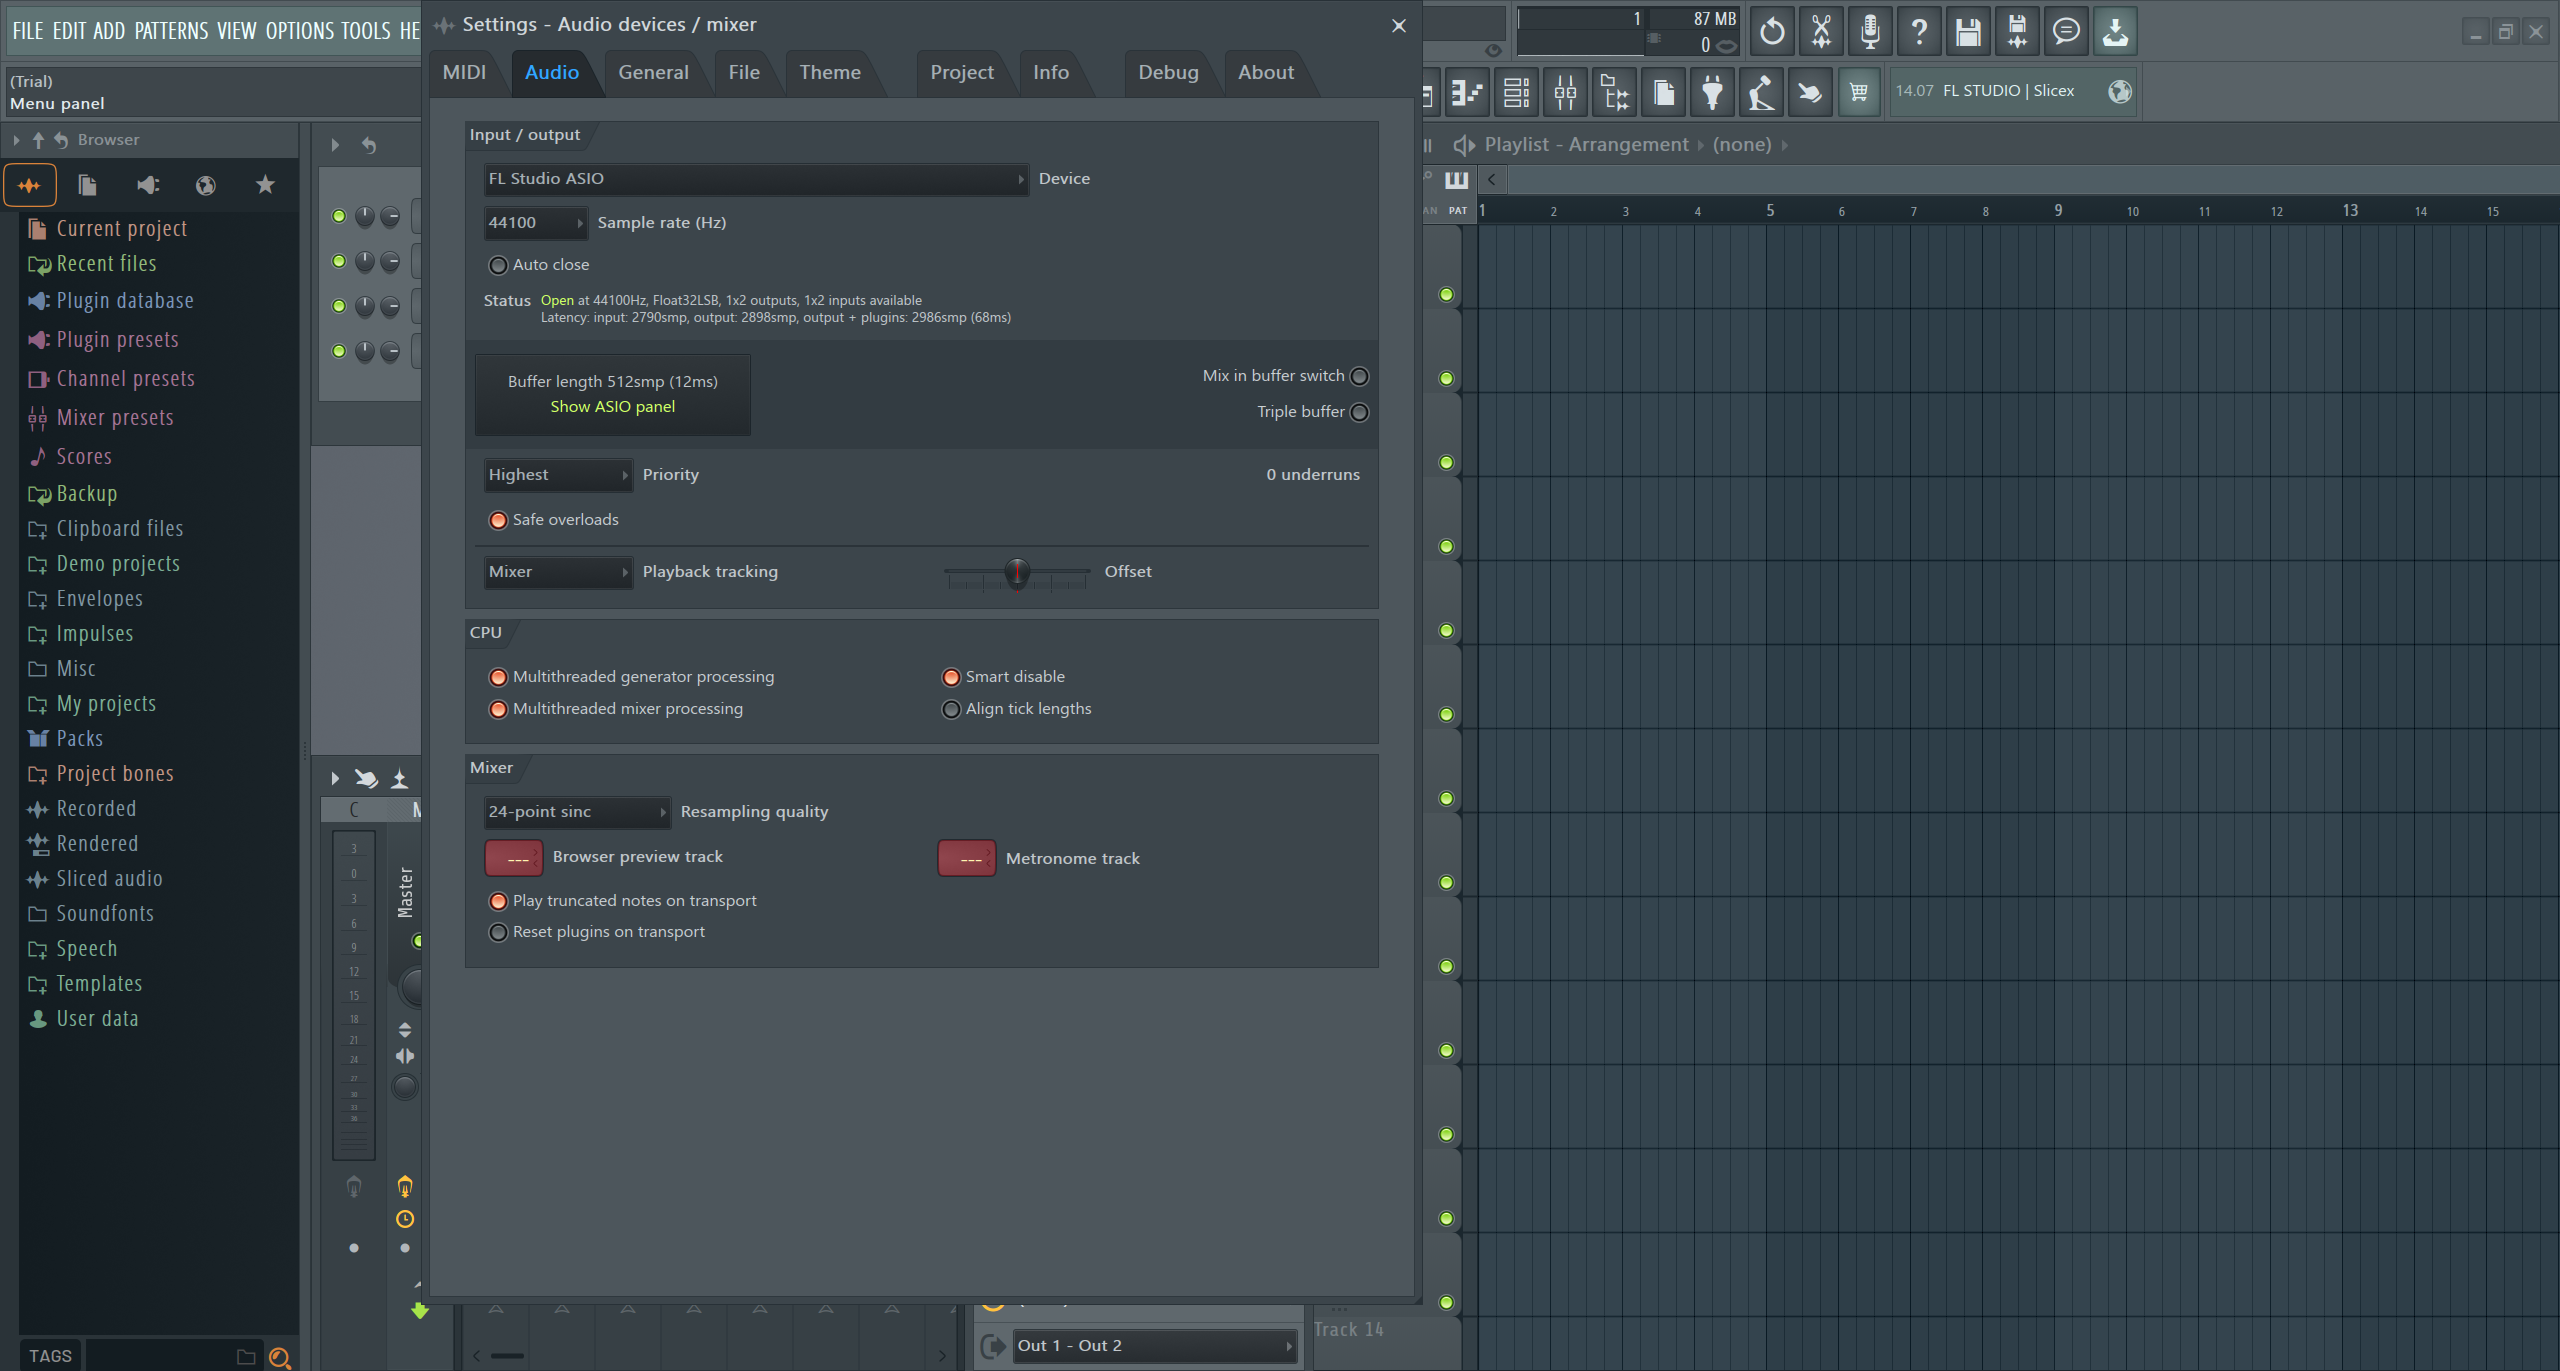
- Access Audio Settings:
- Click on “Options” in the top toolbar and select “Audio Settings” from the drop-down menu. Alternatively, you can use the shortcut key “F10” to open the audio settings.
- Choose Audio Device:
- In the “Audio Settings” window, under the “Device” section, you will see a drop-down menu that lists the available audio devices on your system. Select the audio device you want to use with FL Studio. This can be your internal sound card, an external audio interface, or any other compatible device.
- Adjust Buffer Size:
- The buffer size determines the audio latency, which is the delay between when you trigger a sound and when you hear it. Smaller buffer sizes reduce latency, but they also increase the demand on your computer’s processing power. Larger buffer sizes reduce strain on your CPU but may introduce more noticeable latency. Find a balance that suits your needs by adjusting the buffer length using the slider provided in the “Audio Settings” window.
- Set Sample Rate:
- The sample rate determines the number of samples per second recorded and played back. Higher sample rates offer better audio quality, but they also require more CPU resources. In most cases, a sample rate of 44.1 kHz or 48 kHz is suitable for music production. You can select your desired sample rate from the drop-down menu in the “Audio Settings” window.
- Configure Inputs and Outputs:
- Under the “Input/Output” section in the “Audio Settings” window, you can configure the inputs and outputs of your audio device. Set up the inputs you plan to use, such as microphones or instruments, and the outputs, like studio monitors or headphones.
- Enable Input Monitoring (Optional):
- If you’re recording audio, you may want to enable input monitoring. This allows you to hear the input signal in real-time while recording, which can be helpful for performances and pitch correction. You can typically find this option in your audio interface’s control panel or within FL Studio’s audio settings.
- ASIO Configuration (Optional):
- If your audio device supports ASIO (Audio Stream Input/Output) drivers, it’s recommended to use them. ASIO drivers offer low latency and high performance for audio interfaces. In the “Audio Settings” window, you can access the ASIO configuration panel by clicking on the “Show ASIO Panel” button.
- Test the Audio Setup:
- After configuring your audio device settings, it’s essential to test them. Play a sound or load a project to ensure you’re getting sound output from your selected audio device. If you plan to record, check your microphone or instrument to verify that you’re receiving input signal.
- Save the Audio Settings:
- Once you’ve verified that your audio device is working correctly, click “Accept” or “OK” to save the audio settings within FL Studio 21.
Properly configuring your audio device settings in FL Studio 21 ensures low latency, high-quality audio, and a stable production environment, enabling you to focus on your creative process and produce music efficiently.
Configuring Input and Output Routing
Configuring input and output routing in FL Studio 21 is a fundamental aspect of setting up your digital audio workstation (DAW) for recording and playback. Input routing allows you to define which audio sources (microphones, instruments, etc.) are connected to your system, while output routing determines where the audio is directed—whether to studio monitors, headphones, or external hardware. Understanding and configuring these settings correctly is crucial for seamless music production. Here’s a step-by-step guide on how to configure input and output routing in FL Studio 21:
- Open FL Studio 21:
- Launch FL Studio 21 on your computer.
- Access the Mixer:
- To configure input and output routing, you’ll need to work with FL Studio’s mixer. If it’s not already visible, click on the “View” menu in the top toolbar and select “Mixer” to display the mixer window.
- Configure Input Routing:
- In the mixer window, identify the channel(s) where you want to configure input routing. Typically, you will work with audio tracks where you plan to record audio. Right-click on the channel’s mixer track and choose “Insert > Audio Input” from the context menu.
- After selecting “Audio Input,” a list of available audio inputs will appear. Choose the appropriate input(s) where your audio sources (microphones, instruments, etc.) are connected. If your audio interface supports multiple inputs, you can select different ones for each track.
- Configure Output Routing:
- Output routing determines where the audio will be directed. For example, you might want the audio to play through your studio monitors or headphones. In the mixer window, locate the channel(s) you want to configure for output routing.
- Right-click on the mixer track and choose “Route to this track > [Desired Output].” From the sub-menu, you can choose the desired output destination. For example, select “Master” to route the audio to the master channel, which will then play through your main output device (speakers or headphones).
- Additionally, you can route audio to various other mixer tracks, bus channels, or external hardware by selecting the appropriate option from the sub-menu.
- Adjust Channel Volume and Panning:
- Before recording or playing back audio, it’s essential to set the channel’s volume and panning appropriately. In the mixer, locate the channel you wish to adjust, and use the volume fader to set the desired level. Use the panning knob to position the sound between the left and right channels for stereo tracks.
- Test the Setup:
- After configuring input and output routing, test the setup by playing back a project or recording audio. Verify that the audio signal is coming through the selected inputs and is being routed to the desired output destination.
- Save Your Project:
- Once you’ve configured the input and output routing to your satisfaction, save your project to retain these settings for future sessions.
By following these steps, you’ll successfully configure input and output routing in FL Studio 21. Proper routing ensures that your audio sources are recorded correctly, and the audio output is directed to the appropriate destination, allowing for efficient and seamless music production.
Latency Adjustment and ASIO4ALL
Latency adjustment and ASIO4ALL are essential components in FL Studio 21 for achieving low audio latency and improving the performance of your audio interface. Latency refers to the time delay between when an audio signal is processed and when you hear the output. Minimizing latency is crucial for real-time recording and monitoring, as it ensures a more responsive and natural feel during playback. ASIO4ALL is a software driver that enables low-latency audio processing on Windows systems that do not have native ASIO support for their audio interfaces. Here’s how to adjust latency and use ASIO4ALL in FL Studio 21:
1. Accessing the Audio Settings:
- Launch FL Studio 21 and go to “Options” in the top toolbar, then select “Audio Settings.”
2. ASIO4ALL Installation (If Required):
- If your audio interface does not have native ASIO drivers or you encounter high latency issues, consider installing ASIO4ALL. Visit the ASIO4ALL website (www.asio4all.org) and download the latest version of the driver. Install it on your system following the provided instructions.
3. Selecting ASIO4ALL:
- In the “Audio Settings” window, under the “Device” section, choose “ASIO4ALL v2” from the drop-down menu. If ASIO4ALL is not installed, you may not see it as an option.
4. ASIO4ALL Control Panel:
- Click on the “Show ASIO Panel” button. This will open the ASIO4ALL control panel, which allows you to configure your audio device’s settings.
5. Adjusting Buffer Size:
- In the ASIO4ALL control panel, you will see the “Buffer Size” slider. Reducing the buffer size decreases audio latency but might require more CPU resources. Experiment with smaller buffer sizes to achieve the lowest possible latency without introducing audio dropouts or glitches.
6. Configuring Sample Rate:
- In the ASIO4ALL control panel, you can also set the sample rate. Choose a sample rate that matches the capabilities of your audio interface and the requirements of your project. Common sample rates are 44.1 kHz and 48 kHz.
7. Enable Inputs and Outputs:
- Ensure that the inputs and outputs you wish to use are enabled in the ASIO4ALL control panel. If you have multiple inputs or outputs on your audio interface, you can select which ones to use here.
8. Closing the ASIO4ALL Control Panel:
- After adjusting the settings, close the ASIO4ALL control panel and return to the FL Studio “Audio Settings” window.
9. Test Latency and Performance:
- To check the effects of your latency adjustments, test the audio setup by playing back a project or recording audio. You should notice a significant reduction in latency compared to using other audio drivers.
10. Save Your Settings:
- Once you are satisfied with the latency and ASIO4ALL settings, click “Accept” or “OK” in the FL Studio “Audio Settings” window to save the configuration.
By following these steps and using ASIO4ALL in FL Studio 21, you can achieve low latency, real-time audio processing, and improved performance for recording, monitoring, and playing virtual instruments. Remember that latency requirements may vary depending on your hardware, so feel free to experiment with different buffer sizes to find the best compromise between low latency and system stability.
Conclusion
Setting up your audio device in FL Studio 21 is a critical step to ensure a smooth and productive music production experience. Properly configuring your audio device allows you to harness the full potential of this powerful digital audio workstation and create professional-grade music with high-quality audio output and low latency.
By selecting the appropriate audio device, adjusting buffer sizes, and setting the sample rate, you can achieve low latency, which is essential for real-time performance and recording. This ensures that virtual instruments respond naturally and audio effects process in real-time without noticeable delays.
Configuring input and output routing in FL Studio allows you to define which audio sources are connected to your system and where the audio will be directed. This enables you to seamlessly record audio from various sources and route it to studio monitors, headphones, or external hardware for playback.
Furthermore, utilizing ASIO4ALL, especially for Windows systems lacking native ASIO support, can significantly improve audio processing efficiency and reduce latency, enhancing the overall performance of your audio interface.
Properly setting up your audio device in FL Studio not only optimizes your workflow but also ensures stable performance, minimizing audio dropouts, glitches, and unexpected crashes during your music production sessions.
In essence, paying attention to the details of your audio device configuration in FL Studio 21 empowers you to focus on your creativity, experiment with different sounds, and produce music at its best. Taking the time to set up your audio device correctly is a valuable investment in achieving the highest audio quality and realizing your artistic vision in the realm of music production.