In the context of audio production in Cubase 12, mixing refers to the process of blending and balancing multiple audio tracks to create a cohesive and polished final audio product. It is a crucial stage in the music production workflow that involves manipulating various elements of each track, such as volume, panning, equalization, effects, and dynamics, to achieve a harmonious and well-defined sound.
When you are working on a music project in Cubase 12, you might have several audio tracks, each representing a different instrument, vocal, or sound effect. The goal of mixing is to bring these individual tracks together, ensuring they complement each other and form a coherent sonic landscape.
Here are some key aspects of mixing in Cubase 12:
- Volume Balancing: Adjusting the volume levels of each track relative to one another to prevent any one element from overpowering the mix. This is typically done using volume faders in the mixer view.
- Panning: Placing individual tracks in the stereo field to create a sense of width and space. For example, instruments can be panned to the left, right, or center, allowing the listener to perceive the music as coming from different directions.
- Equalization (EQ): Using EQ plugins to modify the frequency content of each track. This helps to carve out space for different instruments in the mix and reduce any frequency clashes that might occur.
- Dynamics Processing: Applying compression, limiting, or expansion to control the dynamic range of each track. This ensures that softer elements are audible without being too quiet and that louder parts are controlled to prevent clipping or distortion.
- Time-based Effects: Adding reverbs, delays, and other time-based effects to create a sense of depth and ambiance in the mix.
- Spatial Effects: Using effects like chorus, flanger, or phaser to add movement and interest to the sound.
- Automation: Automating various parameters over time, such as volume, panning, or effect levels, to create changes and variations in the mix.
Cubase 12 offers a wide range of tools and features to facilitate the mixing process. Its mixer view allows you to visualize and control the various elements of your mix efficiently. Additionally, you can use plugins and virtual instruments to shape and enhance the sound of each track.
The ultimate goal of mixing in Cubase 12 is to achieve a professional and balanced audio mix that accurately represents the creative vision of the producer or artist. A well-mixed track should sound polished, clear, and engaging, making it enjoyable for the listener across different playback systems.
Understanding EQ
Understanding EQ (Equalization) in Cubase 12 is essential for achieving a balanced and professional-sounding mix. EQ is a powerful tool that allows you to shape the frequency content of audio tracks, making it possible to enhance or attenuate specific frequencies to improve clarity, remove unwanted elements, and create space for different instruments within the mix.
In Cubase 12, there are several ways to apply EQ to your tracks:
- Channel EQ: Each audio track in Cubase has its own Channel EQ, which is a parametric equalizer that allows you to adjust the frequency response of that particular track. To access the Channel EQ, simply open the MixConsole, select the desired track, and find the EQ section in the channel strip. Cubase’s Channel EQ offers various filter types, such as high-pass, low-pass, shelving, and parametric EQ, giving you precise control over the sound.
- Graphic EQ: Cubase 12 also provides a Graphic EQ plugin that can be inserted into the audio signal chain on a track or in the master bus. The Graphic EQ offers a graphical representation of the frequency response with sliders that can be moved up or down to boost or cut specific frequency bands.
- StudioEQ: Cubase 12 includes the StudioEQ plugin, which offers a combination of precise digital filtering and a classic analog EQ sound. It provides more advanced controls and options for shaping the audio.
When using EQ in Cubase 12, it’s important to understand some fundamental concepts:
- Frequency Bands: EQ divides the audio spectrum into different frequency bands, such as bass (low frequencies), midrange (mid frequencies), and treble (high frequencies). Each band can be adjusted independently.
- Gain: The gain control in the EQ allows you to increase or decrease the volume of a specific frequency band. Boosting a band increases the level of those frequencies, while cutting reduces their level.
- Q (Bandwidth): The Q parameter determines the bandwidth affected by the EQ. A narrow Q focuses on a smaller range of frequencies, while a broader Q affects a wider range. This is useful for precise surgical adjustments or broad tone shaping.
- High-Pass and Low-Pass Filters: These filters allow you to cut frequencies below or above a specific point, respectively. High-pass filters are useful for eliminating rumble and low-frequency noise, while low-pass filters can be used to remove unwanted high frequencies.
- Shelving Filters: Shelving EQs allow you to boost or cut all frequencies above or below a certain point. They are useful for broad adjustments to the overall tone of a track.
When applying EQ in Cubase 12, it’s important to use your ears and trust your judgment. Listen carefully to the changes you make and their impact on the overall mix. Aim for a balanced sound where each instrument has its space, and no frequency range is excessively emphasized or masked.
Remember, EQ is a creative tool, but it should also be used with restraint. Overuse or drastic adjustments can lead to unnatural and unpleasing results. Practice and experimentation are key to mastering the art of EQ in Cubase 12 and achieving professional-sounding mixes.
How to make EQ in Cubase
Making EQ adjustments in Cubase 12 is a fundamental skill for achieving a well-balanced and professional-sounding mix. Here’s a step-by-step guide on how to apply EQ to your audio tracks using Cubase 12’s built-in Channel EQ:
- Open Cubase 12 and Load Your Project: Start by launching Cubase 12 and opening your music project. Make sure you have all the audio tracks you want to work on loaded into your project.
- Open the MixConsole: To access the Channel EQ for a specific audio track, you’ll need to open the MixConsole. You can do this by clicking on the “MixConsole” tab at the bottom of the screen or by pressing the shortcut key “F3.”
- Select the Track: In the MixConsole, locate the audio track you want to apply EQ to and click on its channel strip to select it. The selected channel will be highlighted, and its settings will appear in the Inspector on the left side of the screen.
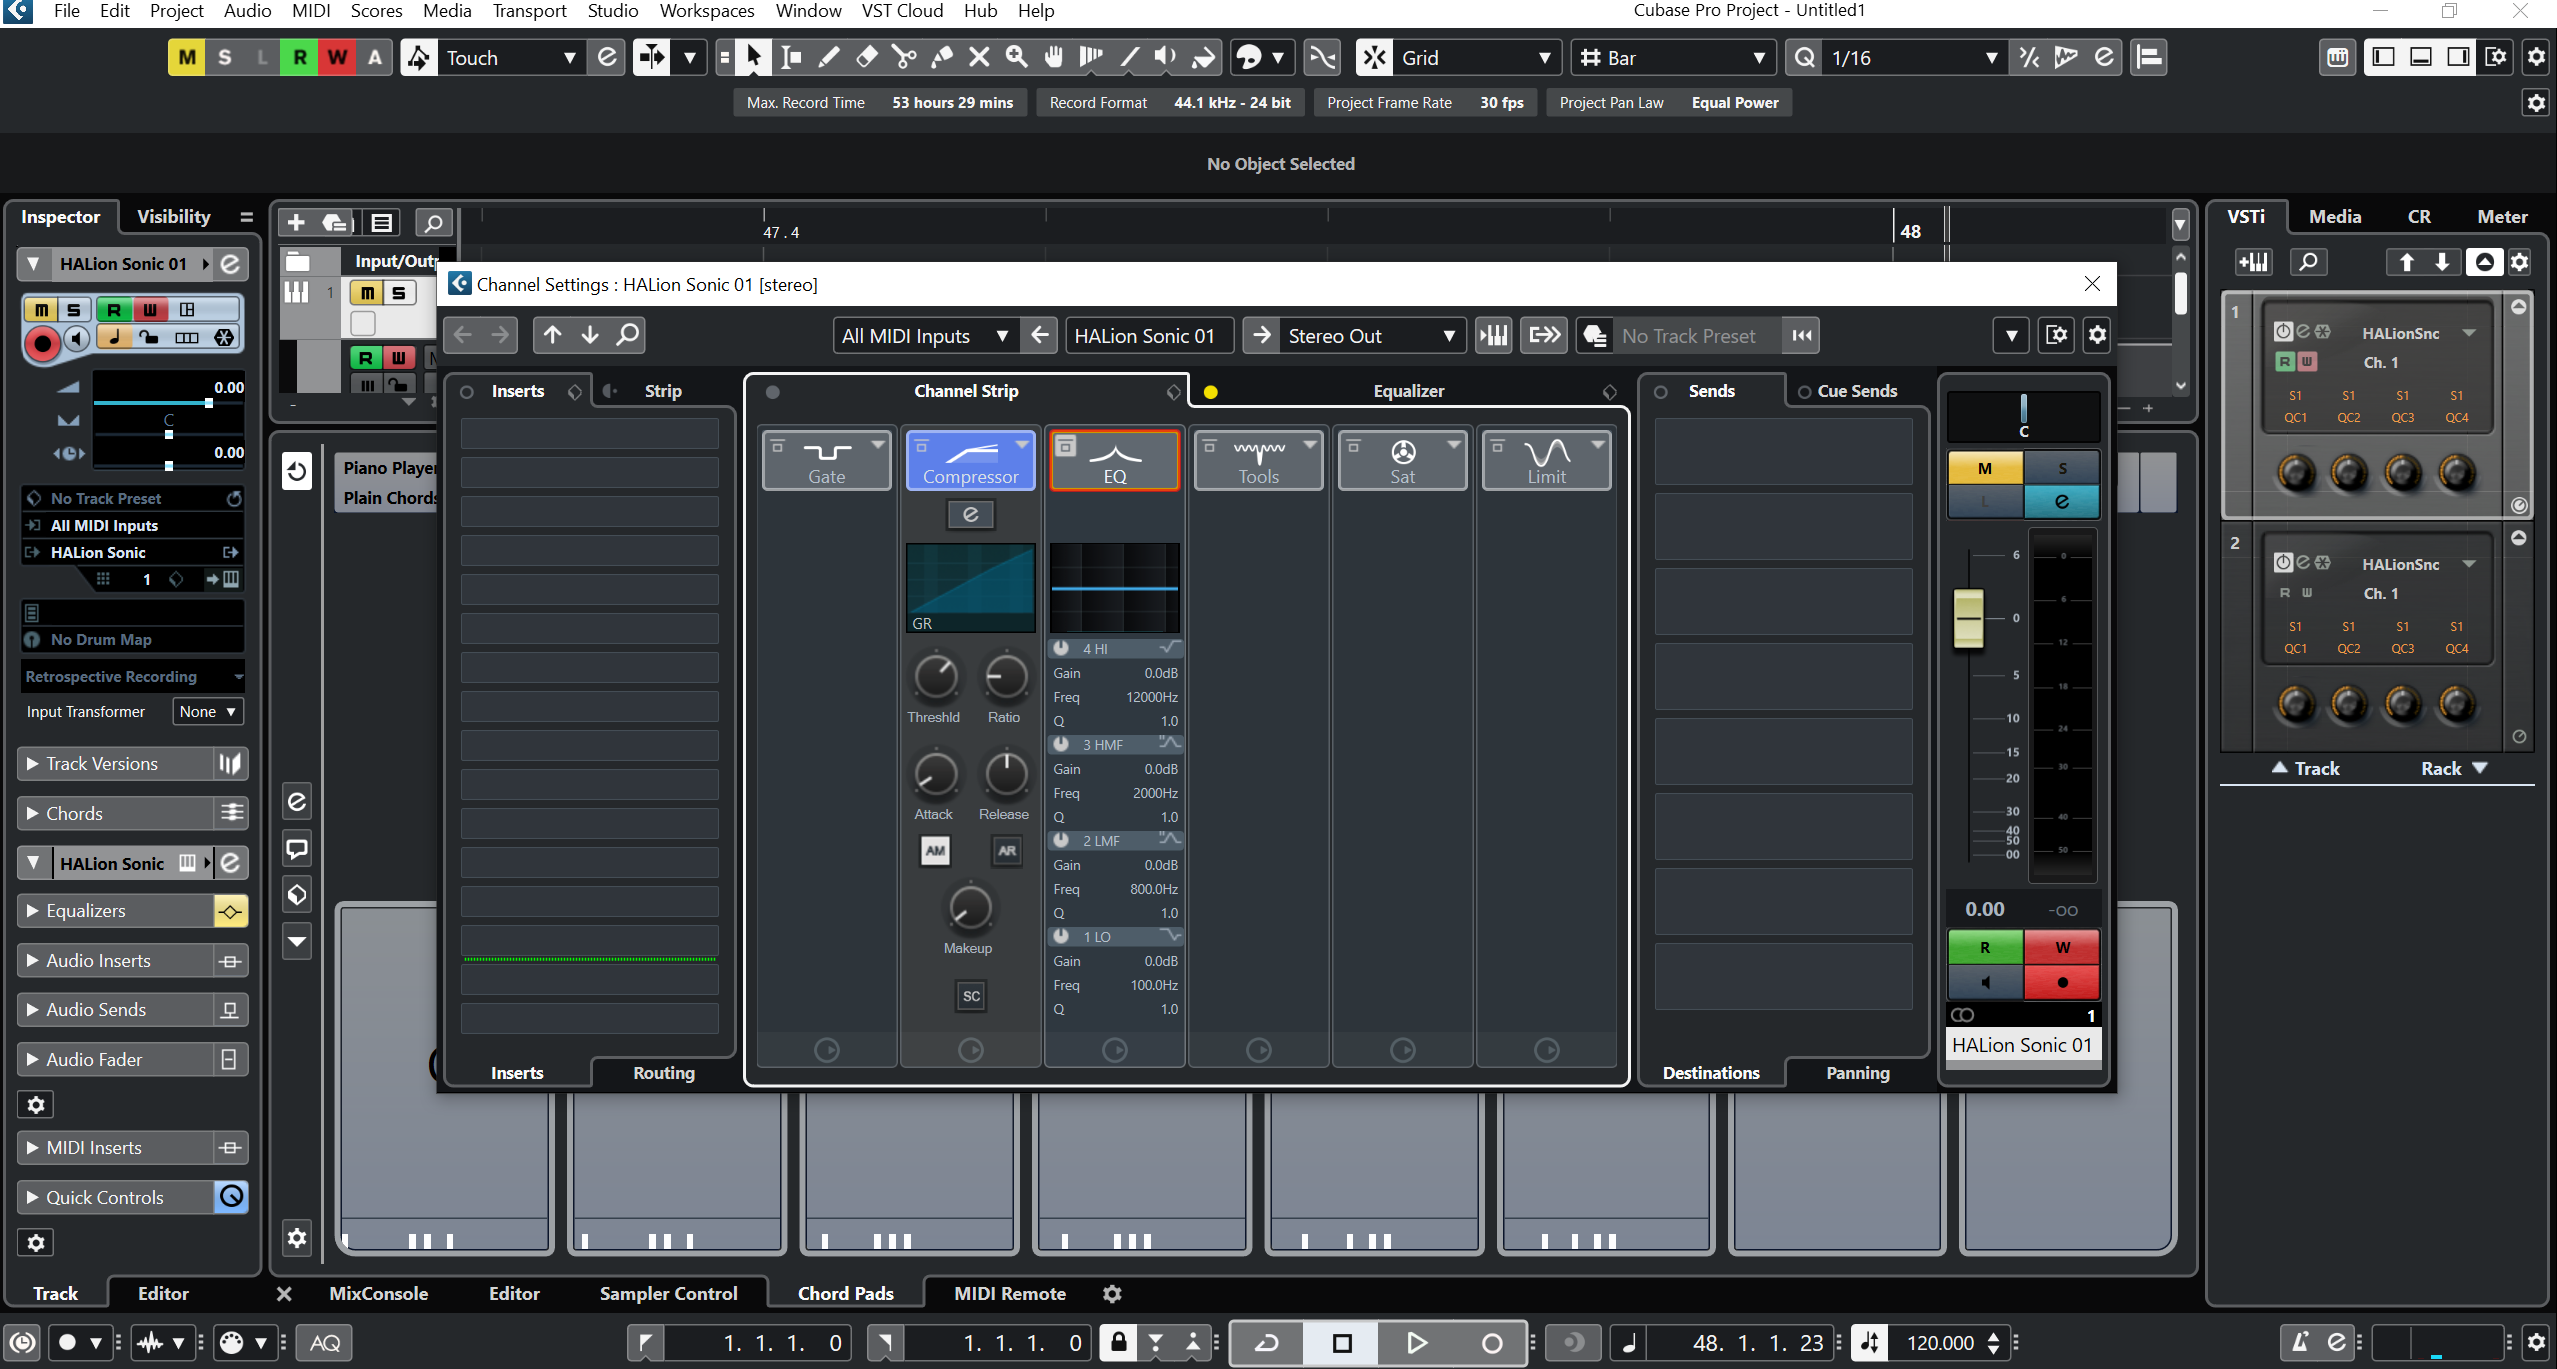
- Find the Channel EQ: In the Inspector, you’ll see various tabs with different track settings. Look for the “e” button, which stands for “Edit Channel Settings.” Click on it to expand the channel settings.
- Activate the Channel EQ: Within the channel settings, find the EQ section and make sure it is activated. You should see a graph representing the EQ curve, and various controls to adjust the frequency bands.
- Adjust the EQ: Now, you can start making EQ adjustments to the selected audio track. Here’s a basic guide to getting started:a. Identify Problem Areas: Listen to the track and identify any problem frequencies that need attention. For example, if there’s excessive bass rumble, you might want to cut the low frequencies. If a track sounds muddy, you can try cutting some of the mid frequencies.b. Use High-Pass and Low-Pass Filters: If needed, engage the high-pass filter to cut low frequencies below a certain point, or use the low-pass filter to remove unwanted high frequencies.c. Adjust Frequency Bands: Use the EQ controls (usually represented by knobs or sliders) to boost or cut specific frequency bands. For example, if you want to add brightness to a track, gently boost the high frequencies.d. Watch the Frequency Spectrum: As you make EQ adjustments, pay attention to the frequency spectrum graph. This will visually show you how the EQ is affecting the track’s frequency response.e. Use Your Ears: Trust your ears while making EQ adjustments. Listen carefully to how each change affects the overall sound. Aim for a natural and balanced sound, avoiding excessive boosts or cuts.
- Compare and A/B Testing: To ensure that your EQ adjustments are improving the track, use the A/B feature in Cubase 12. Save your initial EQ settings and then make your adjustments. You can toggle between the two settings (A/B) to hear the difference and decide which version sounds better.
- Save and Automate: Once you’re satisfied with the EQ adjustments, remember to save your project. You can also automate the EQ settings over time if you want specific EQ changes to occur at certain points in the song.
Remember that EQ is a creative tool, and there’s no one-size-fits-all approach. Experiment, listen, and refine your EQ adjustments to achieve the desired sound for each track in your Cubase 12 project. Practice and experience will help you become more proficient in using EQ effectively for mixing and audio production.
Applying Compression
Applying compression in Cubase 12 is an essential technique in audio production to control the dynamic range of audio signals and achieve a more balanced and polished mix. Compression helps to even out the volume levels of a track by reducing the difference between loud and quiet parts, resulting in a more consistent and controlled sound. Here’s a step-by-step guide on how to apply compression to your audio tracks in Cubase 12:
- Open Cubase 12 and Load Your Project: Start by launching Cubase 12 and opening the music project where you want to apply compression to your audio tracks. Make sure you have all the tracks you want to work on loaded into your project.
- Select the Track: Identify the audio track you want to apply compression to, and select it by clicking on its channel strip in the MixConsole or the Project window.
- Open the Dynamics Section: To access the compression settings for the selected track, you’ll need to open the Dynamics section in the Inspector or the Channel Settings window.
- Activate the Compressor: Once you have the Dynamics section open, find the compressor and make sure it is activated for the selected track. The compressor’s parameters and controls should now be visible.
- Set the Threshold: The threshold is a critical parameter that determines at what level the compressor starts to act. When the audio signal exceeds the threshold, the compressor reduces the volume. Drag the threshold control up or down to adjust the point at which compression begins. The lower the threshold, the more compression will be applied.
- Adjust the Ratio: The ratio determines the amount of gain reduction applied to the audio signal above the threshold. For example, a 4:1 ratio means that for every 4 dB above the threshold, the output level will only increase by 1 dB. Higher ratios result in more noticeable compression. Start with a moderate ratio (e.g., 4:1) and adjust according to your needs.
- Set Attack and Release Times: The attack time controls how quickly the compressor responds to audio signals above the threshold, while the release time determines how long it takes for the compressor to stop attenuating the signal after it falls below the threshold. Adjust the attack and release times based on the characteristics of the audio you are working with. Faster attack times are suitable for controlling transients, while longer release times can create a smoother compression effect.
- Adjust the Makeup Gain: Compression reduces the overall volume of the track, so you’ll likely need to compensate for this loss in gain. Use the makeup gain control to increase the output level after compression. Aim to match the compressed signal’s loudness with the original, uncompressed signal.
- Listen and Fine-Tune: After applying compression, listen to the track to assess its impact. Pay attention to how the compressor affects the dynamic range and the overall balance of the track. Make any necessary adjustments to the compression settings to achieve the desired sound.
- Duplicate Settings for Other Tracks (Optional): If you want to apply similar compression settings to other tracks in your project, you can duplicate the compressor settings or use channel presets to save time and maintain consistency across your mix.
- Save Your Project: Once you’re satisfied with the compression settings, remember to save your project to preserve your work.
Applying compression effectively takes practice, and different audio sources may require different settings. Use your ears, experiment with different compressor parameters, and aim for a balanced mix where the dynamics of each track are controlled without losing the natural feel of the music. As you gain experience, you’ll become more adept at using compression in Cubase 12 to enhance your audio productions.
Working with Reverb
Working with reverb in Cubase 12 allows you to add depth, space, and ambiance to your audio tracks, making them sound more natural and immersive. Reverb is a crucial tool in audio production, simulating the reflections of sound in different acoustic environments. Cubase 12 offers various ways to work with reverb, including built-in effects and third-party plugins. Here’s a guide on how to use reverb in Cubase 12:
- Open Cubase 12 and Load Your Project: Start by launching Cubase 12 and opening the music project you want to work on. Ensure that you have the audio tracks you want to apply reverb to loaded into your project.
- Select the Track: Identify the audio track you want to add reverb to and select it by clicking on its channel strip in the MixConsole or the Project window.
- Insert Reverb Plugin: In Cubase 12, you can add reverb to a track by inserting a reverb plugin in the channel strip. To do this, click on the Inserts section of the selected track in the MixConsole or the Inspector, and then choose a reverb plugin from the list of available effects.
- Adjust Reverb Parameters: Once the reverb plugin is inserted, you’ll have access to its parameters and controls. The most common reverb parameters you’ll find are:a. Wet/Dry Mix: This determines the balance between the original (dry) signal and the reverberated (wet) signal. Increase the wet mix to add more reverb to the track.b. Reverb Time: Also known as decay time, this sets the duration of the reverb tail. Longer reverb times create a more pronounced sense of space.c. Pre-Delay: The time between the original sound and the onset of the reverb tail. A longer pre-delay can help maintain clarity in the mix.d. High-Frequency Damping: Adjusts the amount of high-frequency absorption in the reverb tail, affecting how bright or dark the reverb sounds.e. Room Size: Some reverb plugins allow you to simulate different room sizes, from small rooms to large concert halls.f. Early Reflections: Some reverb plugins include parameters to control the early reflections, which are the first few reflections heard before the reverb tail.
- Choosing Reverb Types: Cubase 12 offers various reverb plugins with different algorithms and emulations of real spaces. Experiment with different reverb types, such as hall, plate, room, chamber, and more, to find the one that suits your track best.
- Send Reverb using Aux Sends: Instead of inserting the reverb directly on the track, you can use an auxiliary (aux) send to route a portion of the track’s signal to a reverb bus. This allows you to apply the same reverb to multiple tracks, creating a cohesive sense of space in your mix.
- Balancing the Reverb: When working with reverb, it’s essential to find the right balance. Be mindful not to overdo it, as excessive reverb can make the mix sound muddy and wash out important elements. Use your ears to determine the appropriate amount of reverb for each track.
- Automating Reverb: To add more dynamics and variation to your mix, you can automate the reverb parameters over time. For example, you might increase the reverb amount during a chorus to create a more expansive sound.
- Save Your Project: Once you’re satisfied with the reverb settings, remember to save your project to preserve your work.
Working with reverb in Cubase 12 requires careful listening and experimentation. As you become more familiar with different reverb plugins and techniques, you’ll be able to use reverb creatively to enhance the depth and dimension of your audio productions.
Advanced Mixing Techniques
Advanced mixing techniques in Cubase 12 take audio production to the next level, allowing you to achieve professional-sounding mixes with greater depth, clarity, and creativity. While the basic principles of mixing remain crucial, advanced techniques add finesse and polish to your music. Here are some advanced mixing techniques you can use in Cubase 12:
- Parallel Processing: Parallel processing involves creating a duplicate track or bus, processing it differently from the original, and then blending it back with the dry signal. In Cubase 12, you can use this technique for parallel compression, parallel saturation, or even parallel reverb to add character and depth to your tracks without affecting the original sound.
- Multiband Compression: Cubase 12 offers multiband compression plugins that allow you to compress specific frequency bands independently. This technique is useful for controlling the dynamics of different frequency ranges separately, especially in complex mixes where certain elements need individual treatment.
- Mid-Side Processing: With Cubase 12’s tools, you can process the mid and side components of a stereo signal separately. Mid-Side processing enables you to adjust the stereo width, apply different effects to the center and sides, and improve the spatial balance in your mix.
- Sidechain Compression and Ducking: Sidechain compression involves using the signal from one track to control the compression on another. In Cubase 12, you can create sidechain compression easily, allowing you to achieve popular techniques like ducking, where one element lowers the volume of another when it plays, making space in the mix for both.
- Automation: Automation in Cubase 12 allows you to change the parameters of various plugins and settings over time. Advanced automation enables intricate changes to volume, panning, effects, EQ, and more, allowing for expressive and dynamic mix transitions.
- Group and VCA Mixing: Cubase 12 offers group tracks and VCA faders that help you manage and control multiple tracks as one unit. Grouping tracks enables you to apply the same processing and adjustments collectively, streamlining your workflow. VCA faders allow you to control the volume of several tracks while maintaining their individual fader settings.
- Spectral Editing: Cubase 12’s spectral editing tools allow you to visualize and edit audio in the frequency domain. Advanced spectral editing techniques can help you clean up audio, remove unwanted noise, and address specific frequency issues precisely.
- De-essing and De-clicking: Cubase 12 provides tools to address specific issues like sibilance (harsh “s” sounds) with de-essing and removing clicks and pops with de-clicking plugins. These advanced processes help clean up vocal and instrument tracks effectively.
- Mix Buss Processing: Applying subtle processing on the mix buss (master output) can glue the mix together and add cohesion. Techniques like mix buss compression and gentle EQ adjustments can enhance the overall sound of your mix.
- Reference Tracks and A/B Comparison: Importing reference tracks into Cubase 12 allows you to compare your mix’s sound with commercial tracks you admire. This helps you to calibrate your ears and make more informed decisions during the mixing process.
- Bus Routing and Parallel Effects: Utilize bus routing to send multiple tracks to a common bus with shared effects. This way, you can apply parallel processing on multiple tracks simultaneously, creating a cohesive and controlled sound.
Remember that these advanced mixing techniques require practice and careful listening. Each mix is unique, so it’s essential to adapt these techniques to fit the specific requirements of your music. Experiment, trust your ears, and be willing to make iterative adjustments to achieve the desired professional result.
Mixing Workflow and Best Practices
Having a well-organized mixing workflow and following best practices in Cubase 12 can significantly improve the efficiency and quality of your audio productions. Here are some essential tips for a smooth and effective mixing process in Cubase 12:
- Preparation: Before diving into the mix, ensure that all your audio tracks are properly recorded, edited, and labeled. Organize your tracks into groups (e.g., drums, guitars, vocals) for better management.
- Save Versions: Create regular backups or save different versions of your mix as you progress. This allows you to revert to previous stages if needed and explore different ideas without losing your progress.
- Mixing in Stages: Divide your mixing process into stages. Start with basic adjustments like volume balancing, panning, and cleaning up unwanted noise. Gradually move on to more detailed processing like EQ, compression, and effects.
- Gain Staging: Pay attention to gain staging throughout the mix. Avoid overloading plugins or clipping at any stage. Keep an eye on the track levels and adjust accordingly to maintain headroom.
- Use Cubase Project Logical Editor: The Project Logical Editor (PLE) in Cubase 12 can automate repetitive tasks during mixing. Create custom presets in PLE to streamline actions like renaming tracks, coloring, or applying specific settings.
- Grouping and VCA Faders: Utilize group tracks and VCA faders to control multiple tracks collectively. This simplifies mixing adjustments and helps maintain relative balances.
- Templates and Channel Presets: Create mixing templates or channel presets for common instruments and effects you use frequently. This saves time and ensures consistency across projects.
- Use Folder Tracks: Organize related tracks into folder tracks to keep your project tidy and manageable, especially in complex arrangements.
- Mix Buss Processing: Consider applying gentle mix buss processing, such as a mix buss compressor or EQ. Use this with caution, as it affects the entire mix. Aim for subtle enhancements rather than drastic changes.
- Reference Tracks: Import reference tracks into Cubase 12 to compare your mix’s sound with commercial tracks. This helps guide your decisions and achieve a more professional sound.
- Monitor Calibration: Ensure your monitoring system is properly calibrated to hear an accurate representation of your mix. Adjust speaker levels, and consider using reference headphones for critical listening.
- A/B Comparison: Use Cubase’s A/B comparison feature to toggle between different mix settings or plugin presets to compare their impact on the mix.
- Automate Expressively: Take advantage of automation to add dynamic changes and expression to your mix. Automate parameters like volume, panning, and effects to create movement and interest.
- Solo and Mute with Caution: Be cautious with frequent soloing and muting, as it can lead to inaccurate judgments. Refer to the mix as a whole to make well-informed decisions.
- Take Breaks: Mixing is a creative process that requires fresh ears. Take regular breaks to rest your hearing and come back with a clear perspective.
Remember, mixing is an iterative process, and it’s okay to experiment and make adjustments until you achieve the desired results. Trust your ears, be patient, and continuously refine your mixing skills in Cubase 12 to create professional-quality audio productions.
Conclusion
Using EQ, compression, and reverb in the mix with Cubase 12 is a powerful combination that empowers audio producers and engineers to create professional and captivating audio productions. These essential tools play a significant role in shaping the sound, controlling dynamics, and adding depth to the mix.
EQ allows for precise control over the frequency content of each track, enabling the removal of unwanted elements, highlighting specific characteristics, and creating space for different instruments to coexist harmoniously. Cubase 12’s versatile EQ plugins and parametric controls provide the means to achieve a balanced and well-defined sound, crucial for a polished mix.
Compression in Cubase 12 allows for taming the dynamic range of audio tracks, ensuring a more consistent and controlled sound. By reducing the difference between loud and quiet parts, compression helps the mix to sound tighter and more cohesive. With Cubase 12’s advanced compression techniques like parallel processing, sidechain compression, and multiband compression, producers have the tools to bring out the best in their tracks.
Reverb in Cubase 12 adds an immersive sense of space, depth, and realism to the mix. Through carefully chosen reverb types, adjustments to reverb parameters, and creative use of sends and returns, producers can create a wide range of acoustic environments and achieve a sense of three-dimensional depth in their mix.
However, it is important to approach these tools with care and subtlety. Overusing any of them can lead to a cluttered or unnatural mix. A thoughtful and nuanced approach is crucial to ensure that each element in the mix contributes cohesively to the overall sonic landscape.
Throughout the mixing process in Cubase 12, it’s essential to trust your ears and listen critically. Use reference tracks to gauge the quality and characteristics of commercial mixes, and always strive to strike a balance between creativity and technical precision.
Cubase 12 provides a comprehensive set of features and plugins to support audio producers in achieving their vision and taking their mixes to the next level. With EQ, compression, and reverb as part of the arsenal, Cubase 12 empowers producers to create captivating and professional-sounding audio productions that resonate with listeners.