In Cubase 12, mastering plugins play a pivotal role in this process, allowing users to refine the overall sonic characteristics of a mix, optimize its dynamics, and add that extra touch of brilliance that sets apart a professional track from an amateur one. Let’s explore some of the key mastering plugins that Cubase 12 offers:
- Multiband Compressor: The Multiband Compressor is a versatile tool that enables users to compress different frequency bands separately. This allows for precise control over the dynamics of specific parts of the audio spectrum, leading to a more balanced and controlled final mix.
- Stereo Enhancer: The Stereo Enhancer plugin in Cubase 12 allows for widening the stereo image of a track, making it sound more spacious and immersive. It’s a great tool for adding depth and dimension to the mix.
- Equalizer (EQ): Cubase 12 provides a powerful Equalizer plugin that enables precise frequency shaping and tonal adjustments. With multiple bands and various filter types, users can sculpt the sound to remove unwanted frequencies and highlight the best aspects of the mix.
- Limiter: The Limiter is an essential tool in mastering to prevent audio peaks from exceeding a set threshold, effectively maximizing the overall loudness of the track without causing distortion.
- Exciter: The Exciter plugin enhances the presence and brilliance of a mix by selectively boosting harmonics and adding a touch of sparkle to the sound. It can be particularly useful for breathing life into dull or flat mixes.
- De-Esser: De-essing is a technique used to tame excessive sibilance in vocal recordings or high-frequency-heavy instruments. The De-Esser plugin in Cubase 12 effectively reduces sibilant sounds without affecting the rest of the audio.
- Reverb: Although primarily known as an effect, reverb can be used subtly in mastering to add a sense of space to the mix. Cubase 12’s reverb plugin offers a wide range of algorithms and controls to achieve the desired spatial enhancements.
- Analyzer: The Analyzer plugin is an invaluable tool for visualizing the frequency spectrum and dynamics of the audio. It helps users identify potential issues in the mix and make informed decisions during the mastering process.
Cubase 12’s mastering plugins are designed to work seamlessly within its intuitive and user-friendly interface. Users can apply these plugins individually or as part of a mastering chain, where multiple plugins are connected in series to process the audio consecutively.
It is important to note that while these mastering plugins provide powerful tools for achieving professional results, the art of mastering requires skill, experience, and a keen ear. It’s essential to approach mastering with a critical mindset, as each track will have unique characteristics and requirements.
In conclusion, Cubase 12’s mastering plugins offer a comprehensive set of tools for elevating audio tracks to their fullest potential. From dynamic control to tonal shaping and spatial enhancements, these plugins cater to the diverse needs of audio professionals, allowing them to craft polished and impactful final mixes right within the Cubase ecosystem. Whether you’re a seasoned audio engineer or an aspiring music producer, Cubase 12’s mastering plugins are sure to inspire creativity and deliver exceptional results.
Understanding the Maximiser Plugin
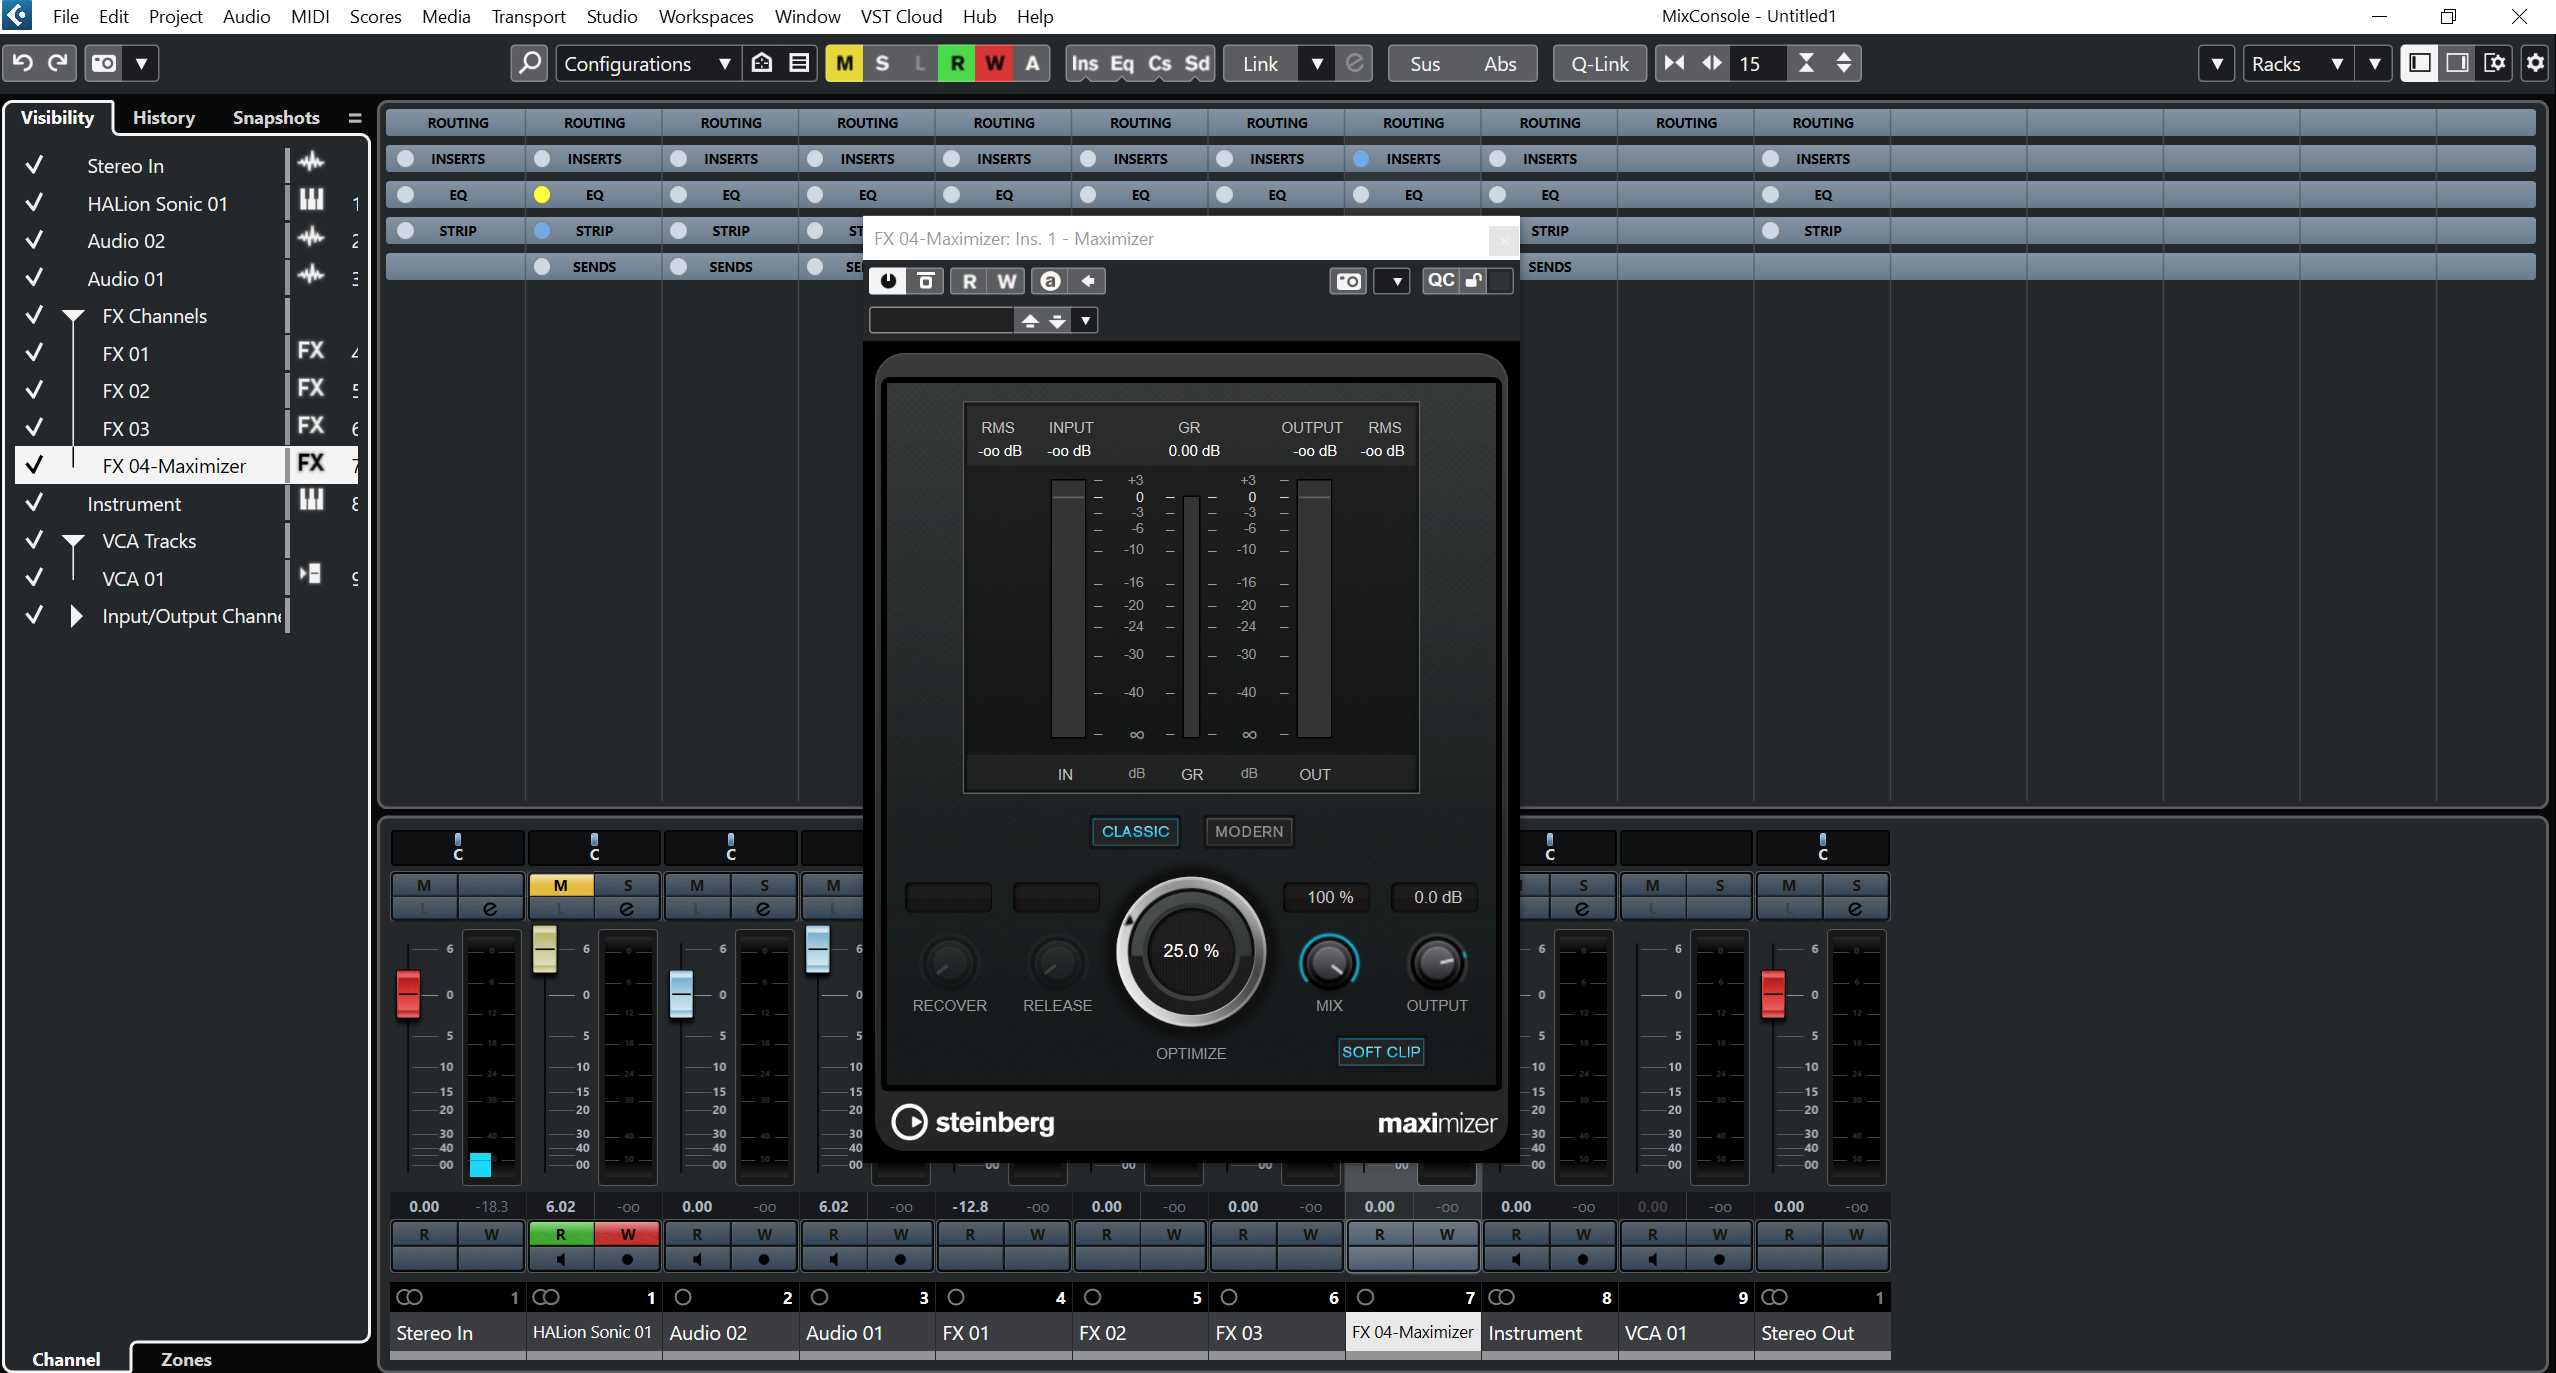
The Maximiser plugin is a crucial component of Cubase 12’s arsenal of mastering tools. As its name suggests, this plugin is designed to maximize the loudness and overall level of a mix, while ensuring that the audio remains clear and free from distortion. The Maximiser is commonly used in the final stages of the mastering process to achieve competitive loudness levels without sacrificing audio quality.
Key Features and Functionality:
- Loudness Maximization: The primary function of the Maximiser plugin is to boost the overall loudness of a mix without causing clipping or distortion. It uses various techniques, including peak limiting and look-ahead processing, to increase the volume of the audio while maintaining a controlled dynamic range.
- Look-ahead Processing: The Maximiser employs a look-ahead feature that analyzes the audio signal slightly ahead of time before applying the limiting effect. This ensures that the plugin can anticipate and respond to sudden peaks or transients in the audio, preventing overshoots and minimizing distortion.
- Threshold and Ceiling: The Maximiser allows users to set a threshold, which acts as the level at which the limiting effect begins to engage. The ceiling is the maximum level to which the audio will be limited. By adjusting these parameters, users can control the intensity of the limiting effect and prevent the audio from becoming overly compressed.
- Release Time: The release time determines how quickly the limiting effect disengages after the audio drops below the threshold. A shorter release time can result in a more aggressive limiting effect, while a longer release time provides a more transparent and natural sound.
- Dithering: The Maximiser plugin also includes options for dithering, a technique used in the final stages of digital audio processing to reduce quantization noise when converting the audio to a lower bit-depth format, such as during the export process.
Best Practices for Using the Maximiser Plugin:
- Use in Moderation: While the Maximiser can significantly increase the loudness of a mix, it’s crucial to use it in moderation. Excessive limiting can lead to audio artifacts and a loss of dynamics, ultimately resulting in a fatiguing listening experience.
- Set the Threshold and Ceiling Wisely: Carefully adjust the threshold and ceiling parameters to strike a balance between loudness and audio quality. Aim to maximize the loudness without causing noticeable distortion or squashing the dynamics of the mix.
- Monitor and A/B Test: Always monitor the output level and frequently A/B test the processed audio with the original mix to ensure that the changes introduced by the Maximiser are enhancing the sound in a desired way.
- Consider the Overall Mastering Chain: The Maximiser is just one piece of the mastering puzzle. It is often used in combination with other mastering plugins, such as EQ, multiband compressors, and stereo enhancers, to achieve a polished and balanced final mix.
- Keep the Listening Environment in Mind: Remember that the perceived loudness of a mix can vary depending on the listening environment. Test the mastered audio on different playback systems to ensure it translates well across various platforms.
Maximiser plugin in Cubase 12 is a powerful tool for mastering engineers and music producers to achieve optimal loudness levels while maintaining audio clarity and fidelity. By understanding its features and best practices, users can harness the full potential of the Maximiser to elevate their audio productions to a professional standard.
Working with the Limiter Plugin
The Limiter plugin is a vital tool in Cubase 12’s mastering arsenal, used to control the peak levels and maximize the loudness of audio tracks without causing distortion. It is often the final plugin in the mastering chain, ensuring that the mix reaches the desired level of loudness while preserving its overall dynamics. Understanding how to use the Limiter effectively is crucial for achieving a polished and professional-sounding master.
Key Features and Functionality:
- Peak Limiting: The primary function of the Limiter is to prevent audio peaks from exceeding a set threshold level. By limiting the peaks, it allows for an increase in the overall loudness without allowing the audio to clip or distort.
- Threshold and Ceiling: The Limiter allows users to set a threshold level, which determines at what point the limiting effect engages. The ceiling is the maximum level to which the audio will be limited. By adjusting these parameters, users can control the intensity of the limiting effect and how much the audio is allowed to exceed the threshold.
- Look-ahead Processing: Many limiters, including the one in Cubase 12, employ look-ahead processing. This means that the limiter analyzes the audio signal slightly ahead of time to anticipate and respond to peaks or transients, resulting in more accurate and transparent peak limiting.
- Release Time: The release time determines how quickly the limiting effect disengages after the audio drops below the threshold. A shorter release time can result in a more aggressive limiting effect, while a longer release time provides a more transparent and natural sound.
Best Practices for Using the Limiter Plugin:
- Set the Threshold Carefully: When using the Limiter, it’s crucial to set the threshold level carefully. If the threshold is set too low, it can cause excessive limiting, resulting in an unnatural and squashed sound. On the other hand, if the threshold is set too high, the limiter may not effectively control the peaks.
- Adjust the Ceiling Wisely: The ceiling is the maximum level to which the audio will be limited. It’s essential to choose an appropriate ceiling level that allows for some headroom and ensures that the audio doesn’t hit the absolute maximum level.
- Use Look-ahead with Caution: While look-ahead processing can improve the accuracy of peak limiting, it may introduce some latency. Be mindful of any potential latency issues, especially if you’re working with time-sensitive material.
- Avoid Overlimiting: Overlimiting occurs when the limiter is pushed too hard, and the audio is excessively compressed and distorted. Keep an eye on the gain reduction meter and ensure that the limiting effect is being applied in moderation.
- Use in Conjunction with Other Mastering Tools: The Limiter is just one element of the mastering process. It is often used in combination with other plugins, such as EQ, multiband compressors, and the Maximiser, to achieve a well-balanced and polished final master.
- Listen on Various Playback Systems: Always check the mastered audio on different playback systems, such as headphones, studio monitors, and consumer speakers, to ensure it translates well across different platforms.
In conclusion, the Limiter plugin in Cubase 12 is a powerful tool for mastering engineers and music producers to control peak levels and maximize loudness while maintaining audio integrity. By understanding its features and following best practices, users can effectively utilize the Limiter to achieve professional and commercially competitive masters in their Cubase projects.
The Mastering Process
Mastering is the final stage in the music production process, where audio tracks are polished, balanced, and prepared for distribution. In Cubase 12, mastering is facilitated through a combination of powerful tools and plugins specifically designed to optimize the sound quality and loudness of the final mix. The mastering process in Cubase 12 involves several essential steps, each playing a crucial role in achieving a professional and cohesive master.
Step 1: Preparing the Mix Before diving into the mastering process, it’s essential to ensure that the mix is as close to the desired final sound as possible. This involves addressing any mixing issues, such as frequency imbalances, dynamic inconsistencies, and panning decisions. It’s crucial to use high-quality monitoring equipment and to listen critically to the mix in different environments to identify any potential problems.
Step 2: Exporting the Mix Once the mix is ready, export it as a high-resolution audio file (e.g., WAV or AIFF) from the Cubase project. It’s essential to use the appropriate bit-depth and sample rate to preserve audio quality throughout the mastering process.
Step 3: Importing the Mix into a New Project Create a new Cubase project dedicated solely to the mastering process. Import the exported mix into this project, which will serve as the starting point for mastering adjustments.
Step 4: Setting Up the Mastering Chain In Cubase 12, the mastering chain consists of a series of plugins and tools applied to the stereo master bus. The order of these plugins can vary depending on the desired outcome, but a common starting point is to place a Spectrum Analyzer first to visualize the frequency spectrum. Following the analyzer, one might typically include plugins such as EQ, Multiband Compressor, Stereo Enhancer, Exciter, and the Maximiser. The exact combination and settings will depend on the characteristics of the mix and the goals of the mastering engineer.
Step 5: Equalization (EQ) Use the EQ plugin to fine-tune the frequency balance of the mix. Address any frequency imbalances or resonances that may affect the overall clarity and tonal quality of the audio.
Step 6: Multiband Compression The Multiband Compressor allows for targeted dynamic control across different frequency bands. Use this plugin to tame harsh frequencies or to add cohesion to the mix.
Step 7: Stereo Enhancer and Exciter These plugins help to widen the stereo image, enhance the spatial aspects of the mix, and add harmonic excitement to specific frequency ranges.
Step 8: Loudness Maximization Apply the Maximiser plugin to achieve the desired level of loudness without causing distortion. Be cautious not to over-compress the audio, as this can result in a fatiguing listening experience.
Step 9: Dithering and Exporting If necessary, apply dithering to the final mix to reduce quantization noise during the export process. Once satisfied with the master, export it to a suitable format for distribution, such as WAV, FLAC, or MP3.
Step 10: Quality Control Before finalizing the master, conduct a thorough quality control check. Listen to the mastered audio on different playback systems and compare it to reference tracks to ensure that it meets industry standards and your creative vision.
By following these steps and using Cubase 12’s powerful mastering tools, you can achieve a polished and professional master that elevates the overall sound quality and prepares your music for its intended audience.
Advanced Mastering Techniques with Cubase 12 Plugins
Cubase 12 provides a wide range of powerful plugins that enable advanced mastering techniques to achieve professional-level audio quality. While the basic mastering process involves essential steps like EQ, compression, and limiting, advanced techniques take the process to the next level, allowing for greater control, precision, and creativity in shaping the final mix. Let’s explore some advanced mastering techniques using Cubase 12 plugins:
- Mid-Side Processing: Cubase 12 offers Mid-Side (M/S) processing capabilities, which allow you to separately manipulate the center (mid) and side information of a stereo mix. This technique is useful for adjusting the stereo width, enhancing spatial elements, and controlling the balance between the center and side signals. Using Cubase’s M/S plugins, such as the M/S Equalizer and M/S Compressor, you can apply different EQ or compression settings to the center and side channels, resulting in a more detailed and three-dimensional sound.
- Parallel Processing: Parallel processing involves blending the processed signal with the unprocessed one, adding character and enhancing specific aspects of the mix without affecting the overall balance. Cubase 12’s MixConsole allows you to set up parallel processing chains on individual channels or the stereo master bus. This technique is particularly useful for adding saturation, harmonics, or dynamics to specific frequency ranges without altering the original mix’s tonal balance.
- Multi-Band Saturation: Cubase 12’s saturation plugins, such as the Quadrafuzz 2, offer multi-band saturation capabilities. This allows you to apply different saturation settings to specific frequency bands, adding warmth and harmonic richness to individual elements of the mix. Multi-band saturation is effective for bringing out the character of instruments like vocals, drums, and bass while preserving the clarity of other elements in the mix.
- Dynamic EQ: Dynamic EQ combines the functionality of an equalizer and a compressor, allowing for frequency-specific compression. In Cubase 12, you can use the Dynamic EQ plugin to tame resonances, control harsh frequencies, and shape the mix’s dynamic response without affecting the entire frequency spectrum. This technique provides more transparent and precise control over the mix’s tonal balance, especially during busy and complex sections.
- Upward Expansion: While traditional downward expansion reduces the volume of quiet signals, upward expansion boosts low-level signals, adding natural sustain and enhancing the mix’s overall energy. Cubase 12’s Expander plugin can be configured for upward expansion, making it a useful tool for breathing life into drums, vocals, or any element that needs a touch of sustain and presence.
- Stereo Width Control: Cubase 12 offers various tools for manipulating stereo width, including the Stereo Enhancer and the VST3 Imager. Advanced mastering techniques may involve automating stereo width adjustments during specific sections of the mix to create dynamic and immersive spatial effects.
- Group and Layer Processing: Instead of processing individual channels separately, you can group similar instruments and apply processing to the entire group. This approach ensures a cohesive and consistent sound for related elements, such as backing vocals, percussion, or background instruments. Additionally, using layer processing allows you to fine-tune the mastering chain for specific sections of the song, such as the chorus or bridge, optimizing the mix’s impact and flow.
Conclusion
Cubase 12 mastering plugins, the Maximiser and Limiter, empowers music producers and mastering engineers to achieve optimal loudness levels and audio clarity in their final mixes. The Maximiser plugin serves as a powerful tool for maximizing the loudness of the audio without causing distortion, thanks to its look-ahead processing and precise threshold and ceiling controls. By employing the Maximiser in moderation and setting the parameters wisely, users can elevate the perceived loudness of their mixes while preserving the dynamic range and overall audio quality.
Similarly, the Limiter plugin plays a vital role in the mastering process by controlling peak levels and preventing clipping. With its threshold and ceiling settings, users can apply peak limiting to ensure a controlled and polished sound without compromising the mix’s dynamics. By using the Limiter with care and understanding the impact of its release time, mastering engineers can achieve a transparent and natural sound in the final mix.
When working with the Maximiser and Limiter plugins in Cubase 12, it is essential to consider the broader mastering chain, which may include other plugins like EQ, multiband compressors, and stereo enhancers. Balancing the use of these plugins and fine-tuning their settings in conjunction with the Maximiser and Limiter allows for a well-rounded and professional mastering approach.
While Cubase 12 provides powerful tools for mastering, it is essential to approach the process with a critical ear and artistic vision. Mastering is an art form that requires experience, skill, and an understanding of the unique characteristics of each mix. By experimenting with the various features and techniques offered by the Maximiser and Limiter plugins, mastering engineers can unlock the full potential of Cubase 12 and deliver polished, competitive, and captivating final mixes that stand out in today’s diverse music landscape.