- Mixer and Effects Slots: FL Studio’s Mixer is where you can process individual audio tracks and add various effects. Each mixer track has a set of effect slots where you can insert different effects plugins. By stacking effects in these slots, you can create complex and unique audio chains to modify the sound of your instruments and recordings.
- EQ (Equalization): Equalization is an essential tool for balancing the frequency content of your audio. In FL Studio, you’ll find Parametric EQ 2, which allows you to adjust specific frequency bands, boost or cut frequencies, and shape the tonal balance of your sounds. Proper EQing can help clean up muddiness, add brightness, or emphasize specific elements in your mix.
- Compression: Compression helps control the dynamic range of audio, making the loud parts quieter and boosting softer parts. Fruity Compressor is the built-in compressor in FL Studio 20, and it’s great for tightening up your mix, adding punch to drums, and smoothing out vocal performances.
- Reverb: Reverb simulates the acoustic environment of a physical space, adding a sense of depth and immersion to your sounds. FL Studio includes Fruity Reverb 2, which offers various parameters to control the reverb’s size, decay, and damping. You can use reverb to place instruments in different spaces, such as rooms, halls, or arenas.
- Delay: Delay is an effect that creates echoes of the original sound, adding a sense of space and rhythm. The native Delay Bank in FL Studio provides multiple delay lines, allowing you to achieve various delay patterns and textures.
- Chorus and Flanger: Chorus and Flanger are modulation effects that add movement and width to your audio. The built-in Chorus and Flanger plugins in FL Studio can give your instruments a rich, swirling sound and are often used on guitars, synths, and vocals.
- Distortion and Saturation: If you’re looking to add grit, warmth, or overdrive to your sounds, FL Studio offers various distortion and saturation plugins, like Fruity Fast Dist, Fruity Squeeze, and others. These effects are commonly used in electronic music, rock, and various other genres.
- Stereo Enhancer: Stereo Enhancer helps widen the stereo image of your audio, making it sound more expansive. FL Studio’s Stereo Enhancer can be useful for giving your tracks a sense of space and making them sound larger-than-life.
These are just some of the many effects available in FL Studio 21. Experimenting with these tools will allow you to craft unique and professional-sounding tracks. Remember that the key to using effects effectively is moderation and understanding how they interact with each other. As you gain experience, you’ll develop your own set of go-to effects and techniques to achieve the perfect sound for your productions.
Adding Effects to Mixer Channels
In FL Studio 20, the Mixer is where you can process individual tracks and add a wide range of effects to shape and enhance your audio. Here’s a step-by-step guide on how to add effects to mixer channels in FL Studio 20:
- Open the Mixer: First, make sure the Mixer is visible in your FL Studio interface. If it’s not already open, go to the main toolbar and click on “View,” then select “Mixer” from the drop-down menu. Alternatively, you can press the F9 key on your keyboard to toggle the Mixer’s visibility.
- Identify the Mixer Channels: The Mixer consists of several channels, each representing a different audio track in your project. By default, your first channel is the Master channel, which processes the final output of your mix. Below that, you’ll find individual mixer channels for each instrument or sound in your project.
- Select a Mixer Channel: Click on the mixer channel that corresponds to the track you want to apply effects to. Once selected, the channel will be highlighted, and you can see its associated settings on the right side of the Mixer.
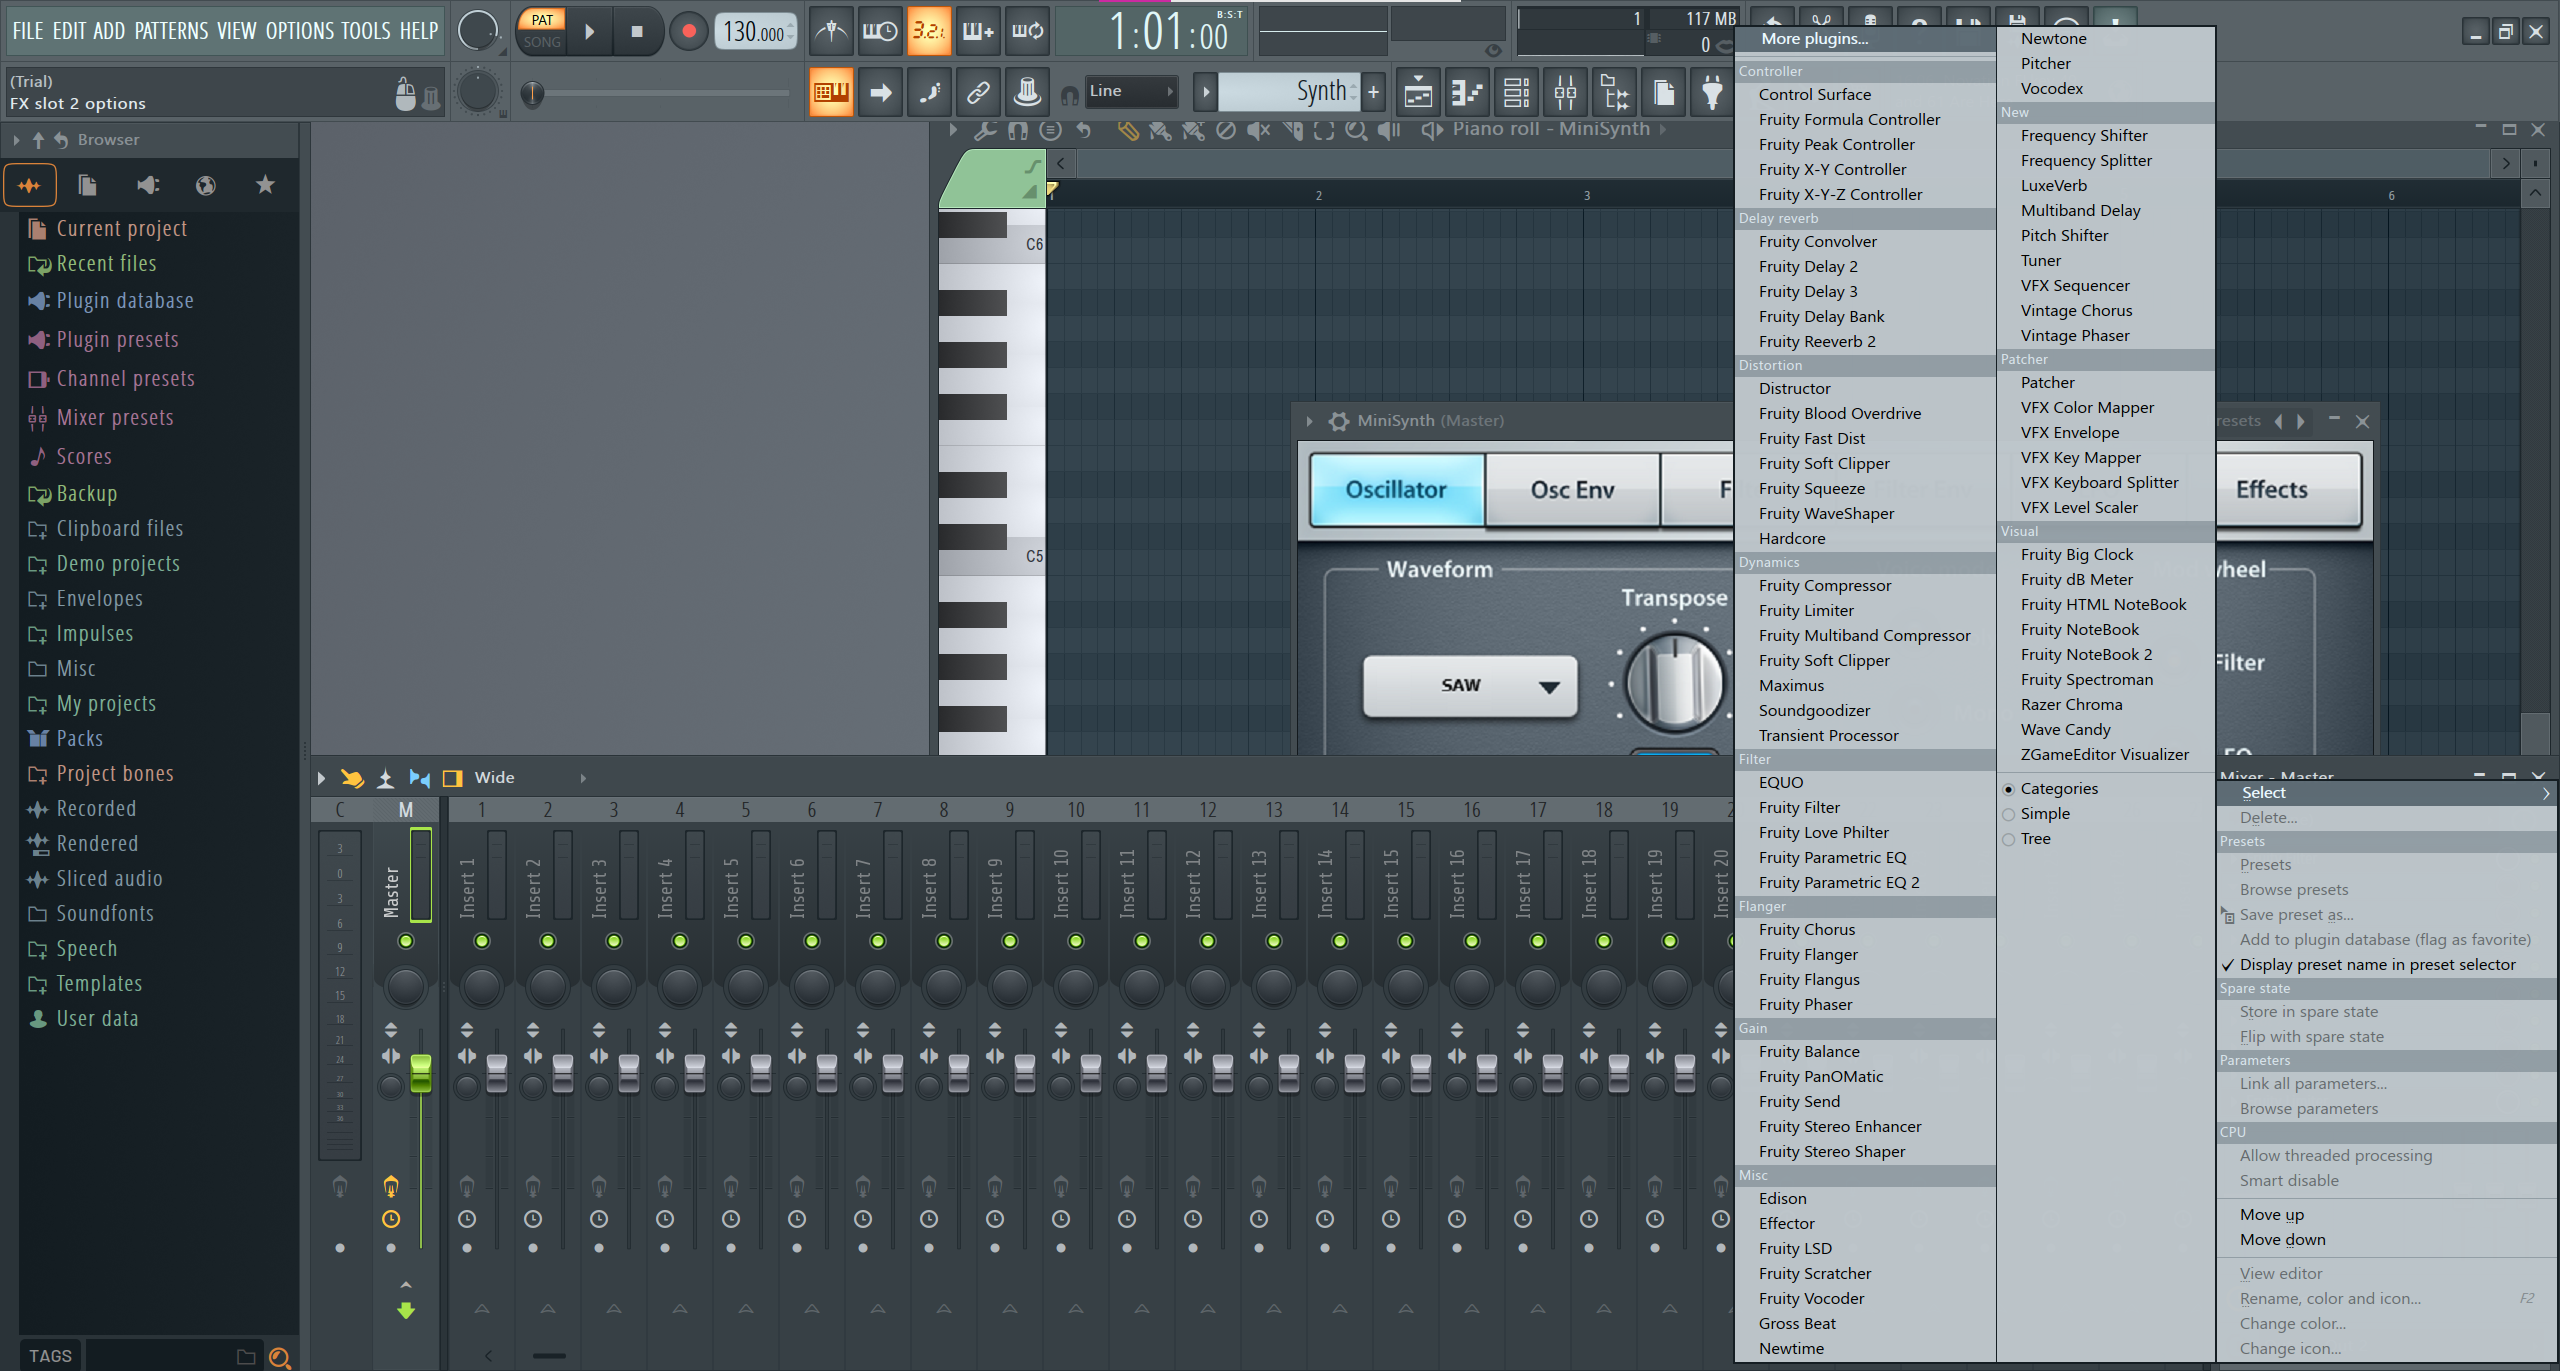
- Add Effects to the Channel: In the selected channel’s settings, you’ll see a section labeled “FX.” This is where you can add effects plugins to the channel. To add an effect, click on an empty slot (labeled “none” by default), and a menu will appear with a list of available effects in your FL Studio installation.
- Choose an Effect: Scroll through the list and choose the effect you want to add. For example, you might select “Fruity Reverb 2” to add reverb to your track, or “Fruity Parametric EQ 2” to apply equalization. There are many effects to choose from, so feel free to experiment and see what works best for your sound.
- Adjust the Effect Parameters: After adding the effect, a new window will appear showing the effect’s interface. Here, you can adjust its parameters to fine-tune the effect to your liking. Each effect will have its own unique set of controls, allowing you to shape the sound precisely.
- Additional Effects and Effect Chains: You can add multiple effects to a single mixer channel by selecting different effect slots and repeating the process. This way, you can create effect chains, where the audio signal passes through several effects in sequence. Effect chains allow for complex and creative sound shaping.
- Changing Effect Order: To change the order of effects within a channel, simply drag and drop the effect slots to rearrange them. The order of effects can significantly impact the final sound, so experimenting with the arrangement can yield interesting results.
- Bypass and Solo: On each effect slot, you’ll find a small power button (Bypass) and a headphone icon (Solo). Bypassing an effect temporarily disables it, allowing you to compare the sound with and without the effect easily. Soloing an effect isolates its sound, helping you focus on its impact.
- Saving Presets: If you find a particular effect configuration that you like, you can save it as a preset. Click on the small disk icon on the effect interface to save the settings. Later, you can load the preset on other mixer channels or projects.
Adding effects to mixer channels in FL Studio 20 is a creative process that can significantly elevate your music productions. Experiment with different effects, combinations, and settings to discover unique sounds that suit your style and vision. The Mixer in FL Studio offers a flexible and powerful platform to craft professional-quality audio with the help of various effects.
Common Effects and Their Usage
FL Studio 21 offers a wide range of effects that can enhance and shape your audio in various ways. Here are some common effects and their typical usages in FL Studio 21:
- EQ (Equalization): Usage: EQ is used to balance the frequency content of your audio. You can cut or boost specific frequency bands to adjust the tonal balance of instruments and vocals. For example, you might use EQ to remove low-end rumble, add brightness to a vocal, or emphasize the presence of a guitar.
- Compression: Usage: Compression is used to control the dynamic range of your audio, making loud parts quieter and boosting softer parts. This evens out the volume and adds sustain to sounds. Common uses include tightening up drums, controlling vocal dynamics, and bringing out the attack of instruments like guitars.
- Reverb: Usage: Reverb simulates the acoustic environment of a physical space, adding a sense of depth and immersion to your sounds. It is commonly used to place instruments in different spaces, such as rooms, halls, or arenas. Reverb can make vocals sound like they were recorded in a large space or give synths a sense of spatiality.
- Delay: Usage: Delay creates echoes of the original sound, adding a sense of space and rhythm. It is used to create depth in mixes and add movement to certain elements. Delay can be applied subtly to create a sense of ambiance or used in a more pronounced manner for rhythmic effects.
- Chorus: Usage: Chorus adds thickness and movement to your audio by slightly detuning and delaying the sound. It is commonly used on instruments like guitars, synths, and vocals to create a rich, wide, and shimmering effect.
- Flanger: Usage: Flanger is a modulation effect that produces a sweeping, jet-like sound. It’s often used to create a whooshing, swirling effect on guitars, synths, and vocals. Flanger can add a sense of motion and excitement to your tracks.
- Distortion and Saturation: Usage: Distortion and saturation add grit, warmth, and overdrive to your sounds. They are widely used in various genres, such as rock, electronic, and hip-hop, to add character and intensity to instruments and vocals.
- Stereo Enhancer: Usage: Stereo Enhancer widens the stereo image of your audio, making it sound more expansive. It is used to give your tracks a sense of space and make them sound larger-than-life. However, use it carefully to avoid phase issues and maintain mono compatibility.
- Gating: Usage: Gating is used to control the volume of audio signals. It is particularly handy for removing unwanted noise or creating rhythmic effects. For example, you can use a gate to make a pad sound pulsate rhythmically or eliminate background noise from a recording.
- Vocoder: Usage: The Vocoder effect in FL Studio uses one audio signal (usually vocals) to modulate another (usually a synthesizer). It’s popular in electronic and pop music to create robot-like vocals or unique vocal textures.
Remember that the key to using effects effectively is moderation and understanding how they interact with each other. It’s essential to listen critically and experiment to find the right combination of effects to achieve the desired sound for your music. FL Studio 21’s powerful effects lineup gives you a vast playground for sonic exploration and creativity.
Using Automation with Effects
Automation is a powerful feature in FL Studio 21 that allows you to control and manipulate various parameters of effects over time. It enables you to add dynamic changes to your music, such as adjusting the intensity of an effect, creating build-ups, fades, and other expressive changes. By automating effects, you can bring life and movement to your tracks. Here’s how you can use automation with effects in FL Studio 21:
- Assigning an Effect to Automation: First, you need to assign an effect parameter to automation. To do this, right-click on the knob or control you want to automate within the effect plugin’s interface. In the context menu that appears, select “Create automation clip.” This action will generate an automation clip in the Playlist window, which represents the chosen parameter.
- Opening the Automation Clip: To view and edit the automation, go to the Playlist window and locate the automation clip you just created. You can access it by clicking on the small triangle at the top left of the Playlist and selecting the “Current project” option. You’ll find your automation clip listed there.
- Drawing Automation Curves: By default, the automation clip will be a straight line, representing the static value of the effect parameter. To create dynamic changes, you can draw curves by left-clicking and dragging on the automation clip. This will create control points that define the parameter’s value at specific points in time. By adding and manipulating these control points, you can create intricate automation patterns.
- Adjusting Automation Curves: To refine the automation curve, you can adjust the position of control points, change their value, or adjust their shape by dragging the Bezier handles. Right-clicking on a control point allows you to access additional options like copying, pasting, or removing points.
- Creating Automation Clips for Multiple Parameters: You can automate multiple parameters of an effect by repeating the process of right-clicking and creating automation clips for each parameter you want to control. This way, you can create complex and evolving changes in your sound by automating multiple effects simultaneously.
- Recording Real-Time Automation: Alternatively, you can record automation in real-time using FL Studio’s automation recording feature. To enable this, click on the record button at the top of the Playlist window (or press the “R” key). Then, move the effect parameters you wish to automate while your project is playing. FL Studio will record your movements, creating automation clips accordingly.
- Automating Effect Chains: You can also automate the on/off state of effect plugins or entire effect chains. This allows you to activate or deactivate specific effects at different points in your track, giving you greater control over the overall sound.
- Using Automation Clips in the Piano Roll: Another way to create automation is by using the Piano Roll. Open the Piano Roll for the channel that hosts the effect you want to automate. Click on the “Show Articulations” button (looks like a small square with a wave), and you can draw automation directly in the Piano Roll for the effect’s parameters.
Automation with effects in FL Studio 21 is a creative tool that empowers you to add movement, expression, and excitement to your music. By experimenting with different automation patterns and parameter changes, you can take your tracks to new heights and create captivating, dynamic productions.
Transitions in Music Production
Transitions are essential elements in music production that help create smooth and engaging progressions between different sections of a track. They serve as bridges between verses, choruses, breakdowns, and other parts of the song, guiding the listener through the musical journey. In FL Studio 21, you have a variety of tools and techniques to craft seamless transitions that enhance the flow and impact of your music. Here’s how you can use FL Studio to create effective transitions:
- Automation: One of the most common methods to build transitions is by using automation. As mentioned earlier, you can automate various effect parameters to create gradual changes in your sounds. For example, increasing the reverb and delay intensity or using a low-pass filter to slowly fade out a section can smoothly lead into the next part of the track.
- Volume and Panning: Adjusting the volume and panning of different elements during transitions can be quite effective. Gradually lowering the volume of certain instruments while introducing others can create a sense of anticipation and prepare the listener for the upcoming section. Panning effects can be used to move sounds from one side of the stereo field to the other, adding motion and interest.
- Risers and Sweeps: Risers and sweeps are audio samples or synthesized sounds that continuously increase in pitch, volume, or both. These elements are often used to build tension and anticipation, making them ideal for transitioning from one part of the track to another. FL Studio provides various ways to create risers and sweeps, including using automation, effects, or dedicated plugins.
- Drum Fills and Rolls: Introducing drum fills and rolls can add energy and excitement to transitions. For example, a snare roll leading up to a drop or chorus can build anticipation and impact. FL Studio’s piano roll and step sequencer make it easy to program intricate drum patterns for these purposes.
- Effect Chains and Mix Automation: Using effect chains in the Mixer allows you to apply a combination of effects to a specific part of the track. You can automate the on/off state of the effect chain or individual effects to trigger different sounds during transitions. This technique is particularly useful for genres like EDM, where impactful drops and build-ups are common.
- Reverse and Stutter Effects: Applying reverse effects to certain elements, such as vocal snippets or synth lines, can create a sense of tension before a transition. Stutter effects, achieved through chopping and repeating small segments of audio, can add rhythmic excitement and make a smooth connection between sections.
- Pitch and Time Shifts: Altering the pitch or time of a sound can be used creatively for transitions. For example, pitching up a vocal or instrument before a chorus can create a sense of lift and excitement. FL Studio’s Time Stretching and Pitch Shifting tools make these adjustments easy to implement.
- Layering and Crossfading: Layering different sounds and crossfading between them during transitions can create a sense of evolution and continuity. For example, you can crossfade between two different melodies or chord progressions to smoothly transition from one to the other.
- Arrangement: Crafting your arrangement with careful consideration for how different sections flow into each other is crucial. The order and structure of your song play a significant role in creating effective transitions. Experiment with different arrangements to find the most seamless progression.
In FL Studio 21, you have a vast array of tools and features at your disposal to create powerful and captivating transitions in your music production. By employing automation, effect manipulation, creative audio techniques, and thoughtful arrangement, you can elevate your tracks and keep your listeners engaged from start to finish.
Utilizing Effects for Transitions
FL Studio 21 offers a wide range of effects that can be harnessed creatively to craft seamless and captivating transitions between different sections of your music. These effects can add excitement, build anticipation, and guide the listener through the musical journey. Here are some effective ways to utilize effects for transitions in FL Studio 21:
- Risers and Sweeps: Risers and sweeps are commonly used effects to build tension and anticipation during transitions. FL Studio provides various tools to create these effects, including automation, volume envelopes, and dedicated riser and sweep samples. You can automate the pitch, volume, and effects parameters to gradually increase intensity as you approach the transition point.
- Reverb and Delay: Reverb and delay are powerful tools to add space and atmosphere to your transitions. Increasing the reverb and delay intensity during transitions can give the impression of the sound expanding or moving away, creating a sense of depth as you transition to the next section.
- Filter Sweeps: Using a low-pass or high-pass filter sweep can be an effective way to create smooth transitions. Automating the cutoff frequency of a filter can gradually remove or reintroduce certain frequencies, making the sound gradually fade in or out, leading to the next section.
- Stutter and Glitch Effects: Stutter and glitch effects can add a dynamic and unexpected twist to your transitions. FL Studio offers various plugins and techniques to create stutter effects, where audio is rapidly chopped and repeated. These effects work well for building energy and making smooth connections between sections.
- Pitch and Time Manipulation: Altering the pitch and time of certain sounds during transitions can create interesting and unique effects. For instance, you can pitch up or down a vocal sample, synth line, or drum pattern to create a sense of excitement and build-up.
- Reverse Effects: Using reverse effects can add intrigue and lead into a transition smoothly. By reversing a sound and gradually fading it back in, you can create a sense of suspense, which can be followed by a powerful impact as the new section begins.
- Automation of Mix Parameters: Automating mix parameters like panning, stereo width, and volume can provide movement and space during transitions. For example, automating the panning of certain elements from left to right can create a sense of motion and lead the listener’s attention to the next section.
- Flanger and Phaser Effects: Flanger and phaser effects can add a swirling, phase-shifting texture to your sounds. Automating the depth and speed of these effects during transitions can give your music an otherworldly quality and smoothly transition from one part to another.
- Effect Chains: Effect chains in FL Studio allow you to apply multiple effects simultaneously. Creating custom effect chains for specific transition points can help you achieve unique and signature sound transitions in your music.
- Layering and Crossfading: Layering different sounds and crossfading between them during transitions can create a sense of evolution and continuity. This technique is particularly effective when transitioning from a calm section to a more energetic one.
Remember that transitions are opportunities for creativity and experimentation. Using effects in innovative ways can elevate your music and keep your listeners engaged throughout the entire track. FL Studio 21 provides a plethora of effects and automation tools to unleash your creativity and achieve seamless and captivating transitions in your music production.
Creative Transition Ideas
Transitions are an exciting aspect of music production where you can let your creativity shine. They help keep the listener engaged, build anticipation, and add excitement to your tracks. In FL Studio 21, you have a wide range of tools and features to experiment with. Here are some creative transition ideas to elevate your music:
- Reverse Reverb: Apply a reverb effect to a short section of audio, then reverse the reverb tail. As the transition approaches, gradually increase the volume of the reversed reverb, creating a unique and mysterious effect that leads into the next part of the track.
- Granular Glitching: Use a granular synthesis plugin to chop up and manipulate a sound into tiny grains. Automate parameters like grain size, position, and density to create glitchy, textural transitions that add complexity and interest to your music.
- Tape Stop Effect: Create a “tape stop” effect by automating the pitch or time-stretching of a sound to make it slow down rapidly. This effect is particularly effective before a drop or chorus, adding impact and intensity to the transition.
- Vocal Risers: Record or use vocal samples to create vocal risers. Increase the pitch, volume, and possibly add reverb to make the vocals soar and lead into the next section of the song.
- Beat Repeat Stutter: Use a beat repeat or glitch plugin to create rhythmic stutters and chops on drums or other instruments. Automate the effect parameters to vary the intensity and pattern, adding energy and excitement to your transitions.
- Morphing Pads or Synths: Experiment with morphing pads or synth sounds. Automate parameters such as filter cutoff, resonance, and wavetable position to gradually transform the sound from one texture to another, creating an evolving transition.
- Filter Sweeps and LFOs: Combine filter sweeps and LFOs (low-frequency oscillators) to create dynamic and evolving transitions. Use these effects to shape the sound of instruments, creating motion and interest as you move between sections.
- Frequency Modulation (FM) Effects: Apply frequency modulation to specific elements during transitions. This technique can add a metallic or robotic texture that complements the overall transition, particularly in electronic and experimental genres.
- Pitch Bending with Automation: Automate pitch bends on instruments, vocals, or even entire tracks. These pitch bends can be subtle or extreme, depending on the mood you want to convey, and can be an effective way to lead into new sections of the song.
- Reverse Drum Fills: Create drum fills, such as snare rolls, and reverse them. As the transition approaches, play the reversed drum fill, then suddenly stop it, leaving space for the impact of the new section.
- Layered White Noise Bursts: Layer white noise bursts and automate their volume and panning to create impactful, atmospheric transitions. White noise bursts can add intensity and fill the frequency spectrum, making the next section of the track sound more massive and energetic.
- Spatial Effects: Experiment with panning, stereo width, and surround sound effects to create spatial transitions. Moving sounds from one side to another or creating an immersive surround effect can give your transitions a sense of movement and depth.
Remember, the key to creative transitions is experimentation. FL Studio 21’s vast array of effects, automation tools, and plugins offer endless possibilities to add your unique touch to transitions in your music production. Don’t be afraid to push boundaries, try new techniques, and let your creativity run wild.
Conclusion
Incorporating Effects and Transitions in FL Studio 21 is an essential aspect of music production that allows producers to elevate their tracks to new heights of creativity and excitement. The vast array of effects available in FL Studio 21 provides a rich palette of sonic possibilities, enabling musicians to shape their sounds with precision and artistry.
By utilizing effects such as EQ, compression, reverb, delay, chorus, and distortion, producers can add depth, character, and emotion to their music. The automation feature in FL Studio 21 empowers artists to dynamically control these effects over time, creating smooth transitions between different sections of their tracks. Automation adds movement, energy, and anticipation, guiding the listener through a captivating musical journey.
Creative transition ideas in FL Studio 21 open up endless opportunities for experimentation. Techniques like reverse reverb, granular glitching, vocal risers, tape stop effects, and frequency modulation offer innovative ways to add interest and impact during transitions. Layering, crossfading, and spatial effects contribute to a sense of evolution and continuity, ensuring a seamless flow from one part of the song to another.
Incorporating effects and transitions in FL Studio 21 requires a balance of technical proficiency and artistic vision. Understanding the characteristics of different effects and how they interact with each other is crucial in achieving the desired sound. Equally important is the ability to let creativity flourish, pushing boundaries and exploring uncharted territories.
FL Studio 21 serves as an exceptional platform for musicians to craft professional-quality music with depth, emotion, and engaging transitions. By mastering the art of effects processing and transition techniques, producers can create tracks that captivate listeners, leaving a lasting impression and taking their music to new heights of expression and artistry.