Akai MPK Mini MKII
$77.99
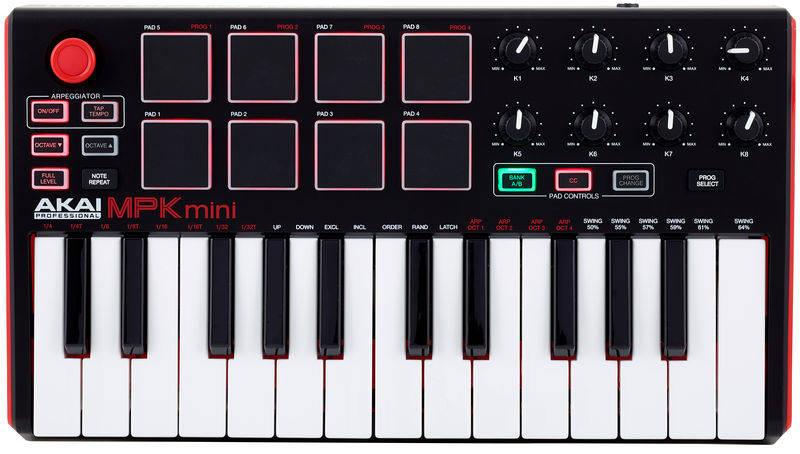
The Akai MPK Mini MKII midi keyboard is the perfect tool for creators, producers and musicians of all kinds, providing unbeatable performance and intuitive musical control in a compact, portable package.
Compare
Description
Akai MPK Mini MKII MIDI device is a compact and versatile controller geared towards music production. With 25 velocity-sensitive keys, eight back-lit MPC-style pads, eight assignable Q-Link knobs, and a built-in arpeggiator, the MPK Mini MKII is a great choice for beginners as well as experienced producers.
One of the standout features of the MPK Mini MKII is its portability. Measuring just 12.5 x 7.13 x 1.75 and weighing less than 1lb, this device can easily fit into a backpack or laptop bag, making it perfect for on-the-go music production. The device also comes with an iOS camera connection kit, which allows it to be used with various iOS devices.
The keys of the MPK Mini MKII are velocity-sensitive, meaning that the dynamics of your playing will be captured in your recordings, adding a level of expressiveness to your tracks. The eight back-lit pads are also velocity-sensitive and provide an intuitive way to trigger samples, drums, or even control your virtual instruments.
The device also comes with eight assignable Q-Link knobs, which can be used to control a variety of parameters in your DAW or virtual instruments. This allows for greater control over your productions and can significantly speed up your workflow.
Additionally, the built-in arpeggiator provides an easy way to create complex arpeggiated patterns with a simple press of a button. This feature can help to add energy and movement to your tracks and is a great tool for those looking to add a little bit of flair to their productions.
Overall, the Akai MPK Mini MKII MIDI device is an excellent choice for anyone looking for a portable and versatile MIDI controller for music production. Its compact size, velocity-sensitive keys, back-lit pads, assignable knobs, and arpeggiator make it a powerful tool for musicians and producers alike.
Akai MPK Mini MKII properties
| Product name |
MPK Mini MKII |
| Brand |
Akai |
| Type |
Keyboard Instruments |
| Keyboard Instrument |
MIDI Keyboard |
| Keys |
Yes |
| Number of Keys |
25 pcs |
| Key Functions |
Aftertouch |
| Pads |
Yes |
| Rotary Controls |
Yes |
| Connections |
6.3mm (1/4″RTS) In, MIDI, MIDI In |
| Colour |
Black, White |
| Power Supply |
USB |
Frequently Asked Questions:
What are the basic steps to connect and set up my Akai MPK Mini MKII as a MIDI controller with my computer for the first time?
To connect and set up your Akai MPK Mini MKII as a MIDI controller with your computer for the first time, follow these basic steps:
1. Connect the USB cable: Use the included USB cable to connect the Akai MPK Mini MKII to one of your computer's available USB ports. Your computer should automatically recognize the device and install the necessary drivers if they are not already present.
2. Power on the unit: Once connected, power on your Akai MPK Mini MKII by pressing the power button located on the top left corner of the device. The display screen should light up indicating that the controller is ready for use.
3. Launch your preferred DAW or software: Open the digital audio workstation (DAW) or music production software that you plan to use with your MPK Mini MKII. Examples include Ableton Live, Logic Pro X, FL Studio, GarageBand, and more.
4. Set up MIDI preferences in your DAW: Within your chosen software, navigate to the settings or preferences menu where you can configure the MIDI inputs and outputs. Assign the Akai MPK Mini MKII as both an input and output device for MIDI data. This will allow you to send and receive MIDI information between your controller and computer.
5. Map controls: Depending on the DAW or software being used, there may be additional steps required to map specific controls within the software to their corresponding hardware counterparts on the MPK Mini MKII. Refer to the user manual for detailed instructions on how to do this in your chosen software.
6. Test your setup: Play notes on the keyboard of the Akai MPK Mini MKII and use the pads, knobs, and faders to control various parameters within your DAW or music production software. Ensure that all inputs are being recognized correctly and adjust any settings as needed until everything functions properly.
By following these basic steps, you should have successfully connected and set up your Akai MPK Mini MKII as a MIDI controller with your computer for the first time.
How can I map the AKAI MPK Mini MKII's knobs and pads to control different parameters within my DAW software?
To map the AKAI MPK Mini MKII's knobs and pad to control different parameters within your DAW software, follow these steps:
1. Launch your DAW software and open a new session or project.
2. Connect your AKAI MPK Mini MKII to your computer using the USB cable provided with it.
3. Make sure that your DAW software recognizes the device by checking the MIDI inputs and outputs. In Ableton Live, for example, go to "File > Preferences > Link/MIDI" and ensure that the MPK Mini MKII is selected under MIDI ports.
4. To assign a knob or pad to control a specific parameter in your DAW software, follow these steps:
- Select the device or instrument you want to control with the knobs or pads of your MPK Mini MKII.
- Open the device/instrument parameters by right-clicking on it and selecting "Show Device."
- In the device/instrument, find the parameter you want to control (e.g., volume, pan, filter cutoff) and click on its name to select it.
- With the selected parameter highlighted, go to your MPK Mini MKII and turn the knob or press the pad you want to assign to that parameter. You should see a pop-up window appearing with the message "MIDI Learn."
- In the pop-up window, click on "Select All" to assign the entire range of the knob/pad to the selected parameter, or drag the cursor to set a specific range if needed.
- Close the MIDI Learn pop-up window by clicking anywhere outside of it. Your AKAI MPK Mini MKII's knob/pad is now assigned to control the selected parameter in your DAW software.
5. Repeat steps 4-5 for each knob and pad you want to assign, and experiment with different parameters to find the ones that suit your needs best.
6. Once you have assigned all the knobs and pads, save your project or session to keep your settings intact.
What is the function of the assignable knobs on the Akai MPK Mini MKII when connected via USB to a computer running a DAW with MIDI learn capability?
The assignable knobs on the Akai MPK Mini MKII serve as programmable controllers when the keyboard is connected via USB to a computer running a digital audio workstation (DAW) with MIDI learn capability. This allows you to map the functions of various parameters in your DAW, such as volume, panning, or effects, to the physical knobs for more hands-on control and real-time manipulation during your productions.
How does the Akai MPK Mini MKII's assignable MIDI buttons and knobs enhance the overall functionality of a MIDI keyboard in music production?
The Akai MPK Mini MKII's assignable MIDI buttons and knobs greatly enhance the overall functionality of a MIDI keyboard in music production. These features allow for more hands-on control over various parameters within digital audio workstations (DAWs) and virtual instruments, providing greater flexibility and precision during the recording, editing, and mixing process. With 12 assignable Q-Link knobs and eight backlit velocity-sensitive MIDI keys, as well as an array of dedicated transport and function buttons, this compact controller offers a wide range of customization options that can significantly improve efficiency and creativity in music production. Whether used for automation, sound design, or live performance, the MPK Mini MKII's assignable MIDI buttons and knobs make it a powerful and versatile tool for any musician looking to take their productions to the next level.
Before you buy Akai MPK Mini MKII
 Acorn Masterkey 61


Lead –
Great equipment. Like the first keys, it works perfectly. A multitude of options and an unconventional appearance guarantee satisfaction. I definitely recommend it.
very nice device, we use Garage Band and the original software is quite difficult for amateurs.
However, I was tempted by Akai MPK! Very good quality equipment and refined details of the device.