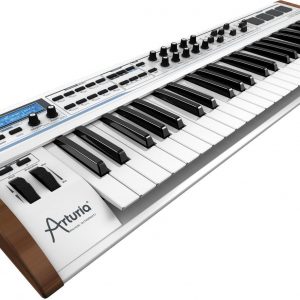
Arturia MiniLab 3
$72.99
Experience limitless creativity with Arturia MiniLab 3 MIDI, the compact and versatile device that unlocks endless possibilities for music production and performance.
Compare
Description
Arturia MiniLab 3 is an advanced MIDI controller device that provides users with a powerful tool for music production. It is a compact, lightweight device that has 25 velocity-sensitive keys, 16 RGB backlit performance pads, 8 touch-sensitive encoders, and touchstrip controls. The MiniLab 3 makes it easy to create music in any environment, whether in a studio or on the go.
The MiniLab 3 is compatible with all major DAWs, including Ableton Live, Logic Pro, and Pro Tools, as well as a wide range of virtual instruments and plugins. The device comes with Analog Lab Lite, a powerful software platform that includes over 6000 sounds from Arturia’s award-winning V Collection.
One of the standout features of the MiniLab 3 is its dynamic and responsive keybed. The keys are velocity-sensitive, meaning they respond to how hard you strike them. Additionally, the device has aftertouch, which allows you to add expression to your playing by pressing down on the keys after the initial strike.
The 16 RGB backlit pads allow you to trigger clips and samples, and they can also be used as drum pads. The pads are incredibly responsive and offer a level of tactile control that sets the MiniLab 3 apart from other MIDI controllers in its class.
The 8 touch-sensitive encoders and touchstrip controls provide a high level of control over your music. The encoders can be mapped to control various parameters in your DAW or virtual instruments, while the touchstrip can be used to control pitch bend, modulation, and more.
Another advantage of the MiniLab 3 is its small size. Its compact and lightweight design makes it easy to take on the road and use in cramped spaces. It also features a flexible USB-powered design, meaning it does not require an external power source, making it one of the most portable MIDI controllers available.
In conclusion, the Arturia MiniLab 3 is an impressive MIDI controller device that provides users with an advanced tool for music production. It is versatile, responsive, and easy to use, making it an ideal choice for musicians and producers at any skill level. With its powerful software and impressive hardware, the MiniLab 3 is an excellent investment that will undoubtedly enhance your music-making experience.
Arturia MiniLab 3 properties
| Product name |
Arturia MiniLab 3 |
| Brand |
Arturia |
| Type |
MIDI Keyboards |
| Keys |
Yes |
| Number of Keys |
25 pcs |
| Drawbars/Sliders |
No |
| Pads |
Yes |
| Rotary Controls |
Yes |
| Modulation Wheel |
No |
| Pre-Programmed Rythms |
No |
| Pre-Programmed Songs |
No |
| Pre-Programmed Sounds |
No |
| Pre-Programmed Drumset |
No |
| Pre-Programmed Effects |
No |
| Built-In Tuner |
No |
| Connections |
MIDI, USB |
| Colour |
Black, White |
| Power Supply |
USB |
Frequently Asked Questions:
How does the Arturia MiniLab 3's 16-bit resolution and high-performance encoder knobs enhance its performance as a MIDI controller compared to previous models?
The Arturia MiniLab 3's 16-bit resolution and high-performance encoder knobs significantly enhance its performance as a MIDI controller compared to previous models. With its increased bit depth, the MiniLab 3 provides greater accuracy in transmitting and receiving MIDI data, which results in more precise control over software synthesizers, samplers, and plugins. The high-performance encoder knobs provide smooth and responsive motion, allowing for quick and easy parameter adjustments during live performances or studio sessions. Additionally, the MiniLab 3's improved resolution provides a smoother and more nuanced touch response when playing keys and pads, making it ideal for expressive and dynamic performances. Overall, these enhancements make the Arturia MiniLab 3 a powerful and versatile MIDI controller that is capable of delivering exceptional performance in both live and studio environments.
How do I program and customize the touch-sensitive performance pads on the Arturia MiniLab 3 for optimal use in a music production environment?
Connect your MiniLab 3 to your computer using the included USB cable. Launch your preferred Digital Audio Workstation (DAW) such as Ableton Live, FL Studio, or Logic Pro X. Open the MIDI settings in your DAW and select the MiniLab 3 as your primary input device. In the MiniLab 3 software editor, open the "Pad Matrix" section to customize the pads' functionality. Select a pad (the LED will light up) and navigate to the "MIDI Channel," "Program Change," "Note," and "Velocity Curve" settings. Set the MIDI channel to match your DAW's default MIDI channel setting. If you want to use multiple MiniLab 3 devices, set each one to a different MIDI channel. The Program Change feature allows you to switch between different sounds or instruments within a virtual synth plugin. Select the desired sound from the drop-down list and adjust the value of the "Program Change" slider to change the program. The "Note" function lets you assign specific MIDI note values to each pad. You can either enter a single note or select multiple notes to trigger a chord. Adjust the "Velocity Curve" setting to determine how sensitive the pads are to different touch pressures. There are several preset options, but you can also create your own custom curve by moving the slider points to shape the response. Repeat steps 5-9 for each pad until all eight are programmed to your liking. Save and close the software editor. Test out your newly customized MiniLab 3 pads in your DAW. Experiment with different touch pressures, chord progressions, and sound selections to get a feel for their capabilities. Continuously refine and tweak your pad settings as needed until you're satisfied with their performance.
How can I effectively program and edit sounds using the encoders, buttons, and touch strip on the Arturia MiniLab 3 MIDI keyboard?
Here are some tips for programming and editing sounds using the controls on the Arturia MiniLab 3:
1. Connect the MiniLab 3 to your computer via USB and make sure it's recognized as a MIDI controller in your DAW (digital audio workstation) software. Select a sound or instrument from your library and assign it to a MIDI channel on your DAW. This can be done by selecting the sound and choosing the appropriate MIDI channel from the options menu. Press the 'MODE' button on the MiniLab 3 until you see the 'SOUND' or 'INSTRUMENT' display on the screen. This will put the keyboard in sound selection mode. Use the encoders on the left side of the keyboard to scroll through your available sounds and instruments. The touch strip can also be used for this purpose by swiping up, down, left or right. To edit a sound or instrument, press the 'PROG' button on the MiniLab 3 until you see the 'EDIT' display. This will put the keyboard in editing mode. Use the encoders and buttons on the right side of the keyboard to make adjustments to various parameters of the selected sound or instrument. The touch strip can also be used as a slider for certain parameters, such as filter cutoff frequency. To save your changes, press the 'PROG' button again until you see the 'STORE' display. This will allow you to save the edited sound or instrument back to your library. Experiment with different sounds and editing techniques using the MiniLab 3 controls to create unique and customized sounds for your productions.
How can I ensure optimal performance and functionality of my Arturia MiniLab 3 MIDI keyboard during both studio sessions and live performances?
To ensure optimal performance and functionality of your Arturia MiniLab 3 MIDI keyboard during both studio sessions and live performances, follow these steps:
1. Charge or connect the keyboard to a power source: The MiniLab 3 runs on battery power or USB bus power, depending on the model you have. Make sure that it is fully charged before your session or performance, or connect it to a power source using the included micro-USB cable. Connect the keyboard to your computer or DAW: Use the provided USB cable to connect the MiniLab 3 to your computer or digital audio workstation (DAW). Make sure that your software recognizes the keyboard and that you have selected it as your input device. Configure the MIDI settings: Go to the MIDI settings menu in your DAW and make sure that the MiniLab 3 is set up correctly. Check the MIDI channel, output, and input settings to ensure that they match the parameters of your software and hardware. Customize the keyboard layout: The MiniLab 3 comes with a default layout, but you can customize it to suit your needs. Use Arturia's MIDI Control Center software to assign different functions to the keys, knobs, and buttons on the keyboard. This will allow you to access frequently used commands quickly and easily during your sessions and performances. Practice regularly: Like any musical instrument, proficiency with the MiniLab 3 requires regular practice. Spend time getting familiar with its features and capabilities, and experiment with different software and hardware configurations. The more you use it, the more comfortable and confident you will become. Take care of the keyboard: To ensure optimal performance and longevity, clean the MiniLab 3 regularly with a soft cloth or microfiber towel. Avoid exposing it to extreme temperatures, moisture, or direct sunlight. Store it in a dry, cool place when not in use. Update the firmware: Arturia releases firmware updates for the MiniLab 3 periodically to improve its functionality and compatibility with new software and hardware. Check the company's website regularly to download and install the latest version of the firmware. Seek support: If you encounter any issues or problems with the MiniLab 3, consult the user manual or contact Arturia's customer support team for assistance. They can provide troubleshooting tips, software updates, and technical advice to help you resolve any issues and get the most out of your keyboard.
Before you buy Arturia MiniLab 3


Reviews
There are no reviews yet.