FL Studio 21, the latest iteration of the popular digital audio workstation (DAW), brings with it an array of powerful features to enhance the music production process. One of the most essential tools for adding life and dynamics to your music is automation. Automation in FL Studio allows you to control various parameters of your instruments, effects, and mixer settings over time, giving you the ability to create intricate and evolving soundscapes.
What is Automation?
Automation is a technique used in music production to control specific parameters of plugins, instruments, mixer channels, and other elements within a project. Instead of manually adjusting these parameters throughout the entire track, automation enables you to record or draw changes to them over time, creating movement, changes in volume, panning, and other variations that can bring your music to life.
Types of Automation in FL Studio 21:
- Mixer Automation: FL Studio’s mixer allows you to control the volume, panning, mute, and solo settings of individual tracks. Automation applied to the mixer lets you adjust these settings dynamically, making your mix more dynamic and expressive.
- Instrument Automation: You can automate various parameters of virtual instruments and synthesizers. For example, you could automate the cutoff frequency of a low-pass filter to gradually change the brightness of a sound over time.
- Effect Automation: FL Studio offers a wide range of effects such as reverb, delay, chorus, and more. By automating the effect parameters, you can create mesmerizing and evolving textures in your music.
- Plugin Automation: If you have third-party plugins or effects integrated into FL Studio, you can automate their parameters as well, expanding the possibilities for creativity.
How to Use Automation in FL Studio 21:
FL Studio 21 provides multiple ways to work with automation:
- Automation Clip: One of the most common methods is by using an “Automation Clip.” This is a dedicated clip that resides in the Playlist or the Channel Rack. By drawing in the desired changes over time, you can automate any knob or slider within FL Studio.
- Event Editor: The Event Editor lets you view and edit automation data in a more precise and detailed manner. It’s ideal for fine-tuning automation curves and making intricate adjustments.
- Record Automation: If you prefer a more hands-on approach, you can enable automation recording and manually tweak the controls while the song is playing. FL Studio will record your adjustments in real-time, capturing your movements as automation data.
- LFO (Low-Frequency Oscillator) Automation: FL Studio 21 also allows you to use LFOs to modulate parameters automatically. This way, you can create rhythmic and pulsating effects that can add an extra layer of excitement to your music.
Conclusion:
Automation is an indispensable tool for music producers, and FL Studio 21 offers a powerful and user-friendly environment for implementing automation in your projects. Whether you want to add gradual filter sweeps, create dynamic volume changes, or make your effects come alive, automation opens up a world of possibilities for shaping your sounds and compositions. By harnessing the automation capabilities in FL Studio 21, you can take your music production to new heights and make your tracks stand out with professional-grade dynamics and movement.
Setting Up Automation
Setting up automation in FL Studio 21 is a crucial skill that allows you to add movement, dynamics, and expressiveness to your music productions. FL Studio provides various methods to create automation, giving you the flexibility to control and automate almost any parameter within your project. Here’s a step-by-step guide on how to set up automation in FL Studio 21:
Step 1: Open FL Studio and Load Instruments/Plugins
Launch FL Studio 21 and open the project in which you want to set up automation. Make sure you have loaded the instruments, effects, or plugins that you wish to automate. You can use both native FL Studio plugins and third-party plugins.
Step 2: Enable Automation
Before you begin setting up automation, ensure that the automation feature is enabled. To do this, click on the “Show/Hide Automation” button located at the top of the FL Studio window. This button looks like a small icon of a graph. When activated, it will display automation controls for the selected parameter.
Step 3: Select the Parameter to Automate
Identify the parameter you want to automate. This could be a volume slider, a knob in a plugin, a panning control, an effect parameter, or any other adjustable parameter within FL Studio or its plugins. Once you’ve chosen the parameter, click on it to select it.
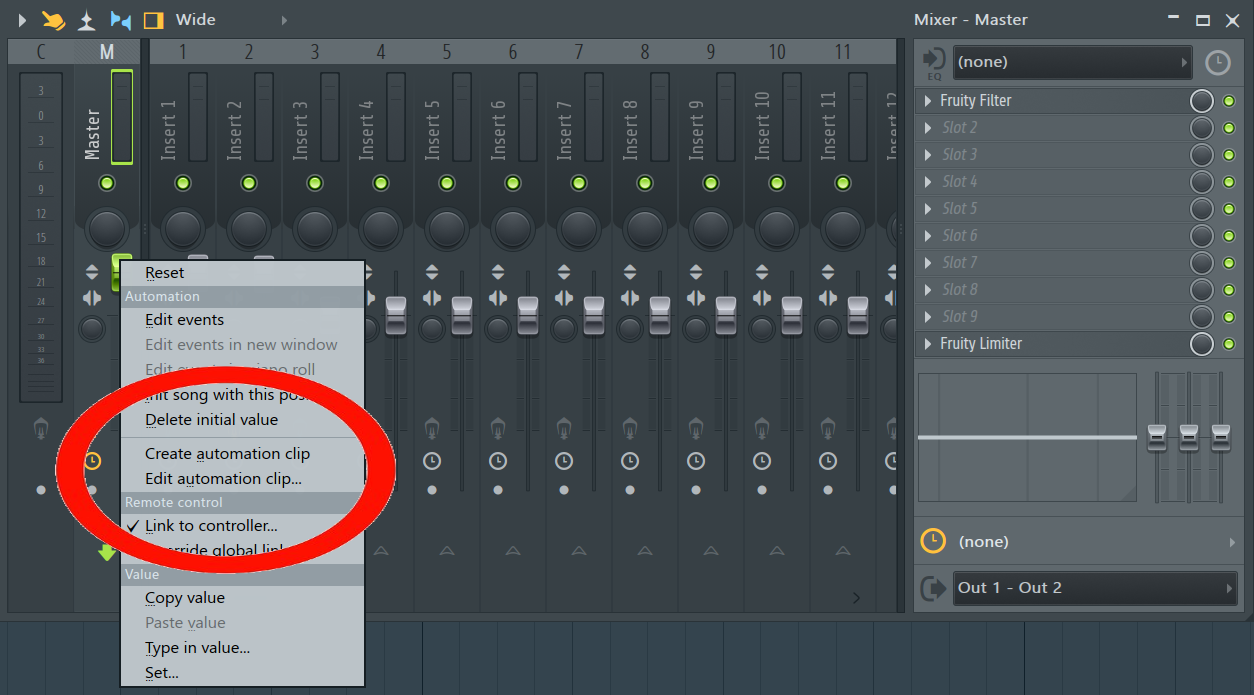
Step 4: Create an Automation Clip
There are several ways to create automation in FL Studio, but one of the most common methods is by using an “Automation Clip.” Right-click on the selected parameter and choose “Create Automation Clip” from the context menu. This will create an automation clip in the Channel Rack or Playlist, depending on your choice.
Step 5: Edit the Automation Curve
With the automation clip created, it’s time to shape the automation curve. Double-click on the automation clip in the Playlist or Channel Rack to open the “Event Editor.” Here, you can see the automation data represented by a curve. Click and drag the curve points to adjust the automation values or add new points to create complex automation movements.
Step 6: Use Automation Lanes (Optional)
If you prefer working directly in the Playlist without using the Event Editor, you can use Automation Lanes. Right-click on the parameter you want to automate and choose “Create Automation Clip” or “Create Automation Track.” This will display an automation lane below the corresponding track in the Playlist. Draw in the automation changes directly in the lane using the pencil tool or by clicking and dragging.
Step 7: Record Automation in Real-Time (Optional)
To record automation in real-time, click on the automation icon at the top of the FL Studio window to enable automation recording. Make sure the parameter you want to automate is armed for recording. Now, play your project and manually adjust the control while the song is playing. FL Studio will record your movements as automation data.
Step 8: Fine-Tune the Automation
After setting up the automation, you may want to fine-tune the curves and values to achieve the desired effect. Use the Event Editor or Automation Lanes to make precise adjustments and polish your automation curves.
Step 9: Experiment and Explore
Automation in FL Studio is a creative tool, so don’t be afraid to experiment and explore different ideas. Try automating various parameters, combining multiple automation clips, and using LFOs for rhythmic effects. The possibilities are vast, so have fun and let your creativity flow.
Basic Automation Techniques
Automation is a powerful tool in FL Studio 21 that allows you to control and modulate various parameters over time, bringing life and movement to your music. Whether you’re a beginner or an experienced producer, mastering basic automation techniques can significantly enhance your music productions. Here are some fundamental automation techniques in FL Studio 21 to get you started:
- Volume Automation: Volume automation is one of the most common and essential techniques. It allows you to control the volume level of a track or an instrument over time. To automate volume in FL Studio 21, you can create an automation clip or use automation lanes. Simply right-click on the volume fader in the mixer or the channel settings, and choose “Create Automation Clip” or “Create Automation Track.” This will create an automation clip or lane where you can draw or record changes to the volume level.
- Panning Automation: Panning automation controls the placement of sound in the stereo field. It enables you to move the audio from left to right or anywhere in between. To automate panning, follow a similar process as volume automation. Right-click on the panning control in the mixer or channel settings and choose “Create Automation Clip” or “Create Automation Track.” Then, draw in the panning changes using the automation clip or lane.
- Filter Cutoff Automation: Automating the cutoff frequency of a filter is a fantastic way to add movement and interest to your sounds. This technique is commonly used for creating filter sweeps and evolving textures. Load an equalizer or filter plugin on your instrument track, and then create an automation clip or lane for the cutoff parameter. Adjust the automation curve to control the filter’s movement over time.
- Effect Automation: FL Studio offers a wide range of effects, such as reverb, delay, chorus, and more. Automating these effects can create intricate textures and transitions in your music. For example, automating the wet/dry mix of a reverb effect can gradually introduce or fade out the reverb, adding a sense of space and dimension to your sounds.
- Modulation Automation with LFOs: FL Studio 21 provides Low-Frequency Oscillators (LFOs) that can be used to modulate various parameters automatically. LFOs can create rhythmic and cyclic changes to parameters, such as vibrato, tremolo, or filter modulation. Assign an LFO to the desired parameter, and adjust its rate, depth, and waveform to achieve the desired effect.
- Automating Virtual Instrument Parameters: Many virtual instruments in FL Studio have automatable parameters, such as oscillator settings, envelopes, and modulation options. By automating these parameters, you can create dynamic and evolving sounds. Right-click on the parameter you want to automate and choose “Create Automation Clip” or “Create Automation Track.”
- Recording Real-Time Automation: FL Studio allows you to record automation in real-time using the “Automation Recording” feature. Enable the automation recording mode by clicking on the automation icon at the top of the FL Studio window. Then, adjust the controls you want to automate while the song is playing, and FL Studio will record your movements as automation data.
Creative Uses of Automation in FL Studio 21
Automation in FL Studio 21 is a powerful tool that goes beyond simple volume and panning adjustments. It opens up a world of creative possibilities, allowing you to shape and transform your music in innovative ways. Here are some creative uses of automation in FL Studio 21 to inspire your music productions:
- Filter Sweeps and Build-Ups: Automating the cutoff frequency of a filter is a classic technique for creating filter sweeps and build-ups. By gradually increasing the cutoff, you can sweep the filter from a low-frequency range to a high-frequency range, adding tension and anticipation before a drop or chorus. This technique works well with various instruments and even entire mix groups.
- Automated Stutter Effects: Create glitchy and stuttering effects by automating the volume or mute settings in short bursts. This technique can be applied to vocals, synths, drums, or any other sound. Experiment with different patterns and rhythms to add excitement and complexity to your tracks.
- Dynamic Reverb and Delay: Automating the wet/dry mix of reverb and delay effects can bring depth and movement to your sounds. Gradually increasing the effect’s wet mix during a breakdown or a vocal section can create a sense of space and ambiance. Conversely, reducing the effect’s wet mix can make a sound feel more upfront and dry.
- Morphing Synth Pads and Textures: Use automation to morph the parameters of a synthesizer or a sampler to create evolving pads and textures. Modulate parameters like wavetable position, filter cutoff, resonance, and LFO rates to transform static sounds into dynamic and evolving sonic landscapes.
- Pitch Bending and Portamento: Automating the pitch bend range or the portamento time can lead to expressive and emotive melodies. Try using subtle pitch bends on lead synths or vocals to add human-like expression, or apply more radical bends for unique sound design.
- Automated Pan Modulation: Experiment with automating the panning of sounds to create movement and spatial interest. Panning automation is especially effective in headphones or stereo setups. You can create swirling effects, “ping-pong” delays, or even simulate sounds moving from one ear to the other.
- Emphasizing Transitions: Use automation to emphasize transitions between different sections of your music. For example, during a buildup, automate the volume, cutoff, and reverb to gradually increase intensity as the drop approaches. Conversely, during a breakdown, use automation to strip elements away and create a moment of tension before the next climax.
- Automated Beat Repeat and Beat Slicing: Automate beat repeat or beat slicing plugins to create rhythmic variations and patterns. This technique can add complexity and groove to drum loops or percussion elements.
- Dynamic Mixing and Sidechain Compression: Automate the parameters of compressors and other mix effects to dynamically control the mix balance. For instance, you can use sidechain compression to duck certain elements in response to the kick drum, giving the track a more pumping and danceable feel.
Mixing and Mastering Automation in FL Studio 21
Automation plays a crucial role in both the mixing and mastering stages of music production. In FL Studio 21, automation allows you to fine-tune the balance, dynamics, and overall sound of your mix, as well as adding the final polish to your master. Here’s how you can effectively use automation for mixing and mastering in FL Studio 21:
Mixing Automation:
- Volume and Pan Automation: Volume and panning automation are fundamental for achieving a balanced mix. Automate the volume levels of individual tracks or elements to control their prominence in different sections of the song. Similarly, use panning automation to position instruments or effects in the stereo field, creating space and separation in the mix.
- Dynamic Mixing with Compression: Automation can be used to control compressors and other dynamics processors. For example, you can automate the threshold of a compressor to achieve subtle or drastic changes in the dynamics of specific tracks. This technique is helpful for managing the dynamic range and ensuring that different elements sit well together in the mix.
- EQ Automation: Automating EQ settings can help you sculpt the frequency balance of individual tracks during different parts of the song. For instance, you can boost the presence of a vocal during the chorus or cut the low end of a pad during a verse to create a more transparent mix.
- Effects Automation: Automate the wet/dry mix or other parameters of effects like reverb, delay, chorus, and more. This allows you to introduce or remove the effect gradually, tailoring the sound to fit the song’s progression.
- Automated Sends and Returns: Use automation to control the send levels of tracks being sent to effect return channels. This way, you can add reverb or delay to specific elements only when needed, reducing muddiness and creating a cleaner mix.
Mastering Automation:
- Overall Volume Automation: In mastering, automation can be used to control the overall volume of the track. Automate volume adjustments to create dynamic moments or to make subtle changes to the perceived loudness.
- Multiband Compression Automation: Automating the threshold or other parameters of multiband compressors in the mastering chain can help manage the balance of different frequency ranges. This ensures a more balanced and polished final sound.
- Equalization Automation: Subtle EQ adjustments during the mastering stage can help address specific frequency issues and further refine the overall tonal balance of the mix. Automate EQ settings to address any problem areas or to bring out certain frequencies.
- Stereo Width Automation: Automating stereo width adjustments can enhance or reduce the stereo spread of the master, giving the music a wider or more focused sound.
- Limiting and Maximizer Automation: Control the threshold or output levels of the final limiter or maximizer to ensure optimal loudness without sacrificing dynamics or causing distortion.
Tips and Workflow for Efficient Automation
Efficient automation in FL Studio 21 can greatly enhance your music production process and lead to more dynamic and expressive tracks. By following these tips and optimizing your workflow, you’ll be able to use automation effectively and with ease:
- Plan Ahead and Conceptualize: Before diving into automation, have a clear vision of what you want to achieve. Think about how automation can enhance the dynamics, movement, and emotion of your music. Planning ahead will save you time and help you create more intentional and purposeful automation.
- Organize Your Tracks and Automation Clips: Keep your project well-organized to avoid confusion. Label your tracks and automation clips appropriately, and use color-coding to distinguish between different elements. This will make it easier to navigate your project and locate specific automation when needed.
- Use Automation Lanes and Event Editor: While automation clips in the Playlist are great for quick adjustments, for more detailed and precise automation, utilize the Automation Lanes and Event Editor. These tools allow you to fine-tune your automation curves and make complex adjustments with ease.
- Use Automation Recording for Live Performances: If you want to record automation in real-time while playing your MIDI controller or making manual adjustments, enable automation recording. This is particularly useful for live performances or when you want to capture spontaneous creative ideas.
- Create and Save Automation Templates: If you often use similar automation patterns in your projects, create templates with pre-configured automation clips for common tasks. Save these templates for future use, so you can quickly apply automation settings to new projects without starting from scratch each time.
- Utilize Automation Presets and Tools: FL Studio offers automation presets for various plugins and effects. These presets can serve as starting points or inspiration for your automation. Additionally, explore automation tools like the Formula Controller, LFOs, and Envelope Controllers to automate parameters in creative ways.
- Group and Link Automation: Group related automation clips to keep them organized and easily manageable. You can also link automation between different parameters, allowing them to follow the same automation curve, which streamlines your workflow and ensures consistency.
- Use Curves and Slopes for Natural Transitions: Avoid sharp automation changes that may sound unnatural. Instead, use curved automation lines and slopes to create smooth transitions and gradual changes, resulting in a more pleasing and organic sound.
- Automate Effects Wet/Dry Mix for Smooth Transitions: When applying effects like reverb, delay, or chorus, automate the wet/dry mix to create smooth transitions. Gradually introducing or fading out effects can make the changes less jarring and more seamless.
- Save Different Versions of Automation: If you’re unsure about drastic automation changes, save different versions of your automation as backups. This allows you to experiment freely without losing your previous settings.
- Reference and Fine-Tune Automation with Headphones: When working with automation, it’s essential to check the results in different listening environments. Using headphones can help you hear fine details and ensure your automation is well-balanced.
- Automate with Intention and Emotion: Always remember that automation is a creative tool. Use it with intention and emotion to add depth and character to your music. Subtle and thoughtful automation can have a more significant impact than excessive or random changes.
Conclusion
Automation is an incredibly powerful and versatile tool in FL Studio 21, enabling music producers to infuse their compositions with dynamic movement and expression. By automating various parameters such as volume, panning, filters, effects, synthesis parameters, and even MIDI controls, producers can add life and depth to their tracks, making them more engaging and captivating for listeners.
Throughout this exploration of automation techniques, we have seen how FL Studio 21 provides a wide array of options to craft intricate and evolving soundscapes. Basic techniques like volume and panning automation can shape the spatial placement of elements in the mix, while advanced methods, such as using automation curves, LFOs, and parameter modulation, offer a world of creative possibilities to experiment with.
Moreover, automation is not limited to individual tracks or instruments; it extends to the mixing and mastering stages as well. By applying automation to mix bus processing and mastering effects, producers can achieve dynamic control and emphasize key sections of their music.
Efficiency in automation comes with proper organization, naming, and color-coding of automation clips, as well as utilizing MIDI controllers for real-time recording. Fine-tuning automation through editing and quantization ensures precision and coherence, helping producers achieve the desired musical expression.
FL Studio 21’s combination of arrangement and playlist automation offers producers different creative approaches to explore, allowing for versatile and dynamic compositions.
Lastly, the ability to save and reuse automation patterns as presets provides a time-saving solution, empowering producers to build a signature sound and style that they can apply across multiple projects.
In essence, using automation to create movement in FL Studio 21 is not just a technical process but an artistic endeavor. It invites producers to experiment, take risks, and express their musical vision in new and innovative ways. With this powerful tool at their disposal, producers can truly take their music to the next level, captivating audiences and leaving a lasting impact. So, let your creativity run wild and unlock the full potential of automation in FL Studio 21 to bring your music to life with movement, emotion, and artistry.