
Description
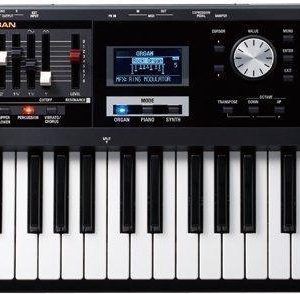
Roland’s Jupiter series of synthesizers have always been a huge hit among musicians due to their versatility and sound quality. To take it a step further, Roland recently released the Jupiter-Xm synthesizer, offering a diverse set of sound engines, unique features, and superior build quality.
The Jupiter-Xm allows you to create sounds using a combination of Roland’s classic analog technology and modern digital synthesis. You can use not just the classic Jupiter-8 and Juno-106 engines that are onboard, but also other engines such as the SH-101, XV-5080, and RD pianos. The aim is to provide a full-fledged sound-making environment that doesn’t limit creativity, and the Jupiter-Xm achieves this with its blend of vintage and modern technology.
An added bonus is the Zen-Core sound engine, which offers a feature-rich and modular sound designing environment that has never been available before in any other synthesizer. The Jupiter-Xm contains over 4,000 Zen-Core sounds, including those from Roland’s iconic synthesizers, drum machines, and other devices. You can use these sounds as they are or design your unique sounds using the synthesizer’s powerful software.
The synth has a total of 37-key velocity-sensitive keyboard with aftertouch, arranged in a 3-octave layout. It’s compact, yet allows for expressive playing as well. The build quality is excellent, and the control panel features LED-lit knobs that indicate the current setting of each patch. You can also customize the settings by assigning parameter control to 6 knobs, making it easy to customize sounds on the fly.
Another unique feature of the Jupiter-Xm is the inclusion of the I-Arpeggio function. This function can help you create complex arpeggios and other rhythmic patterns in no time. The I-Arpeggio function can also extract phrases from audio input or MIDI files, which can then be used in your compositions.
The Jupiter-Xm is also great for live performances. It has a built-in audio interface featuring high-quality audio input/output and MIDI I/O, making it easy to connect to a computer or other MIDI devices. Additionally, it can be powered by USB or can operate from an optional battery pack, making it a portable synthesizer that’s ideal for on-the-go musicians.
Overall, the Jupiter-Xm synthesizer is an excellent choice for anyone who needs a flexible, high-quality synthesizer for live performances or studio work. With its blend of analog and digital technology, and the extensive range of sound engines and other features, you can create almost any sound you can imagine. The build quality and included features make it a complete synthesizer, and its moderate price makes it an attractive choice for musicians of all levels.
Roland Jupiter-Xm properties
| Product name | Roland Jupiter-Xm |
| Brand | Roland |
| Type | Synthesizers |
| Keys | Yes |
| Number of Keys | 37 pcs |
| Drawbars/Sliders | Yes |
| Rotary Controls | Yes |
| Pre-Programmed Effects | Yes |
| Portable | Yes |
| Speakers | Yes |
| Connections | 3.5mm (AUX), 6.3mm (1/4″RTS), Headphone, MIDI, MIDI Through USB, USB, XLR |
| Colour | Black |
| Power Supply | Electrical Cable to Wall Socket |


Reviews
There are no reviews yet.