MediaBay is a powerful and versatile media management tool that comes bundled with Cubase 12, a popular digital audio workstation (DAW) developed by Steinberg. MediaBay provides users with an efficient and intuitive way to organize, search, and access their audio files, loops, samples, and other media assets within Cubase’s workspace.
With the ever-growing libraries of sounds and samples that music producers and audio engineers accumulate, finding the right files quickly and easily becomes crucial. MediaBay addresses this need by offering a centralized hub for managing media assets, eliminating the hassle of navigating through multiple folders and directories.
One of the standout features of MediaBay is its comprehensive categorization system. It allows users to assign tags, attributes, and metadata to their media files, making them searchable by various criteria such as file type, tempo, key, instrument, genre, and more. This extensive tagging system empowers users to find specific files or explore creative possibilities by filtering and combining different search parameters.
MediaBay also supports content management for third-party libraries and plug-ins. It can scan and catalog external sample libraries, virtual instruments, and effects, giving users a unified view of their entire sound arsenal. This integration streamlines the workflow by enabling quick and seamless access to all available media assets, regardless of their source.
Furthermore, MediaBay provides preview functionality, allowing users to audition audio files directly within the application. This feature is particularly helpful when searching for the right sound or loop to fit a project. Users can play back samples in sync with the project tempo, adjust the volume, and even make simple edits to the audio before committing it to the timeline.
In Cubase 12, MediaBay has undergone enhancements to improve performance and usability. The interface has been refined to offer a more streamlined and modern look, with optimized navigation and search options. Users can now customize the appearance of MediaBay to suit their preferences and workflows, ensuring a personalized and efficient media management experience.
MediaBay is an indispensable tool in Cubase 12, designed to simplify the management and exploration of media assets. Its extensive categorization system, integration with third-party libraries, and preview functionality make it an invaluable asset for music producers, sound designers, and anyone working with audio in Cubase. Whether you’re searching for a specific sound or looking to discover new creative possibilities, MediaBay is there to help you organize and access your media files with ease.
Accessing MediaBay in Cubase 12
In Cubase 12, accessing MediaBay is a straightforward process that allows users to quickly and efficiently manage their media assets. MediaBay serves as a centralized hub for organizing, searching, and previewing audio files, loops, samples, and other media within Cubase’s workspace. Here’s how you can access MediaBay in Cubase 12:
- Launch Cubase 12: Start by launching Cubase 12 on your computer. Once the software is open, you will be greeted with the main project window.
- Locate the MediaBay panel: To access MediaBay, you need to locate the MediaBay panel within Cubase’s interface. By default, the MediaBay panel is usually positioned on the right side of the screen, alongside other panels such as the Inspector and the MixConsole. It has an icon resembling a folder with a musical note on it.
- Show or hide the MediaBay panel: If the MediaBay panel is not visible, you can show or hide it by navigating to the top menu and selecting “Media” > “MediaBay” or by using the shortcut key combination “F5” on your keyboard. This action will toggle the visibility of the MediaBay panel.
- Expand the MediaBay panel: Once you have the MediaBay panel visible, you can expand it to get a full view of its contents. Click on the tab or title bar of the MediaBay panel to expand it and reveal the available options and features.
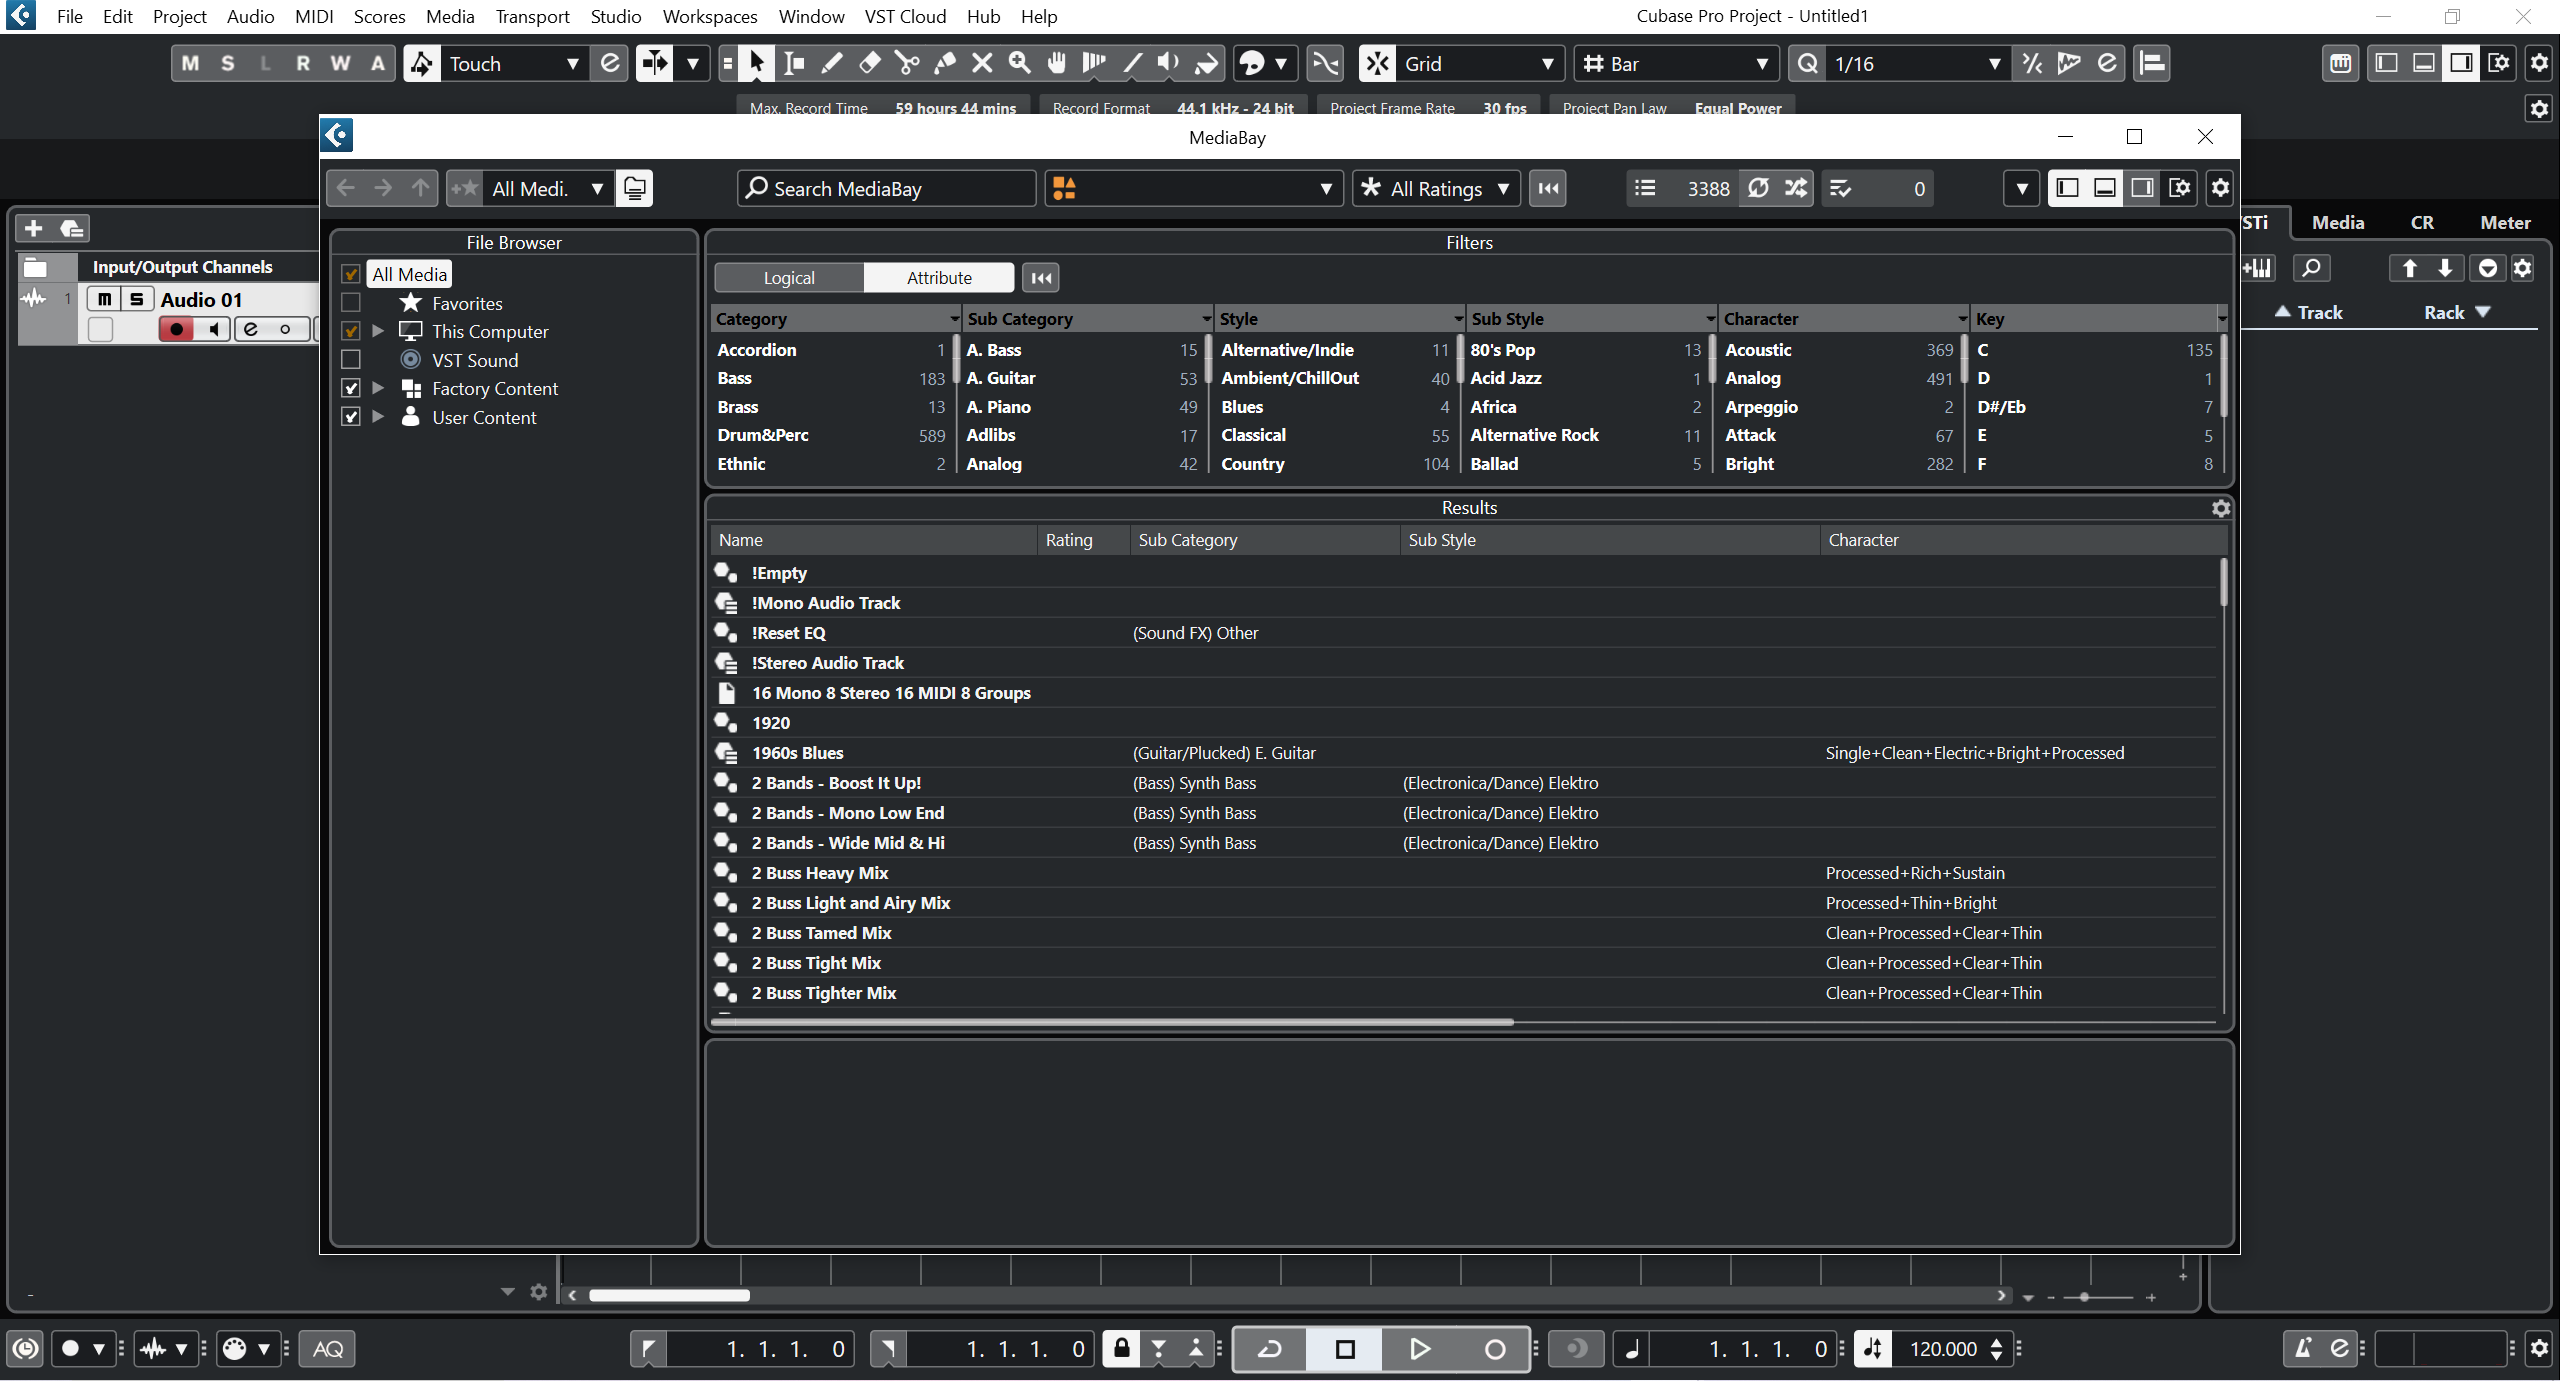
- Explore the MediaBay interface: The expanded MediaBay panel will display a variety of options and sections. These include a browser section for navigating through folders and categories, a search field for finding specific media assets, filter options for refining your search, and a preview section for auditioning audio files.
- Navigate through folders and categories: To browse through your media files, use the browser section within the MediaBay panel. It typically displays a directory tree-like structure that allows you to navigate through folders and categories. Click on a folder or category to view its contents and subfolders.
- Search for media assets: If you have a specific file or type of media in mind, you can use the search field located at the top of the MediaBay panel. Simply enter keywords, tags, or attributes related to the media you’re looking for, and MediaBay will dynamically display the matching results.
- Filter search results: To further refine your search, MediaBay offers filter options. These filters allow you to narrow down your results based on various criteria such as file type, tempo, key, instrument, genre, and more. Use the filter options to customize your search and find the exact media assets you need.
- Preview media assets: MediaBay provides a convenient preview functionality that allows you to listen to audio files and audition them directly within the application. Select a file in the MediaBay panel, and its preview will be played back in sync with the project tempo. You can adjust the volume and even make simple edits to the audio before committing it to your project.
By following these steps, you can easily access MediaBay in Cubase 12 and take advantage of its powerful media management features. Whether you’re organizing your existing media library, searching for specific sounds, or exploring new creative possibilities, MediaBay provides an efficient and intuitive interface to help you work with your media assets seamlessly.
Importing Sounds to MediaBay
Importing sounds to MediaBay in Cubase 12 is a straightforward process that allows you to organize and access your audio files, loops, samples, and other media assets efficiently. MediaBay serves as a central repository for your media library, making it easy to search, categorize, and manage your sounds within Cubase’s workspace. Here’s how you can import sounds to MediaBay in Cubase 12:
- Navigate to the desired location: Within the MediaBay panel, you will find a browser section that allows you to navigate through folders and categories. Use the browser section to browse to the location where your sound files are stored. This could be on your local computer, an external hard drive, or any other connected storage device.
- Import the sounds: Once you have reached the desired location, you can import the sounds into MediaBay. There are several ways to import sounds:a. Drag and drop: Simply select the sound files from their current location and drag them directly into the MediaBay panel. Drop the files onto the desired folder or category within MediaBay, and they will be imported.b. Right-click context menu: Right-click on the folder or category in the MediaBay panel where you want to import the sounds. From the context menu that appears, select “Import Files.” This will open a file browser window from which you can navigate to the location of your sound files. Select the files you want to import and click “Open” to import them into MediaBay.c. File menu: You can also use the file menu within the MediaBay panel to import sounds. Navigate to the folder or category where you want to import the sounds, then go to “File” > “Import” and select “Audio File.” This will open a file browser window where you can locate and select the sound files you want to import.
- Assign tags and attributes: After importing the sounds, it is a good practice to assign tags and attributes to them. This step helps in organizing and searching for sounds later on. Select the imported files in the MediaBay panel, right-click, and choose “Edit Attributes.” Here, you can add tags, set the tempo, key, instrument, genre, and other relevant metadata to categorize the sounds effectively.
- Preview and use the imported sounds: Once the sounds are imported and categorized in MediaBay, you can easily preview them before using them in your projects. Select a sound file in MediaBay, and its preview will be played back within the application. Adjust the volume, apply any necessary edits, and then drag and drop the sound file from MediaBay directly onto your project timeline or into a specific track.
By following these steps, you can import sounds to MediaBay in Cubase 12, allowing for efficient organization, easy searching, and quick access to your media assets. Whether you’re building a comprehensive sound library or importing specific sounds for a particular project, MediaBay simplifies the process and enhances your workflow within Cubase 12.
Organizing Sounds in MediaBay
MediaBay in Cubase 12 provides powerful tools for organizing your sounds, loops, samples, and other media assets. Efficient organization within MediaBay allows for easy searching and quick access to your desired sounds during the music production process. Here are some techniques and features you can use to organize your sounds effectively in MediaBay:
- Folder structure: MediaBay allows you to create a hierarchical folder structure to organize your sounds. This structure can be based on categories such as instruments, genres, moods, or any other classification that suits your workflow. Create folders by right-clicking in the MediaBay panel and selecting “New Folder.” Rename the folders to reflect the desired category and drag and drop sounds into the appropriate folders.
- Attributes and metadata: Assigning attributes and metadata to your sounds in MediaBay helps to categorize and search for them later. Right-click on a sound file or folder and select “Edit Attributes” to access the attributes editor. You can assign tags, set the tempo, key, instrument, genre, and other relevant metadata. Utilize these attributes to create dynamic searches and filters within MediaBay, allowing you to find sounds based on specific criteria quickly.
- Rating and favorites: MediaBay allows you to rate your sounds and mark them as favorites. This feature is useful for identifying your preferred sounds or quickly accessing frequently used samples. You can assign star ratings to sounds by right-clicking on a file and selecting a rating from the context menu. To mark a sound as a favorite, use the dedicated “Favorite” button or right-click on the file and choose “Add to Favorites.”
- Custom tags: In addition to the built-in attributes, MediaBay enables you to create custom tags to further categorize your sounds. Custom tags are flexible and can be tailored to your specific needs. Right-click on a file or folder, select “Edit Attributes,” and click on the “Custom” tab to create and assign custom tags to your sounds. These tags can be used as search criteria to find specific sounds that match your custom categories.
- Preview options: MediaBay provides preview functionality that allows you to listen to sounds before using them in your projects. Take advantage of the preview options to audition sounds within MediaBay and make informed decisions about which sounds to use. Adjust the volume, loop sections of the sound, and make any necessary edits or trims directly within the MediaBay preview player.
- Search and filtering: MediaBay’s powerful search and filtering capabilities make it easy to find specific sounds within your library. Use the search bar at the top of the MediaBay panel to enter keywords, tags, or attributes related to the sound you’re looking for. MediaBay dynamically filters the results based on your search criteria. Additionally, you can apply filters to narrow down your search even further. These filters include file type, tempo, key, instrument, rating, and more.
- Third-party libraries: MediaBay seamlessly integrates with third-party sample libraries and plug-ins, providing a unified view of your entire sound arsenal. When importing or managing third-party libraries, MediaBay scans and catalogs the content, allowing you to access and organize these sounds alongside your native Cubase sounds. This integration ensures that all your sounds are easily accessible and searchable from within MediaBay.
By employing these techniques and utilizing the features available in MediaBay, you can efficiently organize your sounds in Cubase 12. Taking the time to categorize and tag your sounds will pay off in the long run, as it will streamline your workflow, speed up sound selection, and enhance creativity during the music production process.
Integrating MediaBay with Cubase Projects
MediaBay, the powerful media management tool in Cubase, seamlessly integrates with Cubase projects, providing a streamlined workflow for accessing and incorporating media assets into your compositions. By integrating MediaBay with your projects, you can easily browse, search, and import sounds, loops, samples, and other media directly into your Cubase projects. Here’s how you can effectively integrate MediaBay with your Cubase projects:
- Open MediaBay within Cubase: Launch Cubase and make sure the MediaBay panel is open. If it’s not visible, go to the top menu and select “Media” > “MediaBay” or use the shortcut key combination “F5” on your keyboard. This will open the MediaBay panel, which serves as the central hub for managing your media assets.
- Navigate to the desired media: Use the browser section in MediaBay to navigate to the location where your media assets are stored. You can browse through folders and categories to locate the specific sounds, loops, or samples you want to integrate into your project.
- Preview and select media assets: Once you’ve located the desired media assets in MediaBay, you can preview them by selecting the file and using the built-in preview functionality. Adjust the volume and make any necessary edits or trims within the MediaBay preview player to ensure the sound fits your project’s requirements.
- Import media assets: After previewing the media assets, you can import them directly into your Cubase project. There are multiple ways to import media assets from MediaBay:a. Drag and drop: Simply select the desired media file or folder in MediaBay and drag it directly onto the Cubase project window or onto a specific track. Cubase will automatically import the selected media into your project, ready for use.b. Right-click context menu: Right-click on the media file or folder in MediaBay, and from the context menu, choose “Import.” This action will import the selected media into your Cubase project, placing it in the appropriate location based on your selection.c. File menu: Alternatively, you can go to the “File” menu within the MediaBay panel and select “Import” to import media assets into your project. This option opens a file browser window where you can navigate to the desired media files, select them, and click “Open” to import them into your project.
- Organize imported media assets: Once the media assets are imported into your Cubase project, you can further organize them within your project’s structure. You can move the imported media to specific tracks, arrange them within the timeline, and make any necessary edits or adjustments to ensure they fit your composition.
- Access imported media assets: After integrating media assets from MediaBay into your project, you can easily access them for further editing or manipulation. The imported media will be available within your project’s pool, allowing you to work with them as you would with any other audio or MIDI files.
By integrating MediaBay with your Cubase projects, you streamline the process of browsing, selecting, and importing media assets into your compositions. MediaBay’s intuitive interface and powerful search capabilities enhance your workflow and enable you to quickly find and incorporate the perfect sounds, loops, and samples to bring your musical ideas to life in Cubase.
Customizing MediaBay Settings in Cubase 12
Cubase 12 provides users with the flexibility to customize MediaBay settings according to their preferences and workflow. By customizing MediaBay, you can tailor its appearance and behavior to suit your specific needs, making it an even more efficient and personalized media management tool. Here are some ways to customize MediaBay settings in Cubase 12:
- Accessing MediaBay settings: To customize MediaBay settings, first, ensure that the MediaBay panel is visible in Cubase. If it’s not already open, you can show or hide it by navigating to the top menu and selecting “Media” > “MediaBay” or by using the shortcut key combination “F5” on your keyboard. Once the MediaBay panel is open, you can access its settings by clicking on the gear icon located in the top-right corner of the panel.
- Layout and appearance customization: MediaBay allows you to customize its layout and appearance to better suit your workflow. In the settings menu, you will find options to adjust the size and position of the MediaBay panel within the Cubase interface. You can resize the panel by dragging its edges, or you can choose predefined layout options such as vertical or horizontal orientation. Experiment with different layouts to find the configuration that works best for you.
- Column visibility and arrangement: MediaBay displays various columns that provide information about your media assets, such as file name, duration, attributes, and more. You can customize the visibility and arrangement of these columns to display the information that is most relevant to you. Right-click on the column headers in MediaBay to access a context menu where you can select or deselect columns, rearrange their order, and adjust their width. This customization allows you to focus on the specific details you need for efficient media management.
- Filter presets and views: MediaBay offers filter presets and views that help you streamline your search and organization process. The settings menu allows you to manage and customize these presets and views. You can create custom filter presets by defining specific search criteria and saving them for quick access. Additionally, you can customize the default views in MediaBay, specifying the columns and attributes that should be displayed for different types of media files. This customization ensures that MediaBay presents the most relevant information for your specific media assets.
- File types and file locations: MediaBay provides the ability to manage various file types and file locations. In the settings menu, you can specify the types of media files that should be included or excluded from MediaBay’s cataloging and search functions. You can also define the folders and directories that MediaBay should scan and index for media assets. These settings allow you to focus on specific types of media files or restrict MediaBay’s search to specific locations, ensuring a more targeted and efficient search experience.
- MediaBay database maintenance: Over time, as you import, organize, and manage media assets in MediaBay, the database may accumulate unnecessary or outdated information. Cubase 12 allows you to perform maintenance on the MediaBay database to optimize its performance. In the settings menu, you can find options to rebuild or clean up the MediaBay database, removing any redundant or obsolete entries. Regular maintenance helps ensure that MediaBay remains fast, accurate, and up-to-date in managing your media assets.
By customizing MediaBay settings in Cubase 12, you can create a tailored media management experience that suits your specific preferences and workflow. Adjusting the layout, column visibility, filter presets, and other settings allows you to streamline your media organization, search, and access tasks within Cubase. With a customized MediaBay, you can efficiently manage your audio files, loops, samples, and other media assets, enhancing your overall music production experience.
Conclusion
MediaBay in Cubase 12 proves to be an invaluable tool for organizing sounds and media assets within your music production workflow. With its intuitive interface, comprehensive categorization system, and customizable settings, MediaBay offers a seamless and efficient way to manage your audio files, loops, samples, and more.
By utilizing MediaBay, you can easily navigate through your sound library, creating a hierarchical folder structure and assigning tags and attributes to categorize your sounds effectively. The extensive search and filtering capabilities allow you to quickly locate specific sounds based on criteria such as file type, tempo, key, instrument, and genre. The integration of third-party libraries further expands the possibilities, giving you a unified view of all your sound resources.
MediaBay’s preview functionality enables you to audition sounds directly within the application, making it easier to find the perfect sound to fit your project. Additionally, the ability to import sounds from MediaBay directly into your Cubase project, through simple drag-and-drop or context menu options, streamlines the workflow and saves valuable time.
Customizing MediaBay settings empowers you to tailor the tool to your specific preferences and workflow, allowing you to personalize the layout, column visibility, filter presets, and more. This customization ensures that MediaBay works seamlessly within your Cubase environment, providing an optimized experience for managing and accessing your sounds.
By using MediaBay effectively in Cubase 12, you can maintain an organized sound library, easily locate and integrate sounds into your projects, and ultimately enhance your creativity and productivity as a music producer or sound designer. The power and versatility of MediaBay make it an essential component of Cubase 12, assisting you in bringing your musical ideas to life with ease and efficiency.